Build an ESP32 Pet Water‑Bowl Monitor And Auto‑Topper
A sensor on the outside of the bowl, a small peristaltic pump and an ESP32 keep your pet's water topped up and tell you when the reservoir runs dry.
Published October 24, 2026 · 7 picks
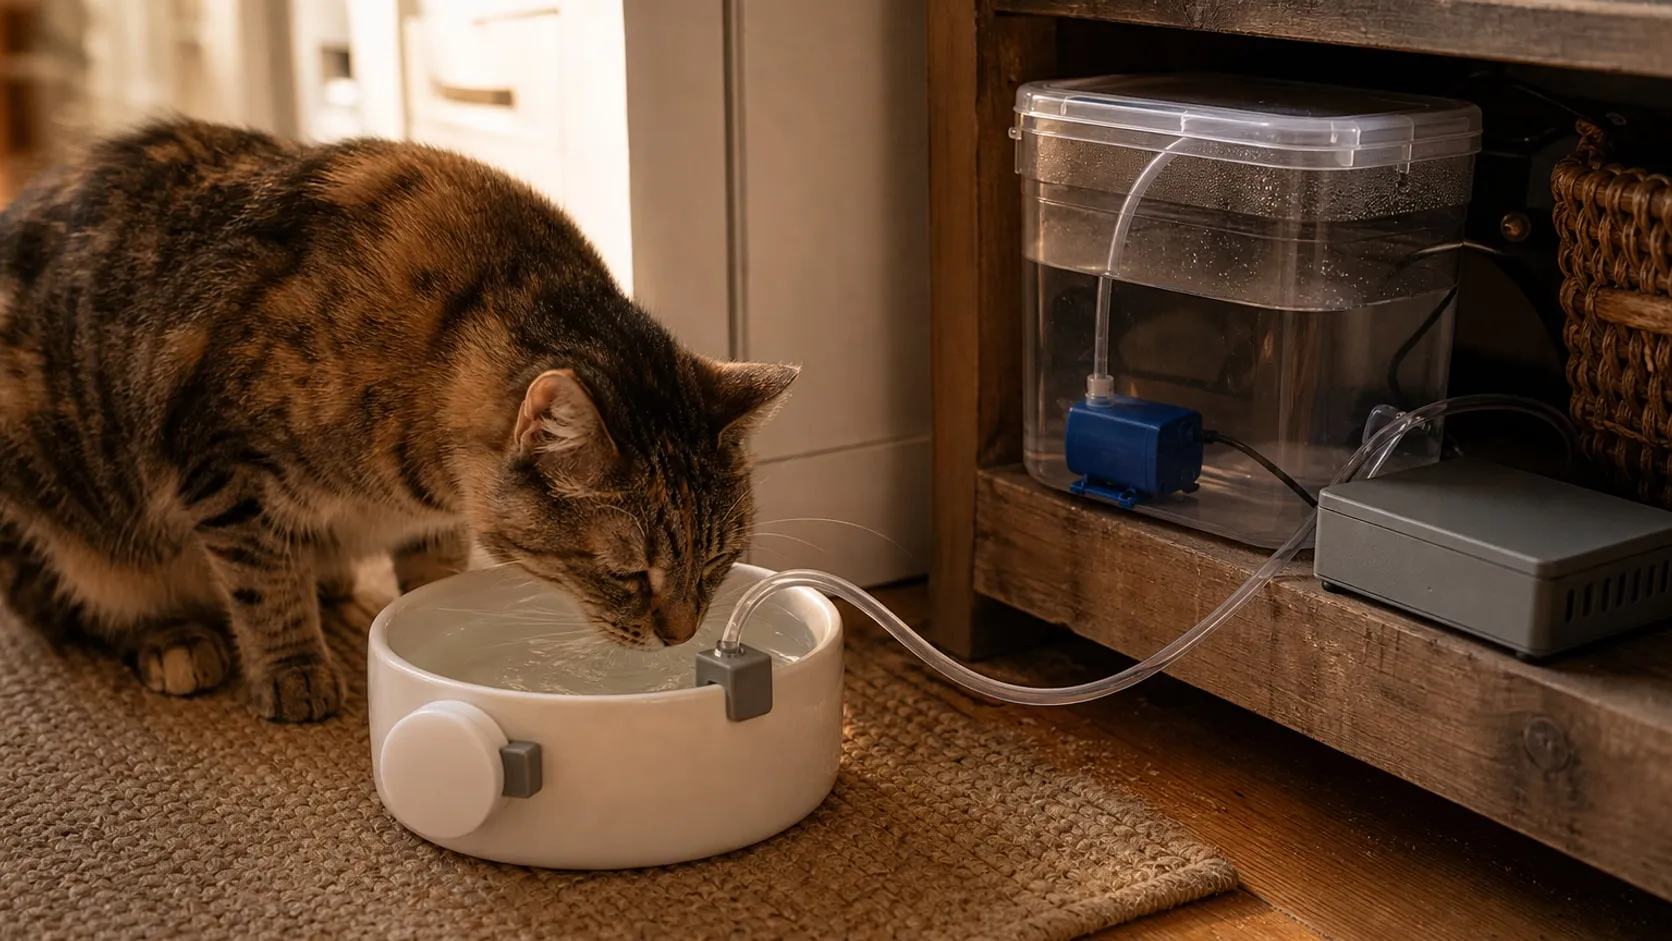
Auto-topping water bowls are a popular project in ESP32 and Home Assistant communities right now, and the reason is easy to see: a bowl that refills itself from a bigger reservoir covers a long day out, a cold month when pets drink from the bowl more than from puddles, or a holiday weekend while someone else checks in. The build is simpler than a feeder: one sensor, one pump, one small board. Here’s the whole build, step by step, with the parts for each step below.
Step 1: Plan how it works
The topper has four parts: a reservoir (any clean, lidded food-safe container), a pump that moves water from the reservoir to the bowl through a tube, a level sensor on the outside of the bowl at the “full” line, and an ESP32 board that reads the sensor and switches the pump.
- The logic is simple. Water below the sensor for a while → pump runs → water reaches the sensor → pump stops.
- Safety limits matter more than features. The code caps how long the pump may run in one go. If the bowl doesn’t fill in that time, the reservoir is empty or something leaks, so the topper stops and reports a fault instead of pumping forever.
- Pick the right bowl. The sensor reads through plastic, glass or ceramic, not stainless steel. A heavy ceramic bowl or a glass dish with straight sides works best.
- Size the reservoir for at least two days of what your pet drinks, so a missed refill isn’t an emergency.
Step 2: Print the brackets
Print the holders in PETG rather than PLA; it copes better with water splashes and regular washing.
- A sensor clip that holds the sensor flat against the outside of the bowl at the fill height. Make it adjustable up and down by a few millimetres; you’ll fine-tune it later.
- An outlet holder that clips to the bowl’s rim and holds the tube end above the water, pointing down into the bowl. The tube should never sit in the water.
- A small electronics box with the cable exits on the bottom, and a mount for the pump next to it.
Printables and MakerWorld have tube clips and project boxes you can adapt. Printed plastic isn’t certified food-safe, so keep printed parts outside the water: the outlet holder only touches the tube, not the drinking water.
Step 3: Mount and tune the level sensor
Clean the outside of the bowl and fix the sensor in its clip so it sits flat against the wall, at the height you want the water to stay at. Leave a bit of space below the rim, so a full bowl doesn’t slosh over when your pet drinks.
Before any wiring goes into the box, connect the sensor to the board on the bench (Step 5) and tune it with the bowl in place: empty, the output should read “no water”; filled to just above the sensor, it should read “water”. Adjust the sensitivity until both readings are reliable, and check that a hand near the sensor doesn’t flip it.
Step 4: Install the pump and tubing
Place the reservoir next to the bowl, or on a shelf above it. A peristaltic pump primes itself, so the reservoir can sit lower than the bowl, too. Cut two lengths of silicone tube:
- Intake: from the bottom of the reservoir to the pump’s inlet. Drill a 5 mm hole in the lid, push the tube through and let it reach the bottom, so the pump can use almost all the water.
- Outlet: from the pump’s outlet to the clip on the bowl’s rim. Run it in gentle curves; a sharp bend kinks soft silicone.
Mount the pump above the reservoir’s water line and run it once with 12 V (Step 7) to check the flow direction. If it pumps the wrong way, swap the two motor wires. Then time it into a measuring cup: at about 70 ml per minute, you now know how long a normal top-up should take.
Keep every tube out of reach or under a cover. A pet that chews through the outlet line can empty the reservoir onto the floor.
Step 5: Wire the board, switch and sensor
Wire everything on a breadboard first, then move it into the box once the code works.
| From | To |
|---|---|
| 12 V + (barrel jack adapter) | MOSFET module power in + and converter input (red) |
| 12 V − | MOSFET module power in − and converter input (black) |
| MOSFET module output + / − | Pump + / − |
| Converter output 5 V (yellow) | XIAO 5V |
| Converter output GND (black) | XIAO GND |
| MOSFET module signal + | XIAO D2 |
| MOSFET module signal − | XIAO GND |
| Sensor signal | XIAO D1 (through a divider, see below) |
| Sensor power + / − | Supply voltage from DFRobot’s tutorial / GND |
Labels differ between MOSFET module batches, so check the markings on yours. Three details make the difference between a topper that works for a week and one that works for years:
- Divider on the sensor signal. The XIAO ESP32-C6’s pins are 3.3 V only. If the sensor runs on 5 V, its signal can reach 5 V, so feed it through a 10 kΩ resistor to D1 with a 20 kΩ resistor from D1 to GND.
- A diode across the pump. A 1N4007 or 1N5819 across the pump’s terminals, striped end on +, absorbs the voltage spike when the motor switches off.
- Shared ground. All the GND and − connections meet: the supply, the converter, the MOSFET module, the board and the sensor.
Step 6: Upload the code
Install the Arduino IDE, add the ESP32 board package and select XIAO_ESP32C6. Enter your Wi-Fi details and upload the sketch below. It waits until the level has been low for 30 seconds (a drinking pet makes waves), runs the pump until the sensor sees water, stops after four minutes no matter what, and rests ten minutes between top-ups. A status page on the board’s IP address shows whether it’s OK, topping up or in fault.
#include <WiFi.h>
#include <WebServer.h>

const char* WIFI_SSID = "your-wifi";
const char* WIFI_PASS = "your-password";

const int SENSOR_PIN = D1;                         // level sensor (through the divider)
const int PUMP_PIN   = D2;                         // MOSFET module signal
const int WATER      = HIGH;                       // sensor reading with water; check in Serial Monitor

const unsigned long DRY_DELAY = 30UL * 1000;       // level must stay low this long
const unsigned long MAX_RUN   = 4UL * 60 * 1000;   // longest allowed top-up
const unsigned long REST      = 10UL * 60 * 1000;  // pause between top-ups

WebServer server(80);
unsigned long lowSince = 0, pumpStart = 0, lastRun = 0;
bool pumping = false, fault = false;
int topUps = 0;

void pump(bool on) {
  digitalWrite(PUMP_PIN, on ? HIGH : LOW);
  pumping = on;
  lowSince = 0;
  if (on) pumpStart = millis(); else lastRun = millis();
}

void setup() {
  pinMode(PUMP_PIN, OUTPUT);
  pump(false);                                     // pump off first, before anything else
  pinMode(SENSOR_PIN, INPUT);
  Serial.begin(115200);
  WiFi.begin(WIFI_SSID, WIFI_PASS);
  server.on("/", [] {
    String s = fault ? "FAULT: pump ran too long. Refill the reservoir, check for leaks, then open /reset"
             : pumping ? "Topping up" : "OK";
    server.send(200, "text/plain", s + "\nTop-ups since start: " + topUps);
  });
  server.on("/reset", [] { fault = false; server.send(200, "text/plain", "Fault cleared"); });
  server.begin();
}

void loop() {
  server.handleClient();
  unsigned long now = millis();
  bool water = digitalRead(SENSOR_PIN) == WATER;

  if (pumping) {
    if (water) { pump(false); topUps++; }
    else if (now - pumpStart > MAX_RUN) { pump(false); fault = true; }   // empty reservoir or a leak
    return;
  }
  if (water) { lowSince = 0; return; }
  if (!lowSince) lowSince = now;
  if (!fault && now - lowSince > DRY_DELAY && now - lastRun > REST) pump(true);
}
Open the Serial Monitor first and check what the sensor reads with and without water; if it’s the other way round,
change WATER to LOW. Set MAX_RUN from your measuring-cup test: a little longer than one normal top-up.
For notifications on your phone (“reservoir empty”, “topped up 6 times today”), the same wiring works with ESPHome and Home Assistant: a binary sensor for the level, a switch for the pump, and an automation with the same delay, run-time limit and rest period. Keep the safety limits on the board itself, so they still apply when Wi-Fi or the server is down. As with any home device, keep it on your home network and use a VPN or Home Assistant’s remote access rather than an open port on your router.
Step 7: Power it safely
One 12 V adapter powers everything: it goes straight to the MOSFET module for the pump, and through the 5 V converter to the board. Before you connect the XIAO, check the converter’s output with a multimeter.
- Electronics above the water. The box goes higher than the bowl and the reservoir, with drip loops in every cable, so water can’t run along a wire into it.
- Don’t power it twice. When you plug in USB to update the code, unplug the 12 V supply first.
- Cable out of reach. Run the adapter cord along the wall and cover it if your pet chews cables.
- Outages. A wall supply stops during a power cut, and the bowl then simply stops being topped up. Fill it fully before you leave, so there’s always a bowl’s worth of water even if the topper does nothing.
Step 8: Test before you rely on it
- Run it with a towel under everything for a few days at home. Check for drips at every tube joint.
- Empty the reservoir on purpose and confirm the topper stops and shows the fault.
- Watch your pet use it. Some pets are wary of a pump humming next to the bowl at first; let them get used to it while you’re home.
- Clean it weekly. Wash the bowl, rinse the reservoir and flush the line with clean water. Replace the tube when it looks cloudy or the pump’s own tube starts to wear.
A topper keeps water in the bowl; it doesn’t replace someone checking on your pet. For anything longer than a day or two, still have a person stop by.
What it costs in time: a few hours of printing for the clips and box, an evening for wiring and code, and a few days of testing at home. The parts for each step are below.
At a glance
7 picksAs an Amazon Associate I earn from qualifying purchases. If you buy through a link on this page we may earn a small commission, at no extra cost to you. How this works.
DFRobot Gravity Non-Contact Liquid Level Sensor (SEN0204)
Detects the water through the bowl wall, so nothing sits in the water.
A float or a pair of probes in a pet’s water bowl lasts about as long as it takes the pet to notice it. A non-contact sensor sits on the outside of the bowl and detects the water through the wall, so the bowl stays an ordinary bowl that you can lift out and wash.
Mount the sensor at the height you want the water to stay at. Below it, the output says “no water” and the pump starts; once the water climbs back past the sensor, the pump stops. The bowl must be plastic, glass or ceramic, and the sensitivity usually needs tuning to the wall once it’s mounted.
Pro tip Set the sensitivity with the bowl in place, first empty and then filled to just above the sensor. A sensor tuned on the bench can miss the water through a thick ceramic wall, or trigger on a wet hand.
Why we like it
- ✓Detects the liquid through the container wall, with no contact with the water
- ✓Digital output — water or no water — that any microcontroller can read
- ✓Adjustable sensitivity to match the wall material and thickness
- ✓Gravity connector and an adapter board for plug-in wiring
- ✓DFRobot publishes an online tutorial for it
Keep in mind
- !Only tells you "water at this height" or not; it doesn't measure how full the bowl is
- !Won't work through a metal wall, so a stainless steel bowl is out
- !The listing doesn't state the supply voltage or the maximum wall thickness — check DFRobot's tutorial first
- Sensing
- Non-contact, through the container wall
- Output
- Digital (liquid / no liquid)
- Interface
- DFRobot Gravity
- Model
- SEN0204
Kamoer NKP Peristaltic Pump (12 V)
Moves water slowly through a tube and seals the line when it stops.
A peristaltic pump moves water by squeezing a soft tube with rollers. For a pet bowl that design has two useful side effects: the water touches nothing but the tube, and when the motor stops, the rollers pinch the tube shut, so the reservoir can’t siphon into the bowl and flood the floor.
The slow flow is a feature here, too. A topper that adds water gradually gives the level sensor time to react, so it’s hard to overfill even if the code is a little slow to switch off.
Pro tip Time the pump into a measuring cup before you build it in. Knowing your real ml per minute lets you set a safe maximum run time: a little longer than one normal top-up, and no more.
Why we like it
- ✓Water only touches the tube; no valves or seals inside the pump
- ✓Self-priming, so the reservoir can sit beside or below the bowl
- ✓Snap-in pump head comes off for tube replacement and cleaning
- ✓Runs in either direction
- ✓12 V DC, switches easily from a MOSFET module
Keep in mind
- !Low flow, about 70 ml per minute — a large bowl takes several minutes to refill
- !The pump tube wears with use and has to be replaced from time to time
- !Audible motor hum while it runs
- Voltage
- 12 V DC
- Flow rate
- ≥ 70 ml/min
- Tube
- 3 mm ID × 5 mm OD
- Size
- 2.63 × 2.16 × 1.61 in
- Weight
- 3.5 oz
- Model
- NKP-DC-S10B
Quickun Food Grade Silicone Tubing (3 mm ID × 5 mm OD, 9.84 ft)
Food-grade silicone in the pump's exact 3 mm tube size.
The tube is the only part of an auto-topper that the water travels through, so it’s worth using one made for food and drink. This one comes in the same 3 mm × 5 mm size as the Kamoer pump’s own tube, so it pushes straight onto the pump’s barbed connectors.
Clear tubing also makes maintenance obvious: if you see green or cloudy patches inside, it’s time to flush the line or replace it.
Pro tip Cut the outlet end so it ends a little above the bowl’s rim, held by a clip, not under the water. A tube that sits in the bowl gets dribbled and chewed, and can pull water back up the line.
Why we like it
- ✓3 mm ID × 5 mm OD, a direct fit for the Kamoer NKP pump's tube size
- ✓Silicone compound compliant with FDA and 3-A sanitary standards, Quickun says; BPA free
- ✓Clear, so you can see bubbles, algae or a blockage
- ✓Soft (50A durometer) and easy to route around corners
- ✓9.84 ft (3 m) — enough for the intake, outlet and a spare length
Keep in mind
- !Soft enough to kink on a tight bend; route it in gentle curves
- !A pet that chews will get through it quickly, so the run must be covered or out of reach
- Size
- 3 mm ID × 5 mm OD (1 mm wall)
- Length
- 9.84 ft (3 m)
- Material
- Silicone, food grade
- Hardness
- 50A
Seeed Studio XIAO ESP32-C6 (Pre-Soldered)
A tiny Wi-Fi board with soldered pins that runs the whole topper.
An auto-topper needs a brain that does three small things reliably: read one sensor, switch one pump, and tell you when something goes wrong. The XIAO ESP32-C6 has the Wi-Fi for the last part and enough spare pins for the first two, on a board smaller than a postage stamp that fits easily inside a printed electronics box.
This is the pre-soldered version, so you can build and test the whole circuit on a breadboard first and only then move it into the enclosure. Seeed also lists support for Zigbee, Thread and Matter, which matters only if your smart home runs on those; a plain Wi-Fi sketch or ESPHome is the simpler start.
Pro tip Keep the board above the water line and away from the bowl, in a closed box with the cables leaving from the bottom. A loop in each cable below the box (a drip loop) keeps a stray drop from running along the wire into it.
Why we like it
- ✓Pin headers come soldered on, so it plugs straight into a breadboard
- ✓2.4 GHz Wi-Fi 6, Bluetooth LE, plus a radio for Zigbee and Thread
- ✓Two RISC-V cores, a 160 MHz main core and a 20 MHz low-power core
- ✓Tiny, 21 × 17.8 mm, with an onboard antenna and a U.FL connector for an external one
- ✓Programs over USB-C from the Arduino IDE; also a common target for ESPHome
Keep in mind
- !Its pins are 3.3 V only, so a 5 V sensor output needs a voltage divider
- !Few pins in total; fine for a sensor and a pump, tight for a bigger build
- !2.4 GHz only — the router's 2.4 GHz band has to reach the bowl
- Chip
- ESP32-C6, RISC-V, 160 MHz + 20 MHz low-power core
- Wireless
- Wi-Fi 6 (2.4 GHz), Bluetooth LE, 802.15.4 (Zigbee, Thread)
- Flash
- 4 MB
- Board size
- 21 × 17.8 mm
- Headers
- Pre-soldered
- Connector
- USB-C
- Model
- 102010636-FA
Dual MOSFET Trigger Switch Module (6-Pack)
Lets a 3.3 V pin switch the 12 V pump on and off.
An ESP32 pin can’t power a 12 V pump directly; it can only tell something else to. A MOSFET module is that something: the board sends a 3.3 V signal, and the module connects the 12 V supply to the pump. It’s silent, has no moving parts and, unlike a relay, it can also run the pump at reduced speed with PWM.
Many common MOSFET modules (the IRF520 kind) don’t switch fully on at 3.3 V. This dual-MOSFET type is listed for 3.3 V logic, which is why it suits an ESP32.
Pro tip Put a diode (1N4007 or 1N5819) across the pump’s two terminals, with the striped end on the + wire. When the motor switches off it kicks back a voltage spike, and the diode absorbs it before it reaches the MOSFET.
Why we like it
- ✓Takes a 3.3 V logic signal, so it works straight from an ESP32 pin
- ✓Load side handles 5–36 V DC; the seller rates it at 15 A, far more than a small pump needs
- ✓PWM up to 20 kHz if you want to slow the pump down
- ✓Screw terminals for the power and pump wires
- ✓Six in a pack, so there are spares for the next project
Keep in mind
- !Unknown brand with little documentation; check the pin labels on your board before wiring
- !No flyback diode visible on the board — add one across the pump's terminals
- !Bare board; it needs a dry enclosure near water
- Load voltage
- 5–36 V DC
- Logic input
- 3.3–20 V
- PWM
- 0–20 kHz
- Rated current
- 15 A (seller rating)
- Size
- 1.34 × 0.67 × 0.47 in
- Pack
- 6 modules
TMEZON 12 V 2 A Power Adapter (8 ft cord)
One 12 V wall supply with a long cord for the pump and the board.
The pump runs on 12 V and the board on 5 V. Rather than two wall adapters, it’s simpler to bring one 12 V supply into the project and step part of it down for the electronics. Two amps leave a comfortable margin for a small pump starting up while the board is on Wi-Fi.
The long cord helps more than it sounds: the outlet can stay behind furniture while the topper sits next to the bowl, with the cable routed along the wall.
Pro tip Wire the supply into the project with a female barrel jack to screw terminal adapter. You can then unplug the topper from the jack for cleaning without touching the wiring.
Why we like it
- ✓12 V at up to 2 A, plenty for a small pump plus the board
- ✓8 ft (2.4 m) cord, so the outlet doesn't have to be next to the bowl
- ✓Standard 5.5 × 2.1 mm center-positive barrel plug
- ✓Over-current, over-voltage and short-circuit protection, TMEZON says
Keep in mind
- !Barrel plug only; you'll need a screw-terminal barrel jack adapter to wire it into a project
- !No battery backup — the topper stops during a power cut
- Output
- 12 V DC, 2 A (24 W)
- Plug
- 5.5 × 2.1 mm, center positive
- Cord
- 8 ft (2.4 m)
- Wall plug
- North American 2-pin
- Model
- MZ-M12V2A24
DORHEA 12 V to 5 V 3 A Buck Converter (Sealed)
A sealed converter that turns 12 V into a steady 5 V for the ESP32.
Small adjustable buck boards work, but their tiny trim screw can drift and they’re bare circuit boards. This one has a fixed 5 V output in a closed aluminum case, which is a better fit for a project that lives next to a water bowl and runs all day.
Three amps is far more than an ESP32 board needs. The extra margin simply means the converter runs cool.
Pro tip Before you connect the board, power the converter on its own and check the output with a multimeter: 5 V on the yellow lead, ground on black. Then connect it to the board’s 5V and GND pins.
Why we like it
- ✓Fixed 5 V output at up to 3 A from a 6.3–22 V input
- ✓Aluminum case, sealed with silicone, DORHEA says — suited to a damp spot near water
- ✓Over-current, over-temperature and short-circuit protection
- ✓Flying leads, nothing to adjust or set up
Keep in mind
- !Bare wire ends; you need to solder, crimp or use lever connectors to join them
- !Reversing the input or output polarity can damage it, so check the colors twice
- Input
- 6.3–22 V DC
- Output
- 5 V DC, 3 A (15 W)
- Case
- Aluminum, silicone sealed
- Weight
- 18 g
- Model
- 15763-1