Build a Modular Wooden Marble Run Kids Will Keep
Maple blocks, pine ramps and loose pegs that let kids rebuild the run a new way every time — the seven steps and the tools for each one.
Published October 13, 2026 · 7 picks
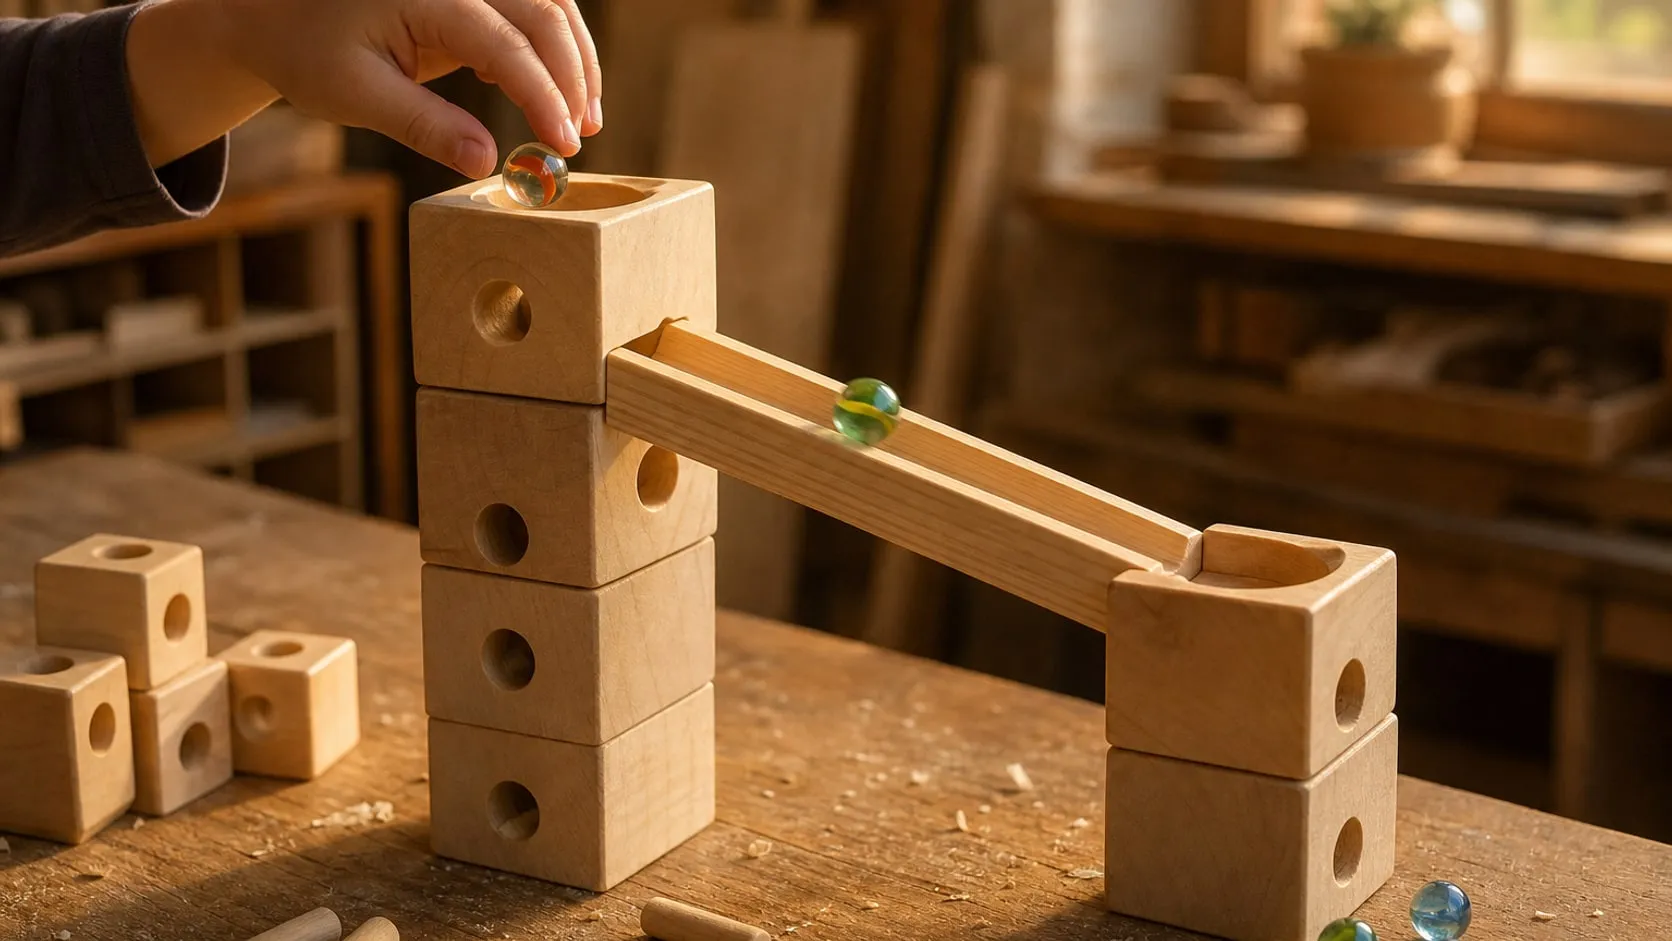
Store-bought wooden marble runs are fun until a piece goes missing, and then the set only builds the layouts on the box. A run you make from identical blocks works the other way round: every block fits on every other block, kids invent their own layouts, and when they want more, you make five more cubes in an evening. The whole system is three parts: 2 in maple cubes with marble channels bored through them, loose pegs that lock the cubes into towers, and thin ramps that carry the marble from one tower to the next. Here’s the whole process, with the tools for each step below.
Safety first. Marbles and pegs are small parts and a choking hazard. This is a toy for kids old enough not to put things in their mouths, and not for children under 3 or a house where toddlers can reach the box. A homemade toy isn’t safety-tested like a store-bought one, so check every block for splinters and cracks before it’s played with.
Step 1: Plan the system
Everything is designed around one marble size, 16 mm (5/8 in), the most common size. Every channel is a 3/4 in hole, which leaves the marble about 1/8 in of room to fall freely. Make these modules, all from 2 in cubes:
- Pillar: peg holes only. It just adds height.
- Drop: a channel straight down through the middle.
- Turn: a channel down from the top that comes out one side, near the bottom.
- Start: a drop with a wide, shallow cup on top to aim the marble into.
- Riser: a half-height (1 in) block to fine-tune a ramp’s slope.
- Ramps: 12 in channels that rest on top of the blocks. One plain ramp lying flat on the table is the finish tray.
A good first batch is 12 pillars, 6 drops, 6 turns, 2 starts, 4 risers (two cubes, cut in half), 4 ramps and a finish tray. That’s 28 cubes, with the rest of the pack left for new ideas later.
Step 2: Build a jig and drill the peg holes
The pegs are what make the run modular, and they only work if the holes are in exactly the same place on every cube. So don’t measure each cube; build a jig once.
- Make the jig. Screw two straight scraps at a right angle onto a small piece of plywood, making a corner the cube can be pushed into. Clamp it to the drill press table so the 3/8 in Forstner bit lands 3/8 in in from both edges of a cube pushed into the corner.
- Test the fit. Drill a hole in a spare cube and push in a peg. It should go in with light finger pressure and pull out again by hand. If it’s too tight, a tiny wobble of the bit in a test hole or a light sanding of the pegs fixes it; better too loose than stuck.
- Drill the top. Set the depth stop to 13/16 in. With the cube’s “top” face up, drill one corner, turn the cube 180° in the jig and drill the opposite corner.
- Drill the bottom. Flip the cube over, keeping the same edge against the same side of the jig, and drill the same two corners. The holes from top and bottom stay 3/8 in apart inside the cube.
A 1-1/2 in peg goes 3/4 in into each of two stacked cubes, and the extra 1/16 in of depth lets the cubes sit tight together. Drill every cube except the risers this way, then drill the risers on the bottom only (they always sit on top of a tower).
Step 3: Bore the marble channels
Use the 3/4 in Forstner bit, a slow speed, and lift the bit every 1/4 in to clear the chips. Clamp every cube; never hold a small block by hand near a large bit. A drill press makes this far easier; the channels must be straight, or marbles catch on the step where two blocks meet.
- Drop: bore through the center of the top face, 1 in deep, then flip the cube and bore 1 in from the bottom to meet it. Mark the centers with diagonal lines corner to corner.
- Turn: bore down from the top center to 1-3/4 in deep, leaving a 1/4 in floor. Then lay the cube on its side with the exit face up and bore into that face, centered side to side and 5/8 in up from the bottom, until the hole meets the first one (about 1-3/8 in deep). Before you drill, slip a 1/8 in scrap under the edge of the cube’s bottom face; the tilt makes the side channel run slightly downhill, so the marble rolls out instead of stopping.
- Start: make a drop, then bore a 2-1/8 in cup about 1/4 in deep on top, centered on the channel.
Drill a turn in a spare cube first and drop a marble in. It should come out the side on its own, every time. If it stalls, use a slightly thicker shim on the next one.
Step 4: Cut risers and ramp rails
On the scroll saw:
- Risers: slice two drilled pillars through the middle into 1 in blocks. Keep the half with the bottom peg holes; sand the cut face flat on sandpaper stuck to a flat surface.
- Rails: turn the blade 90° so long strips can pass beside the arm, clamp a straight scrap to the table as a fence 1/2 in from the blade, and rip pine strips into 1/4 x 1/2 in rails. Each ramp needs two full-length rails and a 1 in end stop; the narrow offcut left from each strip is enough for end stops and cleats.
Feed slowly and use a push stick for the last few inches. A scroll saw is forgiving, but fingers still don’t belong in line with the blade.
Step 5: Glue up the ramps
Each ramp is a 1/4 x 1-1/2 x 12 in strip as the floor, with a rail glued on edge along each long side. That leaves a channel 1 in wide with 1/2 in walls.
- Drill the drop hole first. On every ramp except the finish tray, bore a 3/4 in hole through the floor, centered side to side and 1 in from one end. That end is the low end; the marble drops through it into the tower below.
- Glue the rails. Spread a thin bead of wood glue on the edges of the floor, set the rails on edge flush with the sides and the ends, and clamp through a straight scrap laid across the rails. Wipe off squeeze-out inside the channel with a damp rag right away; dried glue is a bump the marble will find.
- Add the end stop. Glue a 1 in piece of rail across the channel at the low end, so the marble can only go down the hole. The finish tray gets an end stop too, but no hole.
- Add the cleat later. Leave the glue overnight, then see Step 7 for the small cleat under each ramp.
Step 6: Round the edges, sand and finish
Sand a small round-over on every edge of every cube and ramp with 120-grit sandpaper on a block, then sand all faces with 180 and 220. Pay attention to the channel openings: a rounded entry lets marbles roll from block to block without a click. Roll a sheet of sandpaper into a tube to smooth the inside of the channels, and blow out the dust. Wear a dust mask while sanding.
Leave the blocks bare or wipe on a thin coat of a food-safe oil such as mineral oil, and wipe off the excess after 15 minutes. Skip varnish or other film finishes: they make channels sticky and peg holes tight. Lay oily rags flat outside to dry before you throw them away.
Step 7: Build, test and keep adding
Start with this layout to check that everything works together:
- Tower A: two pillars, a turn, and a start on top, all pegged together. The marble drops through the start into the turn and rolls out its side.
- Ledge A: two pillars pegged together, standing right against the turn’s exit face. The high end of the first ramp rests on it, butted against the turn, so the channel floor lines up with the exit.
- Tower B: a single turn, about 8 in away. The ramp’s low end rests on it with the hole over the turn’s channel. With the ramp in place, mark where it crosses the uphill edge of tower B, and glue a small cleat under the floor at that mark. The cleat hooks against the block and stops the ramp from sliding downhill.
- Finish tray: lay it flat on the table against tower B’s exit. The marble rolls out of the turn and stops at the end stop.
From there the system grows on its own: every new level is one more pillar under the existing towers plus a new tower and ledge. Use risers under a ramp’s high end when a slope is too steep, turn a tower 90° to send the run around a corner, and make a second start so two marbles can race. Roll every marble through one block before play, and count the marbles back into the bag afterwards.
What it costs in time: an evening to build the jig and drill the peg holes, an evening for the channels, an evening to cut and glue the ramps, and a weekend morning to sand and finish. The tools for each step are below.
At a glance
7 picksAs an Amazon Associate I earn from qualifying purchases. If you buy through a link on this page we may earn a small commission, at no extra cost to you. How this works.
Craftparts Direct 2 in Maple Wood Cubes, 50-Pack
Solid maple cubes, already cut to the same 2 in size, so every module stacks on every other.
A modular marble run is mostly the same block repeated: one cube with a hole straight down, one that turns the marble sideways, one that just adds height. Starting from cubes that are already square and the same size skips the hardest part of the build, which is cutting dozens of identical blocks on a saw.
Maple is a practical choice for a toy that will be stacked, knocked over and rebuilt for years: it’s hard enough that the edges don’t dent easily and the bored channels stay smooth for the marbles.
Pro tip Mark one face of every cube as “top” with a pencil arrow pointing to the same edge before you drill anything. If the cubes are a hair off-square, keeping them all oriented the same way in your jig keeps the peg holes lined up.
Why we like it
- ✓Solid maple, a hard, smooth wood that suits toys
- ✓Every cube is the same 2 in size, so modules stack and line up without cutting
- ✓Sanded on the listing's word, so they need only a light pass before finishing
- ✓Fifty cubes are enough for several towers and spare blocks for new modules
Keep in mind
- !Small-stock cubes can vary a little in size; check a few before you lay out holes
- !Hard maple is slow to bore with large bits and burns with a dull one
- !A 10-pack is also sold, but too small for more than one tower
- Wood
- Solid maple, unfinished
- Size
- 2 × 2 × 2 in (51 mm)
- Pack
- 50 cubes
- Model
- SQ200050
Rhino Wood 3/8 × 1-1/2 in Fluted Birch Dowel Pins, 100-Pack
Loose birch pegs that lock the blocks into towers that still come apart.
The pegs are what make the run modular. Every cube gets peg holes in two opposite corners of its top and bottom, and a loose pin bridges each pair of stacked cubes. Towers then stand straight and don’t slide apart when a marble lands, yet any block can be lifted off and moved to a new spot.
These pins are sold for glued furniture joints, but the same size works dry as a stacking peg. A pack of 100 covers fifty cubes with plenty left for ramp stops and new modules.
Pro tip Glue one pin into the bottom of each base-row cube only if you build on a baseboard. For everything else, leave the pins loose; the whole point is that kids can rebuild the run a different way every time.
Why we like it
- ✓3/8 in diameter matches the 3/8 in Forstner bit
- ✓1-1/2 in length splits evenly, 3/4 in into each of two stacked cubes
- ✓Beveled ends find the hole easily, even for small hands
- ✓Kiln-dried birch, a hardwood that holds up to repeated stacking
Keep in mind
- !Fluted pins are made for glue; the grooves make a dry fit a little looser
- !Dowel diameters vary slightly; drill a test hole before boring every cube
- Size
- 3/8 × 1-1/2 in (9.5 × 38 mm)
- Count
- 100
- Wood
- Kiln-dried birch
- Ends
- Beveled
INTOO Hex Shank Forstner Bit Set, 16 Pieces
The 3/8 in bit bores the peg holes, the 3/4 in bit every marble channel.
Every opening in a block marble run is a round hole: a channel straight down, a channel out the side, a cup at the top to catch the marble, and small holes for the pegs that lock the blocks together. A Forstner set covers all of them with one kind of bit. Forstner bits cut a flat-bottomed, clean-walled hole, and they can bore two holes that meet inside a block, which is how a marble turns a corner.
For standard 16 mm (5/8 in) marbles, the 3/4 in bit leaves about 1/8 in of clearance, so the marble falls freely without rattling. The 3/8 in bit matches common dowel pins, and the 2-1/8 in bit makes a shallow funnel on a start block.
Pro tip Run large Forstner bits slowly and lift the bit every 1/4 in to clear the chips. In maple, chips packed in the hole are what heat the bit and leave burn marks on the channel walls.
Why we like it
- ✓Sizes from 1/4 to 2-1/8 in, including 3/8 in for dowels and 3/4 in for 16 mm marbles
- ✓Flat-bottomed holes with clean edges, which matters on the visible faces of a toy
- ✓Hex shank on a 3/8 in reduced shank, so the bits don't slip in the chuck
- ✓Wide sizes make starting cups and catch trays in one step
Keep in mind
- !High-carbon steel dulls sooner than carbide in hard maple; keep speeds low
- !Large sizes need a drill press and a clamped workpiece
- Sizes
- 1/4, 3/8, 1/2, 5/8, 3/4, 7/8, 1 in, then 1/8 in steps to 2-1/8 in
- Pieces
- 16
- Material
- High-carbon steel
- Shank
- 3/8 in, hex
WEN 3921 16 in Variable Speed Scroll Saw
Rips thin ramp rails and slices cubes into half-height risers.
A scroll saw is one of the gentler power tools for small parts. The thin blade moves up and down instead of spinning, and it cuts slowly enough that small pieces can be guided with a push stick. For a marble run it does two jobs: ripping narrow side rails from flat strips, and slicing 2 in cubes into half-height blocks for gentler ramp angles.
The WEN’s blade can be mounted turned 90 degrees, which WEN says gives unlimited ripping capacity: the strip passes beside the arm instead of hitting it. That’s what makes long, straight rails possible on a 16 in saw.
Pro tip For rails, clamp a straight scrap to the table as a fence 1/2 in from the blade and feed the strip slowly. Cut all the rails in one session with the fence untouched, so every ramp ends up with walls of the same height.
Why we like it
- ✓Blade mounts in two directions; turned 90° it can rip strips of any length
- ✓Cuts wood up to 2 in thick, enough to slice a 2 in cube in half
- ✓Variable speed, 400 to 1,600 strokes per minute
- ✓Air pump, work light and dust port keep the cut line visible
Keep in mind
- !Ripping long strips takes patience; a fence clamped to the table is a must
- !At 25.5 lb it creeps on a bench unless it's bolted or clamped down
- !The included blades are general-purpose; finer blades help on thin pine
- Throat
- 16 in
- Max cut
- 2 in thick
- Speed
- 400–1,600 strokes/min
- Table
- 16 × 11 in, bevels 45° left
- Power
- 120 V, corded
- Weight
- 25.5 lb
Coowayze Pine Wood Strips, 1/4 × 1-1/2 × 12 in, 15-Pack
Flat pine strips for the ramp floors and the rails along their edges.
The towers of a marble run are blocks; the ramps that connect them are thin channels. These strips do both jobs in a ramp: one strip, left full width, is the floor, and narrow rails ripped from another strip glue along its edges to make the walls. The result is a light, open-topped channel that sits on top of the blocks.
The same listing comes in shorter and longer lengths, so you can add short, steep ramps and long, gentle ones later without changing the design.
Pro tip Sight down each strip before you use it and save the straightest ones for ramp floors. A slight bow is fine for a side rail, where the glue and clamps pull it flat.
Why we like it
- ✓1-1/2 in wide, so one strip is the floor of a ramp with room for side rails
- ✓12 in long, a good ramp length between two towers
- ✓Sanded flat stock — no planing or ripping wide boards to thickness
- ✓Fifteen strips cover the floors and the rails for several ramps
Keep in mind
- !Pine is soft; ramp edges dent more easily than the maple cubes
- !At 1/4 in thick, a long ramp can bow a little if it isn't glued straight
- Wood
- Pine, unfinished
- Size
- 1/4 × 1-1/2 × 12 in (6 × 38 × 305 mm)
- Pack
- 15 strips
- Other sizes
- 1/2 to 2 in wide, 6 to 17-1/2 in long
IRWIN Quick-Grip One-Handed Mini Bar Clamps, 6-Pack (1964749)
Six one-handed clamps to hold rails flat while the glue sets.
Small projects still need clamps. A ramp is three thin strips glued together, and it only comes out straight if the rails are pressed down evenly along their whole length while the glue sets. The same clamps hold a block against a fence on the drill press, so your fingers are never the thing holding a small cube near a large bit.
The mixed pack suits that kind of work: the long clamps reach across a ramp, the short ones hold a cube in a jig, and all of them close with one hand.
Pro tip Lay a straight scrap of wood on top of a ramp’s rails and clamp through it, rather than clamping the rails directly. The scrap spreads the pressure, so a 12 in rail sits flat with three clamps instead of six.
Why we like it
- ✓Three sizes in one pack, two each of 4-1/4, 6 and 12 in
- ✓One-handed trigger leaves the other hand free to hold the parts
- ✓Non-marring pads won't dent soft pine ramps
- ✓Converts to a spreader by moving the jaw
Keep in mind
- !Up to 140 lb of force is fine for small parts, not for big panel glue-ups
- !Six clamps cover one long ramp at a time; more ramps means more waiting
- Sizes
- 2 × 4-1/4 in, 2 × 6 in, 2 × 12 in
- Clamping force
- Up to 140 lb
- Release
- One-handed trigger
- Model
- 1964749
Yellow Mountain Imports Glass Marbles, 16 mm, 60 Pieces
Standard 16 mm glass marbles, the size every channel is bored for.
Design the marble run around the marbles, not the other way round. 16 mm is the most common marble size and the one most wooden marble runs use, which means extra marbles are easy to find and a homemade run plays well with marbles from other sets.
Glass marbles are heavier than plastic ones, so they keep their speed through corners and drops, and they make the clatter that’s half the fun of a wooden run.
Pro tip Roll every marble through one channel block before play. If the maker’s “slight variations” include an oversized marble, it’s better to find it on the bench than stuck halfway down a tower.
Why we like it
- ✓Standard 16 mm (5/8 in) size, so a 3/4 in channel fits with clearance
- ✓Six translucent colors make it easy to race marbles against each other
- ✓Sixty marbles, plenty for a run with several starting points
- ✓Drawstring pouch keeps them together when the run is packed away
Keep in mind
- !The maker notes slight size variations; test them in a channel first
- !Glass marbles are a choking hazard and not for children under 3
- Size
- 16 mm (0.63 in)
- Count
- 60
- Colors
- 6 translucent petal designs
- Material
- Glass
- Includes
- Drawstring pouch