Turn a Pet Photo Into a Custom Night Light
A phone photo of a dog or cat becomes a frosted engraving in clear acrylic that glows on a wooden LED base — a night light no shop sells, in six steps with the tools.
Published October 7, 2026 · 6 picks
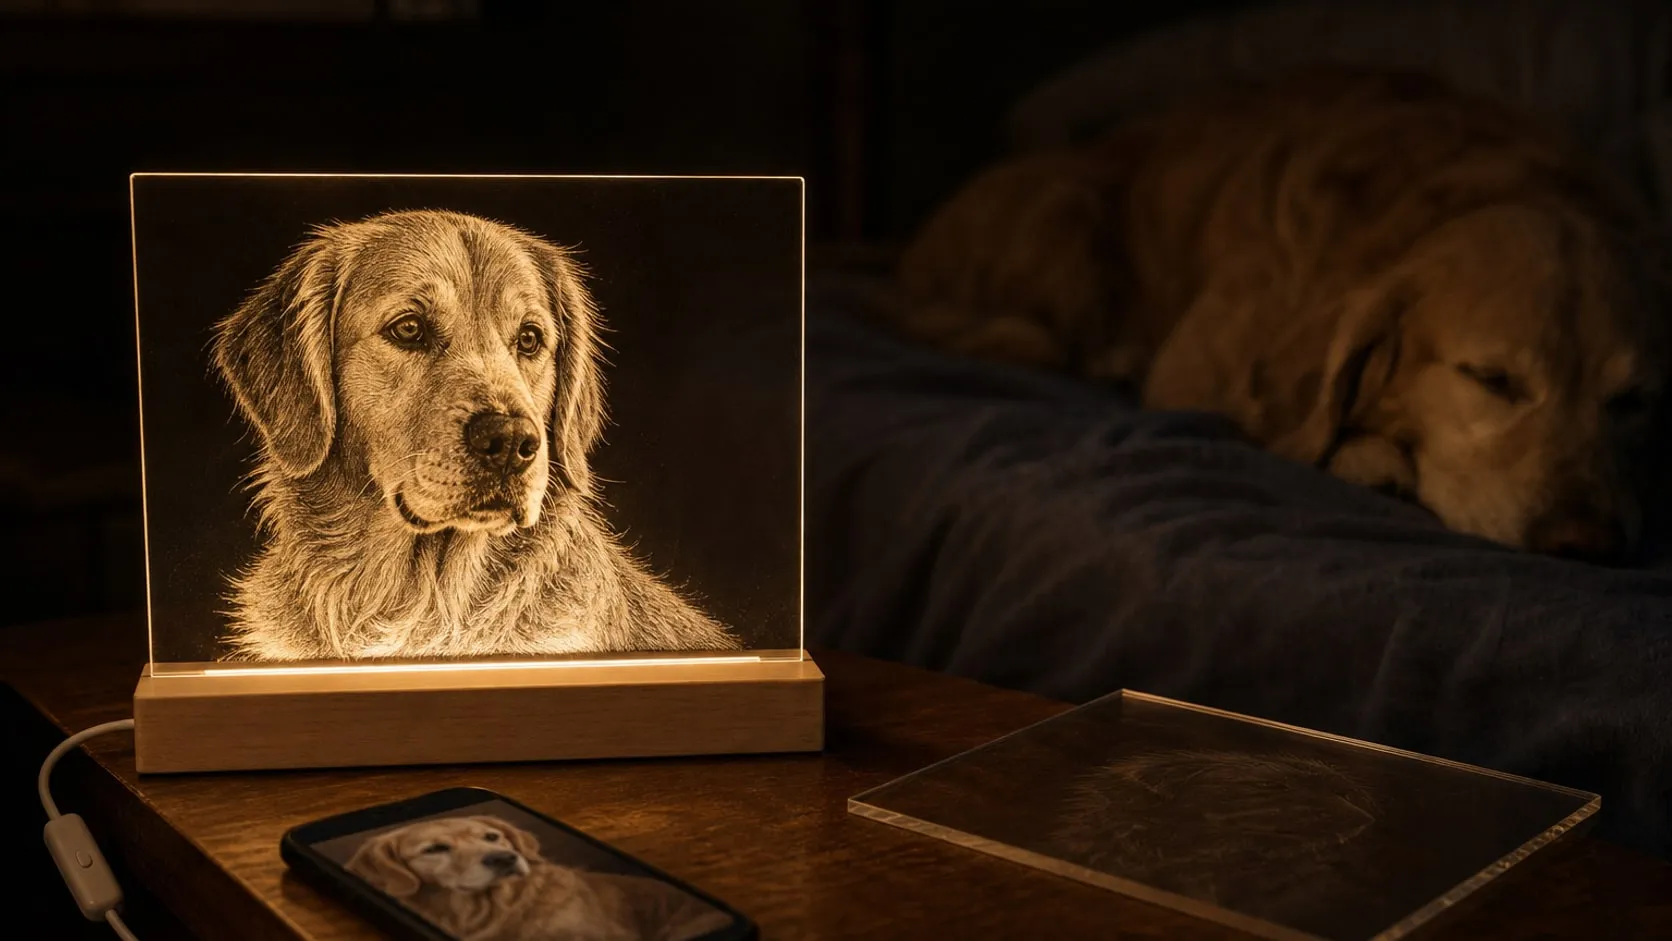
Switched off, it’s a clear pane standing in a strip of wood. Switch it on and the dog appears, drawn in light: the face, the ears, the eyes, floating in the dark pane with nothing around them. That is the whole trick of an edge-lit night light, and it’s why it works as a gift. It’s for the kid whose dog sleeps on the bed, for a friend who just lost a cat, for parents whose house went quiet when the old dog went, or for anyone who sends more photos of the pet than of themselves. It costs an evening and a photo they already have. Here’s the whole process, with the tools for each step below.
Step 1: Pick the right photo
The laser frosts the acrylic where the picture is bright, and the frost is what glows. Everything else stays clear and, in a dark room, invisible. So the photo has to work as light on black. Look for:
- A face toward the camera, eyes sharp. Eyes and whiskers are what make it look like that animal and not a generic one.
- Soft, even light on the face. Window light or outdoor shade. Harsh sun leaves blown-out patches that frost as blank white blobs.
- A clean outline. There’s no frame and no background in the finished piece: the pet’s silhouette is the picture. A pet against a plain, darker background makes the next step easy.
- A light-colored animal is the easy case. Pale fur becomes bright frost. A black dog still works, but it’s the highlights, the eyes and the shape of the face that carry it, so pick a photo with strong light on the face.
- A real photo, not a screenshot. Anything a phone camera took in the last ten years has the resolution; something forwarded through three chats usually doesn’t.
Step 2: Prepare the image
The laser software (LightBurn, paid with a free trial, or LaserGRBL, free) does most of this, and a phone photo app handles the first two points.
- Crop to the pane. A 5 × 7 blank standing sideways in the base gives a 7 in wide picture, with the bottom 3/4 in (2 cm) hidden in the slot. Keep the face in the lower two-thirds, where the light from the base is strongest, and leave the top of the pane for sky, ears or nothing at all.
- Remove the background. One tap in most phone apps or a free online tool. Whatever is left in the picture will glow, so a sofa behind the dog becomes a glowing sofa.
- Grayscale, then contrast. Convert to black and white, push the contrast a little and sharpen slightly. Muddy midtones are the main reason a laser photo disappoints, and on a lit pane they turn into gray haze.
- Invert the image. The laser engraves where the picture is dark, but on edge-lit acrylic the engraving is the bright part. So the brightest parts of the photo must become the darkest in the file. Every laser program has a negative image checkbox; this is the step most first attempts miss.
- Mirror it. The picture gets engraved on the back of the pane and viewed through the front, so the front face stays smooth and the frost is protected and sits a little inside the pane. Flip the whole job horizontally in the software, text included.
- Choose a dither. Diode lasers render photos best as dots. Jarvis and Stucki are the usual choices; set the image resolution to match the line interval you’ll engrave at (Step 5) and let the software resample.
Add the pet’s name, and the years if it’s a memorial, in a small plain font just above the slot line. It’s the part of the pane closest to the LEDs, so it glows brightest; keep it short and skip thin script fonts, which turn into dashes at this size.
Step 3: Prep the blank
Cast, not extruded. Acrylic sheet comes two ways and they look identical. Extruded sheet engraves to a faint, glassy mark; cast sheet turns bright frosted white where the laser works, which is the whole point here. Buy sheet that’s sold as cast, and buy it pre-cut: a diode laser can’t cut clear acrylic, so the blank is the shape you get.
Check that it’s acrylic. Polycarbonate looks the same and chars and smokes badly under a laser. PVC looks the same and releases chlorine gas, which hurts you and corrodes the machine. Stick to acrylic (PMMA) and the materials your laser’s maker lists.
Paint the back. A blue diode laser goes straight through clear acrylic, so on its own it leaves no mark at all. A dark coat on the surface fixes that: the paint absorbs the beam, heats, and the acrylic under it melts into a frosted mark. Peel the protective paper from the back face only, leave the front covered, and brush or sponge on a thin coat of black washable tempera. Let it dry until fully matte, then cross it with a second thin coat. Hold it up to a lamp: any pinhole of light is a spot the laser will skip. Tempera is the hobbyist standard for this because it covers in two coats and washes off with water afterwards.
Tape it down. The blank goes on the bed painted side up, held with a strip of painter’s tape across each corner, outside the picture. Put two more strips on the bed in an L against one corner: a guide, so the test blank and the real one land in exactly the same spot.
Have a CO2 laser? Skip the paint. A CO2 beam is absorbed by acrylic directly and frosts it bright white in one pass, crisper than a diode manages through a coat. Invert, mirror and engrave from the back exactly the same, and use the cutter for what a diode can’t do: a pane shaped like a bone, a heart or the outline of the pet.
Step 4: Set up the laser safely
A desktop diode laser is a Class 4 device: the beam and its reflections off a shiny sheet can damage eyes in an instant, and tempera and acrylic both burn. The setup is simple, and none of it is optional.
- Glasses rated for the laser’s wavelength, on everyone in the room from the moment the laser is armed. Blue diodes run around 445–455 nm; the glasses should state that range and an optical density, and the ones in the machine’s box often state neither.
- Fresh air. A window with a fan blowing out, or an enclosure with an exhaust hose. Burnt paint and hot acrylic make a smell you don’t want in a bedroom, and smoke that settles on the lens.
- Nothing flammable on the bed and a fire extinguisher or a spray bottle of water within reach. Never leave a running laser alone, not even for a photo that takes forty minutes.
- Pets out of the room. The light that hurts your eyes hurts theirs, and a nose at bed height is a burn waiting to happen. The dog in the photo waits outside the door.
- Focus on the painted surface. Set the focus with the module’s spacer on top of the paint, not the bed. Refocus for each blank; the paint adds nothing, but the tape and the bed don’t always sit the same.
- Air assist low or off. The paint does the absorbing, and a strong stream scatters paint dust across the sheet and cools the surface before it frosts.
Step 5: Test, then engrave
Every laser, every batch of sheet and every coat of paint is a little different, so a test comes first. The material test or test grid feature in LightBurn and LaserGRBL engraves small squares across a range of speeds and powers on a painted spare blank; without it, a few 1 cm squares at different settings do the same job.
Starting points people commonly share for a 10 W diode on tempera-coated 3 mm cast acrylic, to narrow the grid:
- Power: 40–80%, at 3,000–6,000 mm/min (50–100 mm/s).
- Line interval: 0.1 mm (254 DPI). Finer intervals melt the dots together on acrylic.
Then engrave a copy of the actual photo, small, on the same spare. Wash the paint off (Step 6), dry it, stand it in the base in a dark room and look at it lit; the frost looks like nothing in daylight.
- Faint, the fur barely there? More power or less speed, or go back and check the paint: a thin coat engraves faint.
- Melted, bubbled or cracked dots? Too much power. Back off before anything else.
- Blotchy light and dark patches that follow the brush strokes? Uneven paint. Sand nothing; wash it, repaint, try again.
- Soft, fuzzy dots? The focus is off. Reset it on the painted surface.
Now the real one: same settings, same focus, same corner of the bed. A 4 × 6 in picture at a 0.1 mm interval takes roughly 30–45 minutes at those speeds. Stay with it, and don’t touch the pane until the head has parked.
Step 6: Wash, fit and light it
Peel the tape, take the pane to the sink and rinse the tempera off under warm water with a soft sponge. It comes away in seconds and the frost stays. Dry it with a lint-free cloth, then peel the front paper. Clean fingerprints with a drop of dish soap and water, never alcohol or an ammonia glass cleaner: both craze acrylic into a web of fine cracks.
Stand it in the base. Wooden bases are cut for a range of sheet thicknesses, and a 3 mm pane can lean in a wider slot; a strip of painter’s tape along each face of the bottom edge, inside the slot, takes up the slack. Keep the edge itself bare, because that’s where the light goes in. Plug the cable into a USB charger and switch it on in a dark room. The lower part of the pane will be brighter than the top, which is normal and why the face sits low. If a bright band shows along the bottom edge, polish nothing: it’s hidden the moment a lampshade or a book sits in front of the base, and most people like it.
The gift. Wrap it switched off, with the USB charger it will actually run on and a note that says soap and water only. For a bigger gift, make two panes for one base, the dog as a puppy and the dog now, and let them swap. If it’s a memorial, the name and the years under the portrait say everything the card would.
What it costs in time: an hour to pick and prepare the photo, an evening for painting, the test grid and a trial run, 30–45 minutes for the real engraving, and ten minutes at the sink. Start a week before the gift is needed, with a spare blank or two, and keep the trial piece. It’s the one you’ll want on your own nightstand. The tools for each step are below.
At a glance
6 picksAs an Amazon Associate I earn from qualifying purchases. If you buy through a link on this page we may earn a small commission, at no extra cost to you. How this works.
KAITELA Clear Cast Acrylic Sheet, 5 × 7 in, 1/8 in, 10 Pack
Pre-cut cast acrylic blanks that frost bright white, with paper on both faces.
An edge-lit night light is a clear pane with a frosted picture in it, and the pane matters more than it looks. Acrylic comes two ways: extruded sheet, which engraves to a faint, clearish mark, and cast sheet, which turns a bright frosted white where the laser works. For a picture that has to glow, cast is the one. These are cast, and they come already cut to 5 × 7 with clean edges, which is the only way to get a tidy rectangle if your laser is a diode and can’t cut clear acrylic itself.
Ten in a pack sounds like a lot until the first evening: one gets the test grid, one gets the trial photo, and the third is the gift. The rest are the next three gifts.
Pro tip Peel the paper from one face only, the back, and paint and engrave that side with the front still covered. The front paper protects the viewing face from paint, scratches and fingerprints until the night light is finished.
Why we like it
- ✓Cast acrylic, the kind that frosts to a brighter white under a laser than extruded sheet does
- ✓5 × 7 in, a size that suits a head-and-shoulders portrait with a strip left over for the base slot
- ✓1/8 in nominal (0.118 in / 3 mm), stiff enough to stand in a slot without flexing
- ✓Laser-cut edges with no chips per KAITELA, and protective paper on both faces
- ✓Ten in the pack — a test grid, a trial run, a mistake and still a few gifts
Keep in mind
- !Pre-cut, so the rectangle is the shape; a diode laser can't cut clear acrylic into a different outline
- !A clear pane shows every fingerprint, so it needs a careful clean before it goes in the box
- !The paper has to come off the back before painting and off the front at the very end, and it tears if peeled fast
- Size
- 5 × 7 in
- Thickness
- 1/8 in nominal (0.118 in / 3 mm)
- Material
- Cast acrylic, clear
- Edges
- Laser-cut
- Protective paper
- Both sides
- Count
- 10
- Other sizes on the listing
- 4 × 6, 8 × 10, 8 × 12, 12 × 12, 12 × 16, 18 × 24 in
- Model
- A57CL10
Prang Washable Tempera Paint, Black, 16 fl oz
The black coat a blue diode needs to mark clear acrylic; it rinses off with water.
A blue diode laser goes straight through clear acrylic. There is nothing in the sheet to absorb a 450 nm beam, so the laser leaves no mark at all, which is why clear sheet is on every diode maker’s “can’t” list. The way around it is a dark coat on the surface: the paint absorbs the beam, heats up, and the acrylic under it melts into a frosted mark. Then the paint comes off and the frost stays.
Hobbyists have settled on washable tempera for the coat because it covers in a layer or two and washes off with water, where spray paint needs a solvent and a dry-erase marker only covers a few square inches evenly. Black is the color: it absorbs the most and shows the coverage best.
Pro tip Two thin coats beat one thick one. Brush or sponge the first on, let it dry until it’s fully matte, then cross it with the second. Hold the sheet up to a lamp: any pinhole of light coming through is a spot the laser will skip.
Why we like it
- ✓Washable formula — it rinses off skin and clothes per Prang, and off acrylic with warm water and a sponge
- ✓Matte black and opaque, so a coat or two covers a 5 × 7 blank evenly
- ✓Ready to use with no shaking or stirring, in a flip-top squeeze bottle that pours a small puddle
- ✓AP certified non-toxic
- ✓16 fl oz is a lot of blanks; a thin coat on a 5 × 7 sheet uses a few millilitres
Keep in mind
- !Sold for paper and kids' crafts; using it as a laser coating is a maker's trick, not something on the label
- !The coat has to be even — thin patches and brush ridges engrave as light and dark streaks in the picture
- !Burnt tempera smokes and smells, so the room needs a window and a fan
- Volume
- 16 fl oz (473 ml)
- Color
- Black, matte
- Type
- Washable tempera, ready to use
- Safety
- AP certified non-toxic
- Bottle
- Flip-top squeeze bottle
- Model
- 10709
ScotchBlue Original Painter's Tape 2090, 0.94 in × 60 yd
Holds the blank square on the bed, and shims it in the base slot at the end.
An open-frame diode laser has no clamps and no honeycomb, just a bed, and a 5 × 7 blank sitting loose on it moves the first time the gantry bumps the bench. A strip of painter’s tape over each corner, outside the picture, holds it flat and still for the forty minutes a photo takes. Two more strips in an L make a corner guide, so the test piece and the real piece land in the same place and the test settings mean something.
The tape earns its second job at the end: wooden light bases are cut for a range of sheet thicknesses, and a 3 mm sheet can lean in a wider slot. A strip along each face of the bottom edge takes up the slack, hidden inside the slot, with the edge itself left bare for the light.
Pro tip Shim the faces, never the bottom edge. The LEDs shine up into that edge, and tape across it dims the whole picture; tape along the sides of the strip that sits in the slot is invisible and changes nothing.
Why we like it
- ✓Medium-adhesion crepe paper that comes off acrylic and the laser bed without residue per 3M
- ✓0.94 in wide — a strip across each corner holds a 5 × 7 blank flat and still for the test and the real run
- ✓Two strips in an L on the bed make a corner guide, so the trial blank and the gift go in the same spot
- ✓A strip along each face of the bottom edge turns a 3 mm sheet into a snug fit in a wider slot
- ✓60 yd on the roll; a project uses a few feet
Keep in mind
- !Paper chars where the laser crosses it, so it stays outside the engraving area
- !3M's label says to remove it within 14 days, so it's a fixture, not a permanent shim on a finished piece
- !Any painter's tape does these jobs; this is the known-quantity roll, not a specialty laser mask
- Width
- 0.94 in (24 mm)
- Length
- 60 yd (180 ft)
- Material
- Crepe paper, blue
- Adhesive
- Medium, no residue (per 3M)
- Thickness
- 0.16 mm
- Model
- 2090-24NC (3M)
- Also on the listing
- 4-roll and 24-roll packs
Twotrees TTS-10 Pro Laser Engraver, 10 W
A 10 W diode with a 300 mm bed, run from a laptop or straight from a TF card.
A photo engraving is thousands of dots, and the dots can only be as fine as the laser’s spot. A 10 W diode with a spot under a tenth of a millimetre is the class of machine that renders whiskers and the catchlight in an eye at 5 × 7 in, and its bed is the size this project needs: one blank for the real thing and one beside it for the test grid, with room left over.
The TTS-10 Pro is an open-frame machine, which is what makes it affordable and what makes the glasses and the ventilation below non-negotiable. It runs from LightBurn or LaserGRBL like any other diode, and it also runs a job from a TF card with no computer attached, which matters more than it sounds for a 40-minute photo.
Pro tip Export the finished job to the TF card and start it from the control board. A laptop that goes to sleep halfway through an engraving leaves a hard line across the picture, and a card in the slot can’t fall asleep.
Why we like it
- ✓10 W optical output from a 450 nm blue diode, with a 0.069 mm spot per Twotrees for photo-grade dots
- ✓300 × 300 mm (11.8 × 11.8 in) work area, which takes a 5 × 7 blank with room for a test piece next to it
- ✓Drives from LightBurn or LaserGRBL over USB, offline from the included 4 GB TF card, or from the phone app
- ✓32-bit dual-core mainboard, aluminum frame, dual Y-axis motors and GT2 belts
- ✓CE, FCC and RoHS listed; 12-month warranty and 30-day returns per Twotrees
Keep in mind
- !Class 4 open frame — rated glasses for everyone in the room, and it never runs unattended
- !No enclosure or exhaust, so smoke from burnt paint and acrylic needs a window and a fan
- !A blue diode passes straight through clear acrylic; it marks it only through a dark coat, and it can't cut a clear sheet to shape
- !Twotrees says bare stainless and uncoated metal need a marking spray
- Laser
- 10 W optical, 450 nm blue diode
- Spot size
- 0.069 mm (per Twotrees)
- Work area
- 300 × 300 mm (11.8 × 11.8 in)
- Control
- USB (LightBurn, LaserGRBL), TF card offline, mobile app, web
- Mainboard
- 32-bit dual-core
- Frame
- Aluminum, dual Y-axis motors, GT2 belts
- Certifications
- CE, FCC, RoHS
- Model
- TTS-10 Pro
FreeMascot OD 6+ Laser Safety Glasses, 190–490 nm
OD 6+ at 450 nm with 55% light transmission, so you can watch the job.
An open-frame diode laser is a Class 4 device, and the blue light bouncing off a painted sheet is bright enough to damage eyes from across the room. Laser glasses are rated by wavelength and optical density, and the pair that comes in many machine boxes states neither. These state both, at exactly the wavelength a desktop diode runs at, and name the standard they were tested to.
The 55% light transmission is the practical difference from darker laser glasses: the room stays bright enough to see the job, the taped-down blank and the person walking in with the coffee.
Pro tip One pair per person who might open the door while the laser is running, and a spare on a hook by that door. A partner looking in for ten seconds needs the same protection as the person at the bench.
Why we like it
- ✓OD 6+ at 405, 445 and 450 nm, which covers the blue diode in desktop engravers
- ✓EN 207 approved per FreeMascot, the European standard laser eyewear is tested to
- ✓55% visible light transmission, brighter than most laser glasses, so watching the engraving is easy
- ✓Wrap-around full-rim frame with side coverage and an anti-fog coating
- ✓Light at 90 g (3.2 oz)
Keep in mind
- !Not rated for CO2 lasers (10,600 nm) or 1064 nm infrared modules
- !The orange tint changes colors, so the test grid is judged with the glasses off and the laser off
- !A full-rim frame doesn't go over prescription glasses; FreeMascot sells a fit-over style on the same listing
- Protection
- 190–490 nm, OD 6+ (405/445/450 nm)
- Certification
- EN 207 (per FreeMascot)
- Visible light transmission
- 55%
- Lens
- Orange, anti-fog coating
- Frame
- Full rim wrap-around, 18 cm wide
- Weight
- 90 g (3.2 oz)
- Model
- TUB-2 (Frame Style 2)
ZEERSHEE Wooden LED Light Base, 9.4 in, Warm White, 2 Pack
A long wooden bar with a warm-white lit slot that takes a 5 × 7 pane sideways.
The round black bases sold for 3D illusion lamps have a short slot with closed ends, made for a plate with a narrow tab, and a diode laser can’t cut that tab into clear acrylic. A long wooden bar solves it: the slot runs most of its 9.4 in length, so a 5 × 7 pane stands in it sideways with its whole bottom edge lit, and a 4 × 6 or a cut-down piece fits just as well.
Warm white is the right choice for a pet portrait. The frost picks up the color of the light, and a warm tone makes a dog look like a dog rather than a hologram. The switch on the cable is the other quiet advantage for a gift: no remote to lose, no app, one click on the nightstand.
Pro tip Stand a plain blank in the slot before engraving anything and switch it on in a dark room. Where the light is strongest, in the lower two-thirds, is where the face should go; crop the photo with that in mind.
Why we like it
- ✓A 9.4 in slot takes a 5 × 7 blank sideways, with the whole bottom edge over the LEDs
- ✓Warm white light, the tone that suits fur and faces; no color cycling to cheapen a portrait
- ✓USB powered with an on/off switch on the cable — a wall adapter, a laptop or a power bank all work
- ✓Solid wood with a smooth natural finish per ZEERSHEE; two in the pack, one to test with and one to give
- ✓Low and light — about 1.1 in tall and roughly 9 oz each
Keep in mind
- !Warm white only — no dimming, no colors, no remote
- !Nothing on the listing says a USB wall adapter is included, so plan on adding one to the gift
- !The slot width isn't on the listing, so a 3 mm sheet may need a tape shim to stand straight
- !Light enters only at the bottom edge, so a picture fades toward the top of a tall pane
- Size
- 9.4 × 1.7 × 1.1 in (bullet says 1.8 × 1.2 in)
- Material
- Wood, natural finish
- Light
- Warm white LED
- Power
- USB cable with inline on/off switch
- Count
- 2
- Weight
- 0.51 kg (1.1 lb) for two