Laser‑Engrave a Stainless Steel Tumbler With a Rotary Jig
A name or logo wrapped around a powder-coated tumbler with a diode laser and a roller rotary — the six steps and the tools for each one.
Published October 7, 2026 · 6 picks
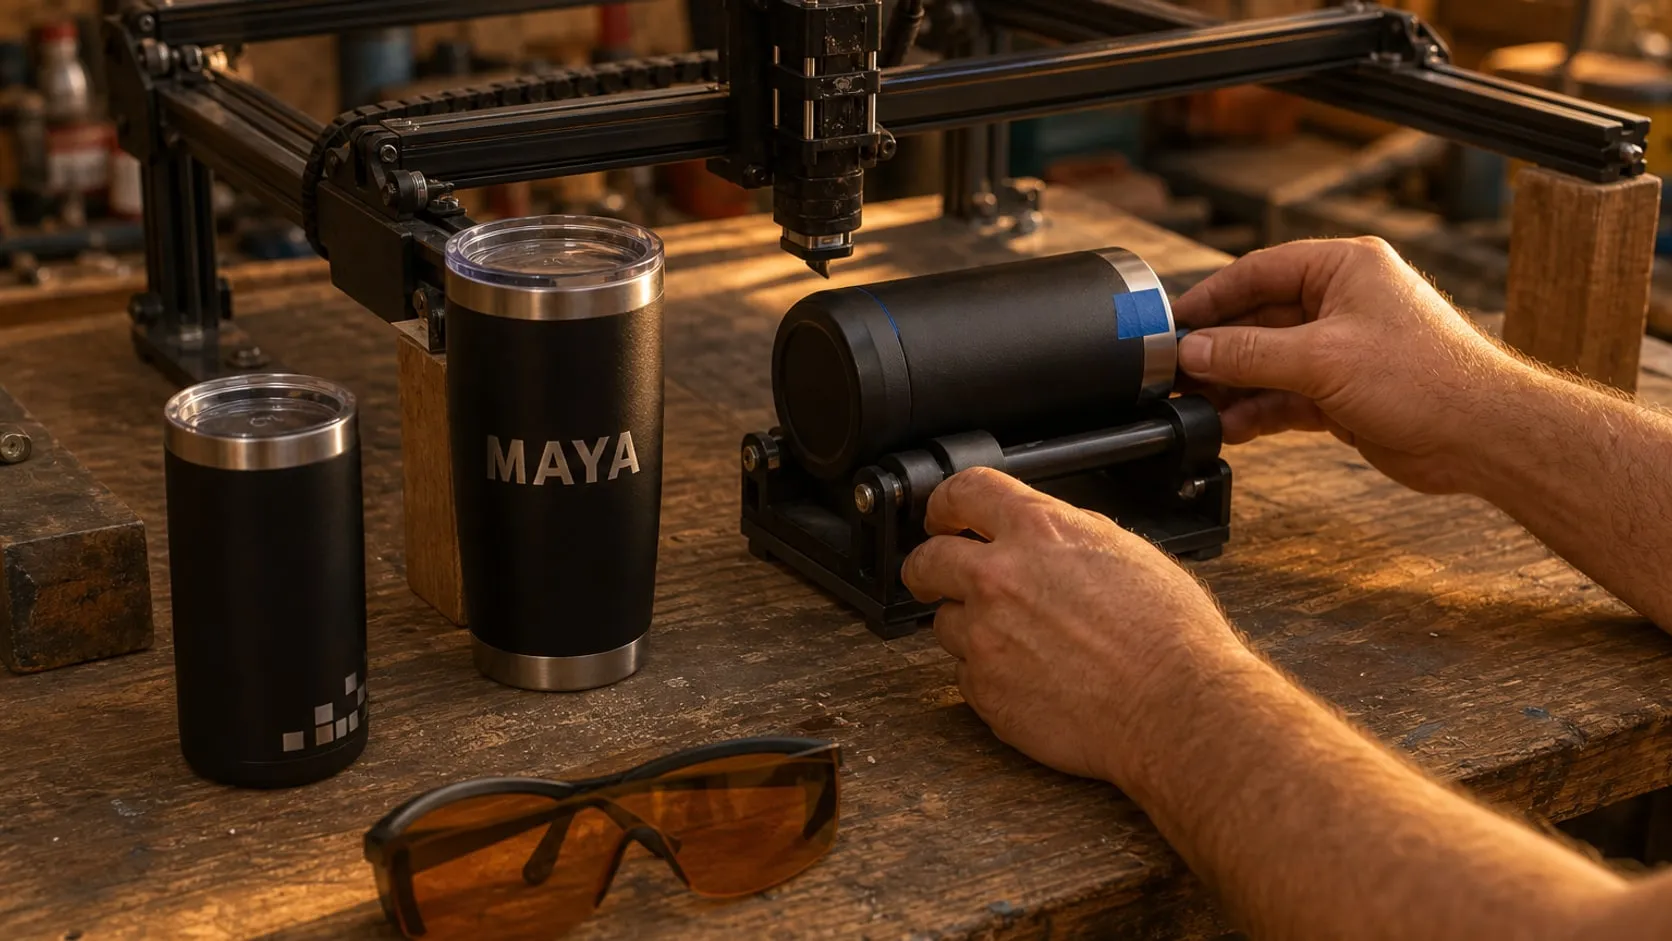
A tumbler with a name on it gets used every day, which is why personalized cups are among the most popular things people make on a desktop laser. A flat laser can’t reach around a cup on its own, though. A rotary jig turns the tumbler under the beam, so the design wraps onto the curved side. Here’s the whole process, from choosing the cup to cleaning the finished engraving, with the tools for each step below.
Step 1: Pick the right tumbler
What the tumbler is coated with decides what the laser can do with it.
- Powder-coated: the easy one. A blue diode burns the colored coating away, and the bare stainless underneath shows through as a bright line on a matte color. That’s the high-contrast look you see on most engraved tumblers, and it’s the best place to start.
- Bare or brushed stainless: needs help. A diode’s blue light mostly reflects off plain steel and leaves little more than a faint mark. Brush on a laser marking compound first, and the laser fuses it into a black mark (a fiber laser can mark steel directly, but that’s a different and more expensive machine).
- Straight is easier than tapered. A straight “skinny” tumbler rests level on the rollers. A tapered one, wider at the top like most 20 oz cups, works too, but needs shimming (Step 2).
- Check the diameter. A 20 oz tumbler is usually around 3.4 in (86 mm) across; make sure your rotary takes it.
Buy one more tumbler than you need. The first one is the test.
Step 2: Set up the laser and the rotary
- Power everything off, then unplug the laser’s Y-axis motor cable and plug the rotary into that port. Some rotaries need a wire swap or an adapter on another brand’s machine, so check the pinout first.
- Set the roller width for the tumbler’s diameter, take the lid off, and lay the cup on the rollers.
- Raise the laser. A cup on rollers is taller than the frame’s clearance, so most open-frame lasers go up on risers. Raise all four feet by the same amount, until the module can reach focus on the top of the tumbler.
- Level the top line. On a tapered tumbler, the side the laser sees slopes downhill toward the narrow end. Shim the narrow end (some rotaries have a height adjustment, or a few washers or a folded card under the base work) until the top line of the cup is parallel to the laser’s X axis. Check with a small level along the top.
- Turn on rotary mode in the software. In LightBurn it’s Tools → Rotary Setup: choose the roller type, enter the rotary’s steps per rotation and the roller diameter from its manual, and press Test. The cup should turn exactly once.
- Focus on the highest point of the cup, right under the laser head.
Step 3: Design to wrap
The design is flat; the cup is round. A few rules keep it from distorting.
- The full wrap is π × diameter. For a 3.4 in tumbler that’s about 10.7 in (272 mm) all the way around.
- Keep a single-side design narrow. The focus only holds near the top of the curve, so a logo or name works best within about 2.5–3 in (65–75 mm) of wrap width. Wider designs blur at the edges.
- Stay on the straight part. Keep clear of the bare steel rims at the top and bottom, and of the tapered zone near the base.
- Position it. The point directly under the laser is the center of the design. Mark the side opposite the handle or seam with a bit of tape, and turn that side up before starting.
- Bold shapes. Fine lines and small text fill in on powder coat. A clean font with strokes at least 0.5 mm wide reads best.
Step 4: Make it safe
A laser that strips powder coat can hurt eyes, lungs and the room.
- Glasses on, for everyone. An open-frame diode is a Class 4 laser. A round, shiny tumbler scatters reflections around the room, so everyone present needs glasses rated for the laser’s wavelength (blue diodes run around 445–455 nm).
- Vent the smoke outside. Burning powder coat gives off fumes you shouldn’t breathe. Work by an open window with a fan pushing air out, or use a fume extractor made for lasers.
- Air assist on. It keeps the smoke and flakes of coating away from the lens and the engraving.
- Stay with it. Never leave a running laser, and keep a fire extinguisher within reach.
Step 5: Test, then engrave
Run a small test grid on the spare tumbler (on the back, or near the bottom) before the real one.
Starting points people commonly share for removing powder coat with a 10–20 W diode, to narrow the grid:
- Fill: 70–100% power at 3,000–6,000 mm/min, 0.08–0.1 mm line interval, one or two passes.
- Slower if it slips. If the cup slides on the rollers, the lines stair-step. Lower the speed rather than pressing on the tumbler.
Look at the test with the laser off:
- Coating still there, or a gray film? Add a second pass, or more power. Change one thing at a time.
- Dark, brown or melted edges? Too much heat; speed up.
- Fuzzy edges? The focus is off, or the cup isn’t level.
On a bare tumbler with marking compound, coat the area thinly and evenly, let it dry completely, and run a separate grid. Marking compounds generally need slower speeds and more power than powder coat. Rinse the compound off after engraving.
When the test looks right, put the real tumbler on, check the focus, run a frame at low power to see where the design lands, and engrave.
Step 6: Clean and finish
- Wipe off the residue. The burnt coating leaves a light haze on the bare steel. A damp melamine pad with light pressure lifts it out of the lines. Try it on the bottom first, since it can dull a glossy coat.
- Wash by hand in warm, soapy water and dry it. Leave the clear lid out of the scrubbing.
- Check the edges in daylight. Any line that’s still dull gets another light wipe.
The gift. A tumbler with a name or a small logo, the lid on, in a plain box with a card that says hand wash, looks finished. For a team or a family set, the same file and settings carry over to the rest of the pack.
What it costs in time: half an hour to set up the rotary the first time, half an hour to design and test, then a few minutes of engraving per cup. The tools for each step are below.
At a glance
6 picksAs an Amazon Associate I earn from qualifying purchases. If you buy through a link on this page we may earn a small commission, at no extra cost to you. How this works.
Cool Yoleb 20 oz Powder-Coated Tumblers, 12 Pack
Powder-coated cups the laser strips to bright steel, twelve of them so one can be the test.
Most of the engraved tumblers on social media are not engraved steel at all. They’re powder-coated cups where the laser burned the paint off in the shape of a name, leaving a bright steel line on a matte color. That’s the easiest and highest-contrast result a desktop diode can get on a tumbler, and it starts with a cup that has a good, even coat.
A dozen identical cups makes the first project far less stressful. One becomes the test piece, the settings that work on it transfer to the other eleven, and a batch of matching gifts or a team set is already in the box.
Pro tip Engrave a small test mark on the bottom edge of one tumbler before anything else. If the coating comes off cleanly there, the same settings work on the side; if it bubbles or leaves a dark film, adjust before you touch the gift side.
Why we like it
- ✓Powder coated, which a blue diode removes cleanly to bare steel — the listing names laser engraving as a use
- ✓12 identical tumblers, so the first one can be a test piece and the settings carry over to the rest
- ✓Double-wall vacuum-insulated stainless steel; 6 hours hot and 12 hours cold per Cool Yoleb
- ✓Clear BPA-free lid with a slide closure
- ✓3.4 in (86 mm) diameter, inside the range of common roller rotaries
Keep in mind
- !Tapered body, wider at the top — it has to be shimmed level on a roller rotary
- !Black only in this pack (other colors are separate listings), and the brand is small
- !Plastic lid; hand-washing is the safe choice for an engraved, coated cup
- Capacity
- 20 oz
- Size
- 3.4 in diameter × 7.5 in tall
- Body
- Double-wall vacuum-insulated stainless steel, black powder coat
- Lid
- Clear AS plastic, BPA-free
- Count
- 12 tumblers with lids
Brilliance Laser Inks Black Metal Marking, Liquid Ready, 120 ml
A marking compound for plain stainless, where a blue diode can't leave a mark on its own.
A blue diode laser reflects off bare stainless steel more than it marks it. The usual workaround is a marking compound: a thin coat goes on the steel, the laser heats it, and the compound bonds to the metal as a black mark wherever the beam passed. Everything else washes off.
That turns an unpainted or brushed steel tumbler into something a diode can personalize, with a dark line instead of the bright one you get on powder coat. It’s the option for a tumbler that’s already been bought, or for anyone who wants the plain steel look.
Pro tip The coat has to be even and fully opaque, but thin. Brush it on in one direction, let it dry completely, and hold the tumbler up to a light: any streak you can see through becomes a gap in the mark.
Why we like it
- ✓Gives a black mark on bare stainless, aluminum, brass and copper, which a blue diode can't mark well on its own
- ✓Pre-measured powder in the bottle — add denatured alcohol to the line and shake
- ✓Foam brush included for a thin, even coat
- ✓Dries in a few minutes, faster with a heat gun or hair dryer, per Brilliance
- ✓Excess rinses or wipes off after the job
Keep in mind
- !The listing says diode lasers from 10 W, but the label on the bottle lists only CO2, fiber and YAG — expect to test speed and power on a scrap first
- !Results depend on the metal grade and how evenly it's applied, which Brilliance says too
- !An extra step on every tumbler — coat, dry, engrave, wash
- Form
- Powder, mixed with denatured alcohol
- Color
- Black
- Volume
- 120 ml (4.1 fl oz)
- Metals
- Stainless steel, aluminum, brass, copper, pewter
- Lasers (per listing)
- CO2 25 W+, fiber/YAG 10 W+, diode 10 W+
- Included
- Foam brush
- Model
- BLI101MBLIQ
ACMER S2 20W Laser Engraver with Air Assist
A 20 W open-frame diode with air assist, with the power to clear powder coat quickly.
A blue diode doesn’t engrave stainless steel so much as remove what’s on top of it. On a powder-coated tumbler the laser burns the coating away and the bare steel underneath becomes the design, so what matters is having enough power to clear the coat cleanly without lingering. A 20 W module does that at practical speeds, and the included air pump keeps the burnt coating from settling back into the lines.
The open frame is what makes it work with a roller rotary. A 20 oz tumbler lying on rollers stands taller than a flat board, so the machine goes up on risers, the rotary sits underneath and the focus is set on the top of the cup.
Pro tip Before the first tumbler, measure from the bench to the bottom of the laser module, then from the bench to the top of a tumbler sitting on the rotary. The difference tells you how tall the risers need to be to reach the focus distance.
Why we like it
- ✓20 W optical output from a 455 ± 5 nm blue diode, the power class that clears powder coat quickly
- ✓25 L/min air assist pump included, which blows smoke and flakes of coating away from the lens
- ✓Open frame, so it can stand on risers over a roller rotary and a tumbler
- ✓300 × 285 mm (11.8 × 11.2 in) working area for flat work between tumbler batches
- ✓Limit switches for homing; free ACMER Studio software, plus other engraving software per ACMER
Keep in mind
- !Class 4 open frame — rated glasses for everyone in the room, and it never runs unattended
- !Arrives as a kit to assemble, with no camera, enclosure or fume extraction
- !The listing doesn't name a rotary or LightBurn, so check the rotary port and software setup with ACMER before buying a third-party roller
- Laser
- 20 W optical, 455 ± 5 nm blue diode
- Spot size
- 0.09 × 0.1 mm
- Working area
- 300 × 285 mm (11.8 × 11.2 in)
- Max speed
- 10,000 mm/min
- Air assist
- 25 L/min pump, included
- Files
- NC, DXF, BMP, JPG, PNG
- Software
- ACMER Studio (free), others per ACMER
- Warranty
- 1 year
Ortur Laser Rotary Roller (YRR 2.0)
A two-roller rotary that turns cups from 8 to 110 mm across under the laser.
A flat-bed laser moves in X and Y. A rotary takes over the Y axis: instead of the head moving forward and back, the rollers turn the cup underneath it, so a design can wrap around the side. The laser doesn’t know the difference, it just sends the same Y moves, and the software converts them into turns of the roller.
Rollers suit tumblers better than a chuck does. The cup lies on two rubber wheels with nothing pressing on the coating, it goes on and comes off in seconds, and the same jig takes a 12 oz skinny tumbler and a 30 oz one by moving the second roller to another slot.
Pro tip Rubber rollers grip by friction, and friction drops when they’re dusty. Wipe them with a little isopropyl alcohol before a batch, and if a tumbler still slips, slow the engraving speed rather than adding weight.
Why we like it
- ✓Seven width settings for objects 8–110 mm (0.3–4.3 in) in diameter, which takes a 20 oz tumbler with room to spare
- ✓Rubber-covered rollers turn the object by friction, so there's no chuck to clamp a cup into
- ✓Plugs into the laser's Y-axis port and works with LightBurn and LaserGRBL per Ortur
- ✓Ortur says it fits other brands' machines too
- ✓Small and light (2.4 lb), so it stores on a shelf between jobs
Keep in mind
- !On other brands Ortur says the blue and green wires at one end of the cable may need swapping — check the pinout before plugging in
- !A roller only turns what rests on it; a tapered tumbler has to be shimmed level or the design slants
- !The laser has to be raised on risers to clear a tumbler on the rollers
- Object diameter
- 8–110 mm (0.3–4.3 in), 7 settings
- Drive
- Stepper motor, rubber-covered rollers
- Connection
- Laser's Y-axis port
- Software
- LightBurn, LaserGRBL
- Size
- 5.1 × 7.2 × 3.2 in
- Weight
- 2.4 lb
- Model
- Ortur YRR (2.0)
Laserlands OD 6 Laser Safety Glasses for Blue & Violet Lasers (TUB-F)
OD 6 glasses for the blue diode band; a round cup throws reflections everywhere.
A curved, shiny tumbler is the worst shape for stray reflections. A flat board scatters the beam’s reflection in roughly one direction; a round cup throws it in a fan around the room, and the side of a stainless rim is close to a mirror. On an open-frame diode, rated glasses for everyone in the room are not optional.
These are rated for the blue and violet band desktop diodes use, and the wraparound shape covers the sides of the eyes, where a reflection off the curve of a cup is most likely to come from.
Pro tip Keep the glasses in their case next to the laser’s power switch, not in a drawer. The rule is easy to keep when the glasses go on as the machine goes on.
Why we like it
- ✓OD 6 at 405 and 450 nm, listed for 445 and 473 nm lasers as well
- ✓OD 4 across the wider 190–500 nm band per the listing
- ✓Wraparound polycarbonate lenses in a full-rim frame cover the sides, where reflections off a round cup go
- ✓Comes with a case
Keep in mind
- !Not for CO2 (10,600 nm), fiber or 1064 nm infrared lasers
- !OD 6 is stated at specific wavelengths; check that the 455 nm of some diode modules is inside the rating you rely on
- !Short 3-month warranty, and the amber tint hides the real color of the mark — judge tests with the laser off and the glasses off
- Protection
- OD 6 at 405/450 nm, OD 4 at 190–500 nm (per the listing)
- Listed lasers
- 405, 445, 450, 473 nm
- Lens / frame
- Amber polycarbonate, plastic full-rim frame
- Included
- Case
- Model
- TUB-F
Mr. Clean Magic Eraser Extra Durable, 12 Count
A damp melamine pad lifts the burnt-coating haze out of the lines.
When the laser strips powder coat, some of the burnt coating settles back as a gray or brown film on the bare steel and the edges of the lines. It wipes off, but a cloth tends to skate over the narrow grooves. A damp melamine pad reaches into them and lifts the film without any cleaner on the coating.
Light pressure is enough. The aim is a bright steel line with crisp edges; scrubbing hard only risks wearing a shiny patch into the matte coat around it.
Pro tip Cut a pad into four small blocks. A corner of a small block fits the letters and lasts longer than working with the whole pad, and the rest stay dry for the next tumblers.
Why we like it
- ✓Works with water alone, so no solvent touches the powder coat
- ✓Melamine foam gets into engraved lines that a cloth slides over
- ✓The Extra Durable version is made to crumble less, per Mr. Clean
- ✓12 pads, enough for a batch of tumblers and the shop's other messes
Keep in mind
- !Melamine is a fine abrasive — it can dull a glossy powder coat, so test it on the bottom of the cup first
- !Not for the clear plastic lid, which it can haze
- !Each pad wears down as it's used
- Material
- Melamine foam
- Count
- 12 pads
- Use
- Wet with water, squeeze, wipe
- Scent
- Unscented