Make a Keychain From Your Kid's Drawing
A crayon drawing turned into a real keychain in the same bright colors — a handmade gift for grandparents, parents or teachers, in six steps.
Published October 4, 2026 · 6 picks
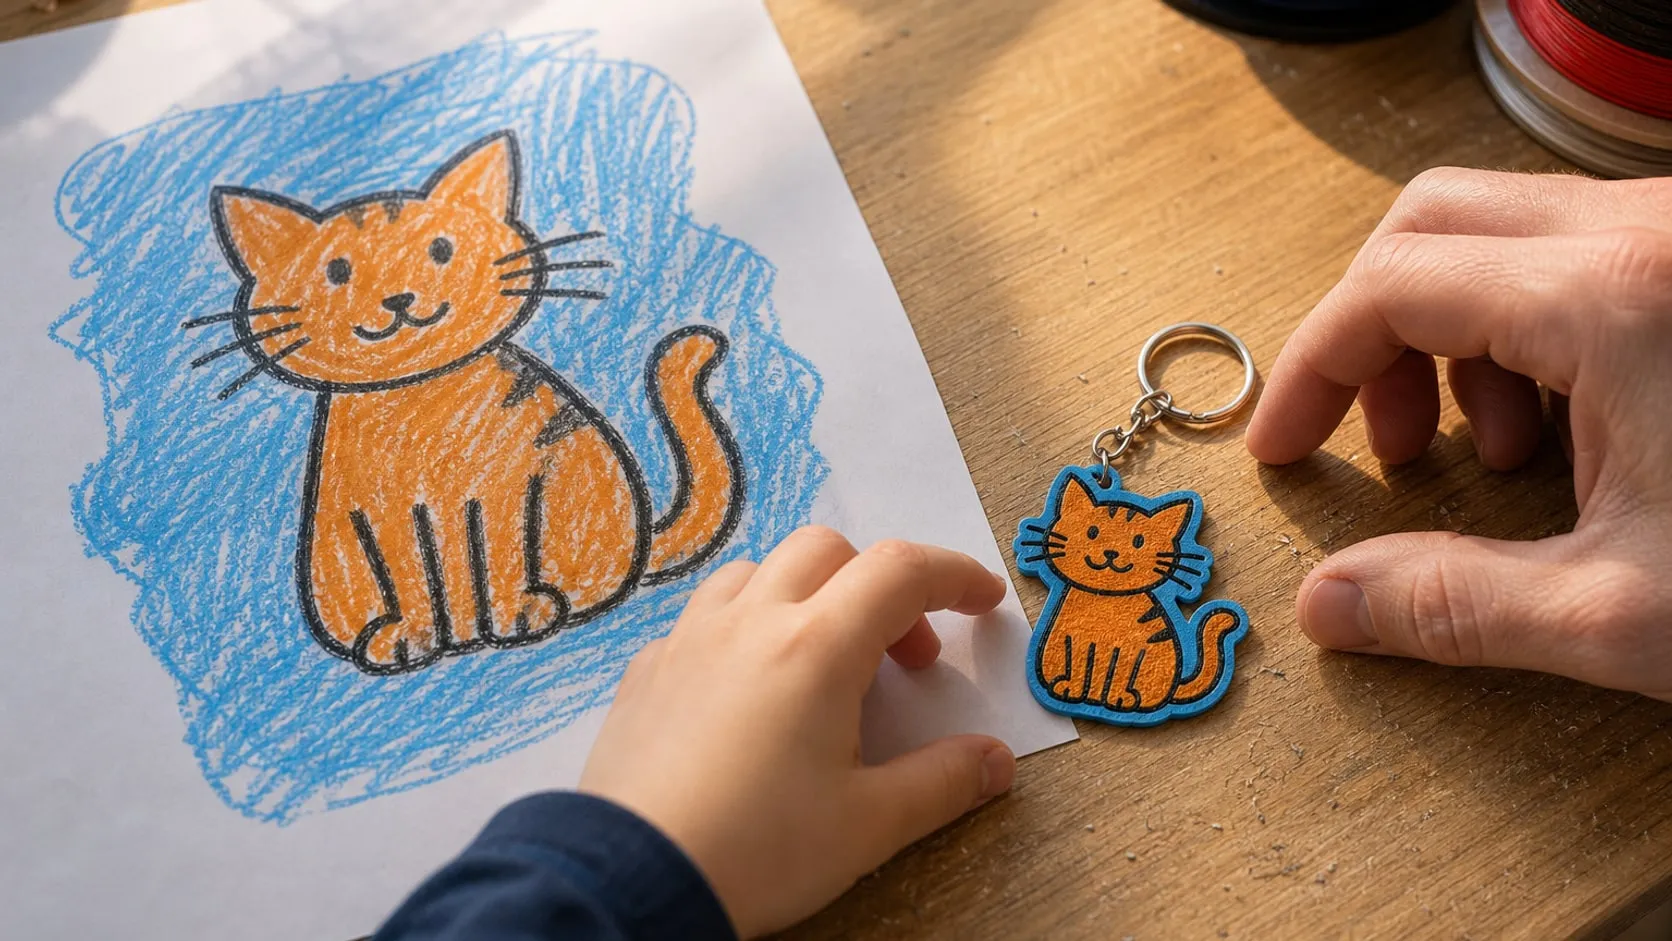
Every parent has a drawer full of drawings: a lopsided cat, a family of stick people, a dinosaur with too many legs. Turned into a keychain, one of them goes from the fridge door to someone’s pocket, in the same colors the kid picked. It’s a gift that works for almost anyone: grandparents, the other parent, an aunt, a teacher at the end of the year. And the kid gets to say “I made that”. Here’s the whole process, with the tools for each step below.
Step 1: Get the drawing ready
A keychain is about 2 in (50 mm) across, so the drawing gets much smaller. Simple and bold works best.
- Thick, closed outlines. Ask for the outline in a black marker, not pencil, with no gaps where colors meet.
- Few colors. Four is easy on a multicolor printer; each extra color adds time.
- Skip the tiny details for now. Whiskers and eyes that would end up thinner than 1 mm get added later with a paint pen.
- Scan it, or photograph it flat in daylight, straight from above, with no shadow from the phone.
Step 2: Turn the drawing into a 3D file
The drawing has to become a vector file (SVG) first: clean shapes instead of pixels.
- Trace it. Free tools such as Inkscape (Trace Bitmap) or any online image-to-SVG converter turn the photo into one shape per color. Clean up stray specks; they’d print as crumbs.
- Give it depth. Import the SVG into Tinkercad or straight into your slicer (most current slicers import SVG). A good starting point: a 3 mm base in the outline color, with the colored areas raised 0.6–1 mm on top.
- Add the hole. At least 5 mm wide and 3 mm from the edge, on a solid part of the drawing, never a thin arm or tail.
Keep the original drawing safe. It’s part of the gift.
Step 3: Print it in color
On a multicolor printer, assign one filament to each color in the slicer and let it switch on its own. On a single-color printer you can still do it: design the colors as separate layers and add a color change (pause) at the height where each one starts, then swap the filament by hand.
- 0.2 mm layers and a clean, level bed — the whole design lives in the first few layers.
- Lay it flat, drawing side up. No supports needed.
- Fill the plate. Printing ten keychains takes little more time than printing two. Make one for every grandparent.
Step 4: Clean up the edges
The first layer often leaves a thin, sharp lip around the bottom edge. Run a sanding stick along it, and through the ring hole, until nothing catches on a fingertip. Sand only the edges and the back; sanding the top smears the colors.
Step 5: Add the small details
Now add what was too thin to print: eyes, a smile, whiskers, the kid’s initials or the year on the back. Water-based paint pens are safe for kids to use, so let the artist finish their own work. Rub the area lightly with fine sandpaper first so the paint grips, let it dry overnight, and seal it with a thin clear acrylic spray. A keychain gets handled every day.
Step 6: Attach the ring
Twist the small jump ring open sideways with two pliers, one on each side of the gap. Don’t pull it apart into an oval. Hook it through the hole and the chain, then twist it closed until the ends meet flush.
A few safety notes: keychains with small metal rings are not toys for children under three. PLA softens at around 140 °F (60 °C), so a keychain left on a car dashboard in summer can bend.
What it costs in time: half an hour to trace and set up the drawing, one to a few hours of unattended printing, depending on the number of colors and keychains, and an evening for paint and rings. Wrap it with the original drawing, folded small, in the same box. The tools for steps 3 to 6 are below.
At a glance
6 picksAs an Amazon Associate I earn from qualifying purchases. If you buy through a link on this page we may earn a small commission, at no extra cost to you. How this works.
Anycubic Kobra X Multicolor 3D Printer (4-Color)
Four colors loaded at once, so the outline and fill print in one go.
A kid’s drawing is usually a few flat colors inside a dark outline, which is exactly what a multicolor printer is good at. Each color in the drawing becomes one filament, and the printer switches between them on its own while the keychain is printing. With four colors loaded, most drawings fit without simplifying them.
The Kobra X carries its four spools on a holder on top of the frame, so it doesn’t need extra desk space for a separate color box. Auto leveling matters more than it sounds for keychains: they’re thin, flat prints where the whole design is in the first few layers.
Pro tip Fill the plate. Ten keychains with the same four colors take barely longer than two, because the printer changes color once per layer for the whole plate, not once per keychain. Print extras for grandparents, aunts and uncles.
Why we like it
- ✓Four colors built in, no separate color unit needed to start
- ✓Expandable to more colors with extra ACE 2 Pro units, Anycubic says
- ✓260 × 260 × 260 mm (10.2 in) build volume — a whole plate of keychains in one go
- ✓Auto bed leveling (LeviQ 3.0) with 49-point calibration
- ✓Wi-Fi and app control, with a camera that watches for failed prints
Keep in mind
- !Not compatible with the older ACE Pro color unit, only the ACE 2 Pro — check before reusing old gear
- !Every color change still costs a little purge filament and time; a four-color keychain prints slower than a one-color one
- !A newer model with fewer reviews than long-running printers
- Colors
- 4 built in
- Build volume
- 260 × 260 × 260 mm
- Max speed
- 600 mm/s
- Nozzle
- Hardened steel, up to 300 °C
- Leveling
- LeviQ 3.0, automatic
- Materials
- PLA, PETG, TPU, PVA, ASA
- Connectivity
- Dual-band Wi-Fi (2.4/5 GHz), LAN
SUNLU PLA Filament 1.75 mm, 8 × 250 g Color Bundle
Eight bright crayon-box colors on small spools.
Kids don’t draw in “matte charcoal” and “sage green”. They draw in red, yellow and sky blue, and the keychain looks right when the plastic matches the crayons. A bundle of small spools gives you a full set of bright colors without buying a kilogram of each.
A keychain uses only a few grams of filament, so a 250 g spool lasts a long time. The white is useful as a base layer under lighter colors, so yellow and cyan don’t look dull over a dark backing.
Pro tip Hold the drawing next to the spools before you assign colors in the slicer. Pick the closest match by eye in daylight; the color names on the spool rarely match the names a kid would use.
Why we like it
- ✓Eight colors — white, red, orange, yellow, green, blue, cyan and purple
- ✓250 g spools — plenty for dozens of keychains in each color
- ✓±0.02 mm diameter tolerance
- ✓Works with standard PLA profiles
Keep in mind
- !No black in this set, and most drawings have a black outline — add a black spool separately
- !Small 140 mm spools may need an adapter on some multicolor holders; the listing itself says so for Bambu's AMS
- Material
- PLA
- Diameter
- 1.75 mm ± 0.02 mm
- Spools
- 8 × 250 g
- Colors
- White, red, orange, yellow, green, blue, cyan, purple
- Spool size
- 140 mm diameter, 36 mm wide, 53 mm hole
Honoson Sanding Sticks, 20 Pieces, 80–12000 Grit
Thin sticks for the sharp first-layer edge and the ring hole.
A printed keychain usually comes off the plate with one sharp spot: the first layer, which spreads a little and leaves a thin lip around the edge. That lip is what catches on pockets and scratches fingers. A few strokes with a sanding stick along the bottom edge take it off.
The pointed end also fits inside the ring hole, which is often the roughest part of the print. Smooth it so the jump ring turns freely and doesn’t wear through the plastic.
Pro tip Sand only the edges and the back. The top of a multicolor keychain is the drawing itself, and sanding it smears the colors and dulls the surface.
Why we like it
- ✓Grits from coarse 80 to very fine 12000 in one set
- ✓Each stick is labeled with its grit
- ✓Thin, angled shape reaches into tight corners and small holes
- ✓Use wet or dry
Keep in mind
- !The finest grits polish rather than remove — on PLA you'll mostly use the lower half of the set
- !Sticks wear down quickly on the coarse end
- Pieces
- 20
- Grit range
- 80–12000
- Shape
- Double angle
- Use
- Wet or dry
- Model
- YL-Honoson-2918
POSCA PC-3M Paint Markers, Fine Tip, 8 Colors
Fine paint pens for eyes, smiles and lines too thin to print.
Some lines in a drawing are thinner than a printer can make: whiskers, a smile, the shine in an eye. Those are better added with a paint pen after printing. A fine tip works like a felt marker, so it’s a natural tool for a kid who wants to finish their own keychain.
The paint is opaque, so white over a black outline or yellow over blue actually shows. Let each color dry before the next one touches it.
Pro tip Rub the painted area once with fine sandpaper (or the 400 grit stick) before painting. A slightly rough surface holds the paint much better than glossy PLA. Finish with a thin clear acrylic spray once it’s fully dry.
Why we like it
- ✓Fine 0.9–1.3 mm reversible tip
- ✓Eight colors — white, yellow, pink, red, blue, light blue, green and black
- ✓Water-based and ACMI-certified non-toxic, so kids can add their own details
- ✓Opaque paint covers over dark plastic
Keep in mind
- !On smooth PLA the paint can rub off with daily use — seal it with a clear coat on a keychain
- !The pen needs shaking and pumping before the first use, or the tip floods
- Tip
- Fine, reversible, 0.9–1.3 mm
- Colors
- 8
- Ink
- Water-based acrylic paint
- Model
- PC3M8C
KINGFOREST Split Key Rings with Chain and Jump Rings, 1 in, 50 Sets
Split rings with chain and jump rings, fifty sets in one bag.
A printed keychain needs three bits of metal: a split ring for the keys, a short chain, and a small jump ring that goes through the hole in the print. This kit has all three, so there’s nothing to match or measure.
Fifty sets is more than one drawing needs, but once a kid sees their drawing on a keychain, there are usually more drawings coming. The extra rings also work for bag tags and zipper pulls.
Pro tip Design the hole in the print at least 5 mm wide and 3 mm from the edge. A hole closer than that can snap off the first time the keychain drops.
Why we like it
- ✓50 key rings with chain, plus 50 separate open jump rings
- ✓1 in (25 mm) ring, a standard keychain size
- ✓Short 1.1 in chain lets the keychain hang and swing freely
- ✓Polished nickel finish
Keep in mind
- !The 0.4 in jump ring needs a hole of at least about 4 mm in the print
- !Nickel-plated, not stainless — the finish can wear on a keychain used every day
- Sets
- 50 rings with chain + 50 jump rings
- Ring diameter
- 1 in (25 mm)
- Chain length
- About 1.1 in
- Jump ring
- 0.4 in (10 mm)
- Material
- Nickel, silver finish
URSKYTOUS Jewelry Pliers Set, 4 Pieces
Smooth-jawed pliers to twist jump rings open and closed cleanly.
A jump ring is the weak link in a keychain if it’s opened the wrong way. Pulled apart sideways into an oval, it never closes properly and slips off. Twisted open with two pliers, one on each side of the gap, it closes flush again.
The chain nose and bent nose pliers in this set are the pair for that job. The round nose pliers and the cutter are useful for wire loops and charms later.
Pro tip Open the ring like a door, not like a mouth: one pliers pushes away from you and the other pulls toward you. Close it the same way, then wiggle it back and forth a little past closed so the ends press together.
Why we like it
- ✓Four tools — chain nose, round nose, bent nose pliers and a wire cutter
- ✓Smooth jaws without teeth don't mark the ring
- ✓Small size suits small parts
- ✓Steel jaws with ergonomic grips
Keep in mind
- !Light-duty craft pliers — not for workshop wire or heavy gripping
- !For keychains you'll mostly use two of the four
- Pieces
- 4
- Tools
- Chain nose, round nose, bent nose pliers, wire cutter
- Jaws
- Steel, smooth
- Size
- About 4.9 in