3D‑Print A Modular Cat Wall Climbing System
Printed PETG brackets, solid wood steps, sisal and grip pads — a cat wall you can rearrange, with the steps and the parts for each one.
Published October 4, 2026 · 6 picks
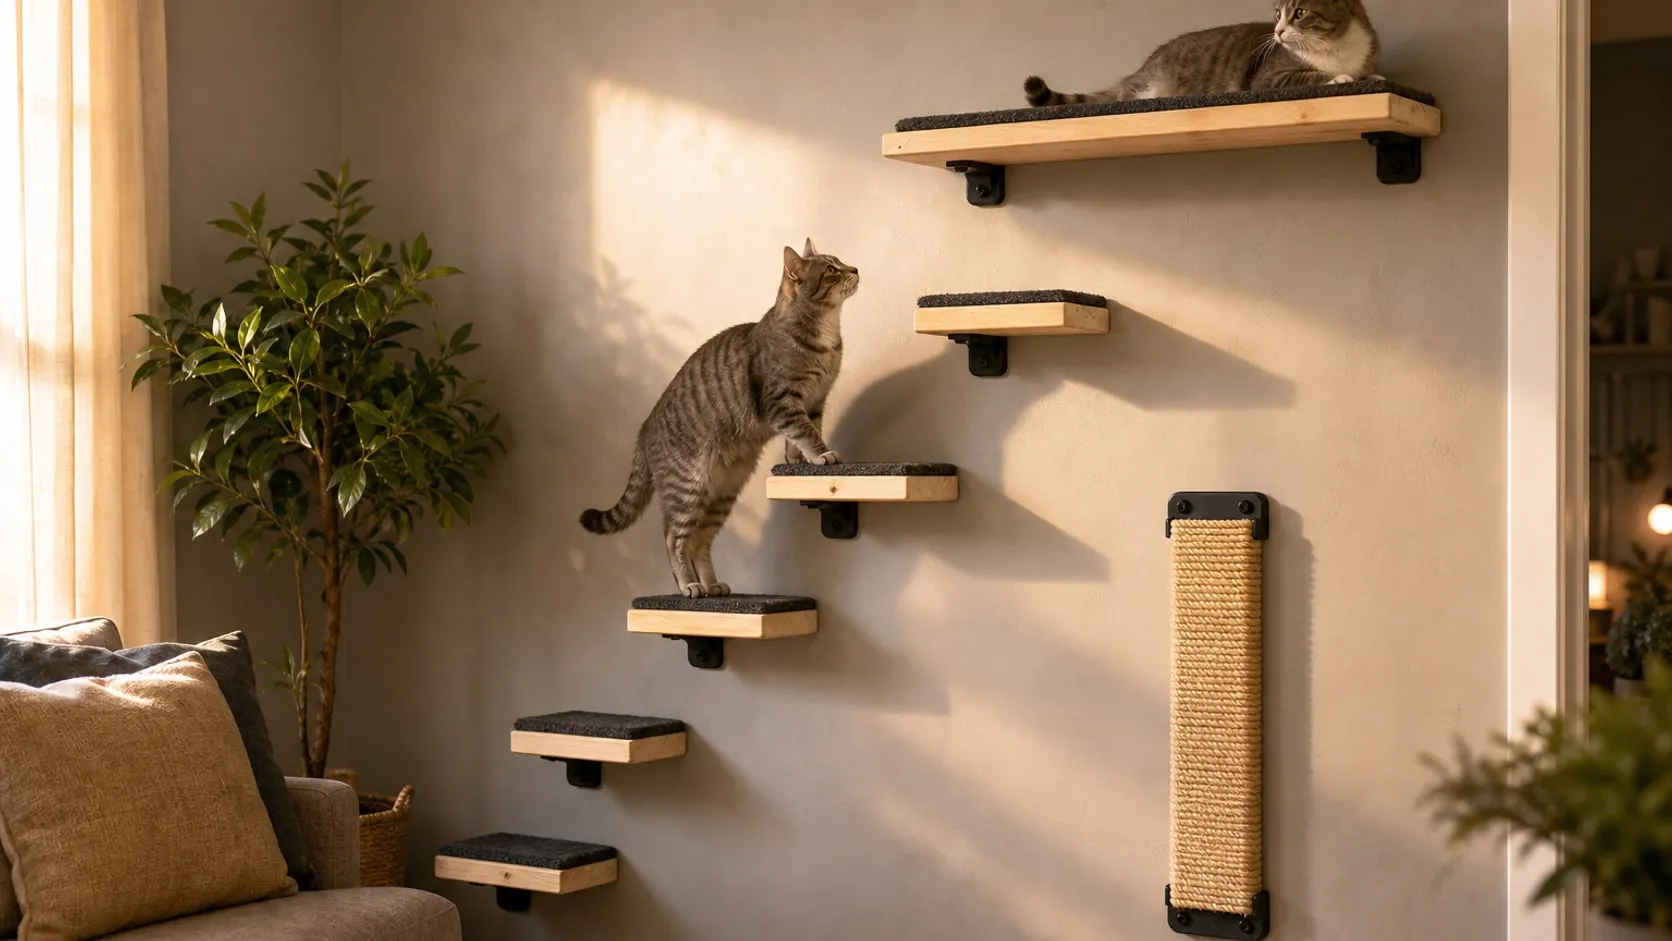
Cat walls, the shelves and steps that let a cat climb, perch and patrol above the floor, are one of the most shared “catification” projects this fall, and they suit small apartments especially well: the cat gets vertical space and you keep the floor. A printer makes the project modular. Brackets, step clips and rope holders are printed parts, so adding a step, moving a perch or changing the route is a reprint and a couple of screws instead of a new set of shop-bought shelves. Here’s the whole build, step by step, with the parts for each step below.
Step 1: Plan the route on the wall
Draw the wall first, before you print anything. Tape paper rectangles to the wall where each step would go and look at it as a staircase: the cat has to be able to go up and down the same route.
- Find the studs. Mark them with a stud finder and pencil. Every main perch and the top landing go on studs; only small steps go on anchors.
- Keep the gaps short. Steps about 12–18 in (30–45 cm) apart, both up and sideways, suit most cats. Older, heavier or very young cats need smaller gaps.
- Plan a way down. Cats often get onto a high shelf and won’t jump back. Every high point needs a step below it that’s reachable without a long drop, and nothing should end in a dead end.
- Leave landing room. Keep the first step away from sharp furniture corners, TVs, lamps and anything breakable below the route.
- Height under the ceiling. A top perch needs at least 12 in (30 cm) of headroom so the cat can turn around.
Step 2: Print the brackets and clips
MakerWorld, Printables and Thingiverse have cat-shelf brackets, step mounts and rope holders; search for designs made for the thickness of your boards. Print everything structural in PETG rather than PLA. PETG flexes a little before it cracks, and it doesn’t creep under a constant load in a warm room.
- Walls, not infill. Use 5–6 perimeters and 40%+ infill for brackets. A thick-walled bracket is much stronger than a thin one with 100% infill.
- Orient the layers along the load. Lay a bracket on its side so the layers run along the arm. A bracket printed standing up can split between layers when a cat lands on the end.
- Countersink the holes. Flat-head screws should sit flush; a raised head can crack the plastic as it pulls down.
- Print one and break-test it before you print the set (see Step 7).
Printed brackets suit short steps, up to around 12 in (30 cm) wide and 8 in deep, with two brackets per step. For the long main perches, use a steel bracket, either the one hidden in a floating shelf or a printed cover over a steel angle bracket.
Step 3: Prepare the boards
Thick solid wood is the simplest board for a cat wall: it doesn’t sag, and it holds screws well. Cut long boards into short steps if you want more of them, sand the cut ends and round over every corner and edge a cat could hit.
Finish the boards before assembly. A water-based clear finish or a pet-safe hardwax oil protects the wood from claws and cleaning; let it cure fully (check the can, often several days) before the cat uses the wall.
Then fix the printed brackets to the underside of the step boards with short wood screws. Drill pilot holes so the wood doesn’t split, and drive the last turn by hand so the screw doesn’t crack the print.
Step 4: Mount the steps on the wall
- On a stud: use two structural wood screws, 2-1/2 in (64 mm) or longer, per bracket into the stud. This is where the main perches and the top landing go.
- Between studs: use a steel toggle anchor such as SNAPTOGGLE for each bracket screw. Not plastic expansion anchors, and not self-drilling drywall anchors.
- Check for pipes and cables. Don’t drill directly above or below outlets and switches, and if you’re unsure what is behind the wall, use a wire and pipe detector before drilling.
- Use a level. A step that tilts even slightly forward is a slide, not a step.
If you rent, check your lease first: a cat wall means a few holes per step. Toggle anchor holes are larger than picture-hook holes and need a little more patching when you move out.
Step 5: Add the scratching surfaces
A cat wall that only goes up gets less use than one that also scratches. Wrap sisal rope tightly around a vertical post or board next to the first step, or around the front edge of a low step, and glue it every few turns, not just at the ends. A small printed clamp at each end keeps the rope from unravelling and looks neater than a blob of glue.
Place the scratching surface at the bottom of the route. Cats often scratch right before or after a climb, and a vertical post at the start gives that habit a target that isn’t the sofa.
Step 6: Add grip and comfort
Finished wood is slippery. Cover the top of every step and perch with a thin self-adhesive carpet pad cut slightly smaller than the board, with rounded corners. On the main perches, add a removable cushion or a felt or sheepskin pad: the shelf the cat lies on is not the same as the step it jumps on. Keep cushions attached with hook-and-loop strips so they can’t slide off the edge with the cat on them.
Step 7: Load-test before the cat moves in
- Test one printed bracket to failure on a spare board on the bench. If it breaks at a load you can easily push with one hand, change the design or the print settings before printing the rest.
- Lean on every step. Press down hard on the front edge of each mounted step with your hand, far harder than a cat weighs. Anything that moves, creaks or flexes gets fixed now.
- Watch the first week. Let the cat find the route, and check the screws and anchors after a few days of use. Re-tighten anything loose, and check again every few months.
Introduce the wall with treats or a toy on the lowest steps, and let the cat take it at its own pace. Some cats run up on day one, others take a week.
What it costs in time: an evening to plan and mark the wall, a day or two of printing for brackets and clips, an afternoon to cut, sand and finish the boards (plus curing time), and an afternoon to mount, wrap and test. The parts for each step are below.
At a glance
6 picksAs an Amazon Associate I earn from qualifying purchases. If you buy through a link on this page we may earn a small commission, at no extra cost to you. How this works.
ELEGOO PETG Filament, 1.75 mm, 1 kg, Black
Tougher and less brittle than PLA for brackets a cat lands on.
A printed cat-wall bracket has a harder job than most prints: it holds a board, and a few times a day a cat lands on that board from a jump. PLA is stiff but brittle, and it creeps under a constant load in a warm room. PETG is the usual step up. It gives a little before it breaks, and it holds its shape near a radiator or a sunny window.
A 1 kg spool covers a set of brackets, end caps and rope clips for a small wall, with spare for a test print or two. Black disappears in the shadow under a shelf; the same listing has lighter colors if your wall is white.
Pro tip Strength in a printed bracket comes from walls, not infill. Print load-bearing parts with 5–6 perimeters and lay them on the bed so the layers run along the arm of the bracket, not across it, so the load never tries to peel layers apart.
Why we like it
- ✓PETG flexes a little before it cracks — better than PLA for a part a cat lands on
- ✓Good layer adhesion, ELEGOO says — the weak point of any printed bracket
- ✓±0.02 mm diameter tolerance; dried and vacuum sealed before packing
- ✓Many colors on the same listing to match a wall or a wood tone
Keep in mind
- !Strings more than PLA; expect to tune retraction or clean wisps off the parts
- !Absorbs moisture once opened — dry it before a long batch of structural parts
- Material
- PETG
- Color
- Black
- Diameter
- 1.75 mm ± 0.02 mm
- Weight
- 1 kg
- Part number
- CA-EL-3D-PEB01
Homeforia 24 in Solid Pine Floating Shelves, Unfinished (Set of 2)
Thick solid pine with a hidden steel bracket for the main perches.
A cat wall needs a few boards that can take a real landing, and solid wood is the simplest answer. These are thick pine slabs with a steel bracket that slides into the back. Screwed into studs, they make a solid main perch. The same boards also work on your own printed brackets if you’d rather have a visible, modular look.
At 24 in long, each board can reach two studs on standard 16 in stud spacing, which matters more for a cat wall than for a shelf of books. The listing’s 50 lb rating is a static load. A cat jumping on is a sudden one, so mount the main perches into studs, not into drywall alone.
Pro tip Seal the boards with a water-based clear finish and let it cure fully before the cat moves in. Then stick a carpet or sisal pad on the top surface: bare finished wood is slippery for a landing cat.
Why we like it
- ✓Solid pine, 1.75 in thick — no sag over 24 in and plenty of wood for screws
- ✓Hidden steel bracket, screws and anchors in the box
- ✓Rated for 50 lb per shelf when screwed into studs, Homeforia says
- ✓Bare sanded wood — finish it to match the room
Keep in mind
- !Only 6.5 in deep — fine as a step, tight as a place to lie down for a large cat
- !Raw pine can take stain unevenly; test on the back edge first
- Size
- 24 × 6.5 × 1.75 in (61 × 16.5 × 4.4 cm)
- Material
- Solid pine, unfinished; steel bracket
- Pieces
- 2
- Rated load
- 50 lb per shelf (into studs)
- Model
- WDUNFN04-2
FIXLINK
Flat-head screws that fix the boards to printed brackets without poking through.
Every printed bracket has two jobs: hold on to the wall and hold on to the board. These screws are for the second. A #8 × 1-1/4 in flat-head screw goes through a typical printed bracket arm and well into a thick board without coming out of the top, and the black finish stays out of sight under the shelf.
Design or choose brackets with countersunk holes, so the screw head sits flush and pulls the plastic down evenly instead of cracking it. Drive the last turn by hand; a drill on full torque can split a print.
Pro tip Drill a small pilot hole in the board (about 1/8 in for #8 in pine). The screw then pulls the bracket tight to the board instead of pushing the two apart.
Why we like it
- ✓#8 × 1-1/4 in — a common size for screwing through a printed bracket into a board
- ✓Flat (countersunk) head sits flush in a countersunk hole in the print
- ✓Black e-coat hides under a dark shelf or bracket
- ✓115 screws — plenty for a whole wall and spares
Keep in mind
- !Phillips drive cams out more easily than Torx or square drive
- !Too short for mounting into studs — that needs 2-1/2 in or longer structural screws
- Size
- #8 × 1-1/4 in
- Head
- Flat, Phillips
- Material
- Carbon steel, black e-coat
- Pieces
- 115
TOGGLER SNAPTOGGLE Drywall Anchors with Bolts (12 Pack)
Steel toggle anchors for the small steps that can't land on a stud.
Studs rarely fall exactly where a cat wants the next step. For the small steps between the main perches, a toggle anchor is the strongest common option for hollow drywall. Plastic expansion anchors and self-drilling screws are fine for picture frames, not for something a cat pushes off from a dozen times a day.
SNAPTOGGLE’s steel channel flips behind the drywall and is held there by plastic straps, so you can bolt a bracket on, take it off to rearrange the wall, and bolt it back. For a modular system that changes over time, that matters.
Pro tip Use anchors for the small steps only. Put every main perch, and anything a cat jumps down onto from above, on studs. TOGGLER publishes failure loads, not working loads, and a landing cat hits much harder than its weight.
Why we like it
- ✓A steel channel spreads the load across the back of the drywall
- ✓The anchor locks in place before the bolt goes in — remove a shelf and the anchor stays
- ✓Fits walls from 3/8 to 3-5/8 in thick, TOGGLER says
- ✓Made in the USA
Keep in mind
- !Needs a larger hole than a plastic anchor, so moving a step leaves a bigger patch
- !The listing mixes sizes and load figures across variants — check the bolts that arrive before planning loads
- Pieces
- 12 anchors + 12 round-head bolts
- Material
- Zinc-plated steel
- Wall thickness
- 3/8–3-5/8 in
- Part number
- 24200-Set 12
T.W. Evans Cordage Twisted Sisal Rope, 3/8 in × 100 ft
Natural 3/8 in sisal for a scratching post and wrapped step edges.
A cat wall with a scratching surface gets used for more than climbing. Cats scratch where they land, and a vertical sisal post next to the first step gives that habit a better target than the sofa. Sisal is the standard material because the rough fibers catch claws the way bark does.
Wrap it tight around a post or a board, or around the front edge of a step, and lock the ends with hot glue or a small printed clamp. At 3/8 in thick the rope is easy to wrap and gives claws a deep grip.
Pro tip Glue every few turns, not just the ends, and push each turn tight against the last one with a flat stick. A loose wrap slides down under scratching and leaves gaps where claws can catch.
Why we like it
- ✓Natural fiber, oil- and chemical-free, T.W. Evans says
- ✓3/8 in thickness — the usual size for scratching posts
- ✓100 ft wraps a long post or the edges of several steps
- ✓Model 22-410 from an established US cordage maker
Keep in mind
- !Sheds fibers, especially at first — vacuum around the wall for a while
- !Loose ends unravel; they need glue or a printed clamp to stay neat
- Material
- Sisal, twisted
- Diameter
- 3/8 in (about 9.5 mm)
- Length
- 100 ft (30 m)
- Model
- 22-410
SHENGOCASE Trimmable Self-Adhesive Carpet Pad for Cat Shelves, 78.7 × 15.8 in
Cut-to-size carpet so a landing cat doesn't slide off the wood.
A finished wood shelf is slippery for a cat. A landing that starts with a slide ends with a scramble, and some cats stop using a step after one bad jump. A thin carpet layer on top of each board fixes that, and it also keeps claws off the finish.
The roll is wide enough to cover a 6.5 in board from one strip, with the rest cut into pads for the small steps. Because it peels off cleanly, you can replace the pad on the most-used landing when it wears through, without touching the rest of the wall.
Pro tip Cut the pad a little shorter than the board on every side and round the corners. Square corners are the first to lift, and a cat will find any loose edge and pull it.
Why we like it
- ✓78.7 × 15.8 in — enough to cover several 24 in boards
- ✓Cuts with scissors to any shape, including around a printed bracket
- ✓Peels off without residue, SHENGOCASE says — swap a worn pad without sanding
- ✓Several colors on the same listing
Keep in mind
- !Thin (about 0.16 in) — grip, not cushioning
- !Adhesive alone may lift under heavy scratching; the listing itself recommends staples
- Size
- 78.7 × 15.8 in (200 × 40 cm)
- Thickness
- About 0.16 in (4 mm)
- Material
- Polyester carpet, self-adhesive back
- Color
- Dark gray