3D-Print a Layered City Map Night Light
Stacked, backlit layers of PLA turn the streets and water of a place you love into a glowing night light — the six steps and the parts for each one.
Published October 6, 2026 · 7 picks
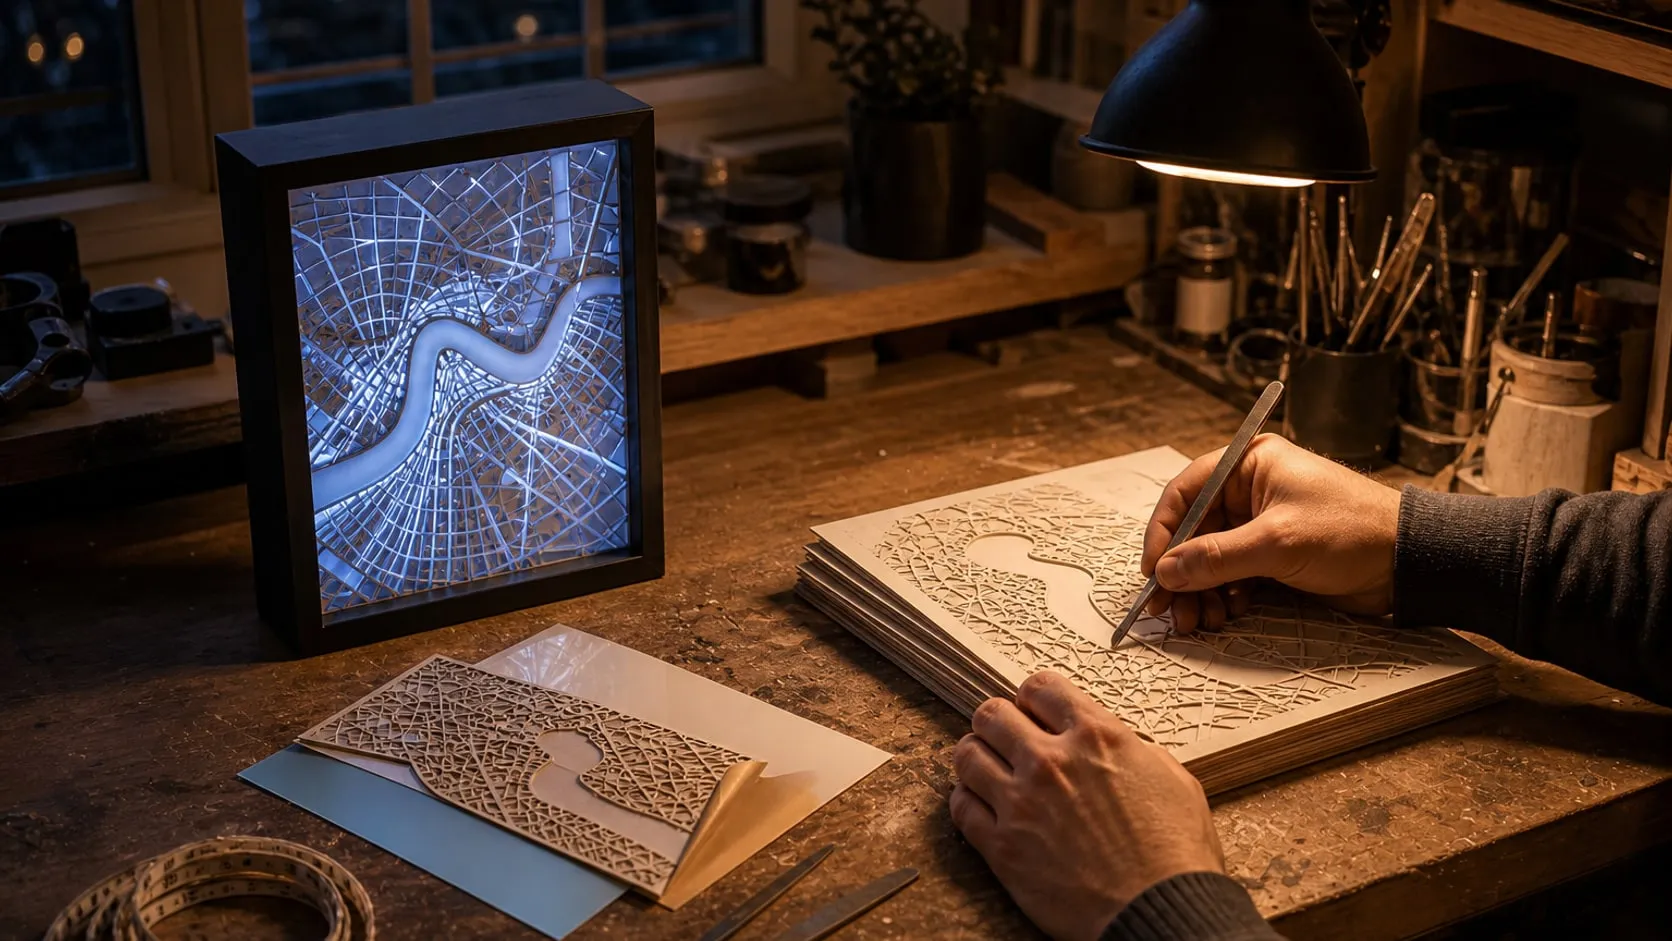
A layered map light is a stack of flat prints: the water and the glow in translucent plastic at the back, the land in matte white on top with the streets cut through, maybe a third layer for the parks or the blocks of the old town. Unlit, it’s a crisp white relief of a place. Switch it on and the river, the harbor and every street glow. It works for the obvious places, where you grew up, where you met, the first apartment, and it has almost no fiddly parts: every layer is a flat print, and the box is a store-bought frame. Here’s the whole process, with the parts for each step below.
Step 1: Pick the place and plan the layers
Choose an area where the water and the streets make a pattern you’d know at a glance: a coastline, a river bend, a harbor, an old town with a grid. Around 1–2 miles (2–3 km) across is a good size for an 8 × 10 frame; much bigger and the streets turn into noise.
Then get the layers:
- Ready-made models. Search “layered city map” or “city map night light” on MakerWorld and Printables. Designers publish popular cities as separate layer files, and many take requests.
- Your own place. Tools built on OpenStreetMap data, such as Cadmapper or the BlenderGIS add-on for Blender, export streets, buildings and water as separate outlines. Bring them into Fusion, or as SVG into Tinkercad, extrude each outline into its own 2–3 mm plate, and you have your layers.
Keep it to three or four layers: a glow plate at the back (translucent, full size), land with the water and the streets cut out, and an optional accent layer for parks, blocks or a small label with the name and coordinates. Every extra layer costs depth and light.
Step 2: Size it to the frame and your printer
Measure the inside opening of the frame and make the layers about 1/8 in (3 mm) smaller each way. A full 8 × 10 in layer is 203 × 254 mm, which only fits a 256 mm bed. On a 220 mm bed, print the map at 6 × 8 in (152 × 203 mm) and add a printed mat around it, or split each layer along a river or a main road, where the seam disappears.
In the slicer:
- 2–2.4 mm per layer, at 0.2 mm layer height. Thin enough to stack four, thick enough not to flex.
- Streets at least 1.5 mm wide. Narrower channels fill with first-layer squish and strings. Keep the main and secondary roads, drop the alleys.
- 100% infill on every layer. Backlight shows an infill pattern through white PLA like an X-ray.
- Smooth side out. The face that touched the build plate is the cleanest. Mirror the model if needed so that side faces the viewer.
Step 3: Print the layers
Each layer is one color, so a single-nozzle printer does the whole job; you change filament between plates. Matte white for the land reads like cut paper and hides layer lines on a big flat surface. The glow plate and the water go in translucent PLA: after a few stacked layers it comes out frosted, not clear, which is exactly what spreads the light evenly.
A full-size layer takes a few hours, and the whole stack is two or three plates, so run them overnight. Print a 2 × 2 in (5 cm) square of each filament first and hold it against the lit strip: it shows in a minute how each color glows at your thickness.
Step 4: Clean up and test-fit
Flat prints come off the bed with a small lip around the bottom edge and, in the narrow channels, strings and blobs. Run a round or square needle file through every street and along the water edges; a diamond file clears PLA quickly, and a brush clears the file. Then dry-stack the layers and hold the stack up to a window. Wherever daylight comes through is where the LEDs will glow.
If the model has no alignment built in, add it: the same outer outline on every layer, or two small pegs on one layer and matching holes in the next, so nothing drifts while the glue sets.
Step 5: Build the light box
Take the back board out of the frame. Inside, the box is 1.5 in (38 mm) deep, which splits like this from the back: about 3/4 in (20 mm) of air for the light to spread, the 1/8 in acrylic diffuser, then 3/8 in (10 mm) of map layers, then the glass.
- Light. Stick the COB strip around the inside walls, close to the back, LEDs facing in. The inside of an 8 × 10 frame is about 36 in (0.9 m) around, so cut the 1.5 m strip at the nearest marked cut point. File a small notch in the edge of the back board for the USB cable.
- Diffuser. Cut the acrylic to the opening: score it along a steel ruler with a plastic scoring knife and snap it over the edge of the bench, or use a fine-tooth saw. Print four corner blocks 3/4 in (20 mm) tall, glue them into the corners of the box and rest the acrylic on them.
- Check it. Plug the strip into a 5 V/2 A USB charger (the strip needs the full 2 A) and look at the acrylic. You want one even glow with no bright band along the edges. If the edges are hot, move the strip back or make the blocks taller.
No frame? Many map models come with a printed frame that has a channel for the strip and a slot for the diffuser. The steps are the same; you lose the glass and gain a few hours of printing.
Step 6: Stack, glue and finish
Glue the layers together with small dots of gel super glue at the corners and across the wide land areas, never along a street edge, where squeeze-out would show as a bright blob. The gel stays where you put it and sets in seconds, so align the layer first and press for half a minute. Keep glue off the glow plate wherever light passes: cyanoacrylate can leave a white haze on the plastic around a joint.
Set the finished stack on the acrylic (a dot of glue at each corner holds it), put the glass back or leave it out to avoid reflections, and close the frame. Then pick the color with the remote: a soft blue for the water, or warm white if you want it to look like paper. The strip remembers the last color and has a timer, which is what makes this a night light rather than a lamp.
What it costs in time: an evening to plan and slice the layers, a night or two of unattended printing, an afternoon for cleanup and assembly, and a day for the glue to fully cure. The parts for steps 3 to 6 are below.
At a glance
7 picksAs an Amazon Associate I earn from qualifying purchases. If you buy through a link on this page we may earn a small commission, at no extra cost to you. How this works.
OVERTURE Matte PLA Filament, 1.75 mm, 1 kg, Matte White
Matte white for the land and the streets — hides layer lines and looks like cut paper.
The land layers of a map light are large, flat and plain, so every layer line and every glossy highlight shows. A matte white PLA solves both: the surface scatters light instead of reflecting it, and the layer lines fade into a texture that looks like thick paper or an architect’s model. Against the glowing streets, that flat white is the whole look.
One kilogram covers a lot of layers: a full 8 × 10 in plate at 2.4 mm takes around 150 g, so a spool is good for a map light with a mat and spare plates for a second one. The same Overture line comes in light gray and black if you want a darker mat around the map.
Pro tip Print the land layer with the face that touched the build plate toward the viewer. On a textured PEI sheet it picks up a fine, even matte texture that looks better than any top surface the nozzle can draw.
Why we like it
- ✓Matte finish conceals layer lines on large flat surfaces, OVERTURE says
- ✓±0.02 mm diameter tolerance from closed-loop measuring during production
- ✓Good bed adhesion and easy brim removal — what a full-plate flat print needs
- ✓Same line in light gray, black and many colors for mats and accent layers
Keep in mind
- !Matte PLA blends tend to be more brittle than standard PLA — thin street bridges snap if you force a layer into place
- !White glows faintly under backlight at 2 mm — print land layers at 100% infill and at least 2.4 mm for crisp contrast
- Material
- PLA (matte)
- Color
- Matte White
- Diameter
- 1.75 mm ± 0.02 mm
- Weight
- 1 kg (2.2 lb)
- Shelf life
- 1 year unopened, OVERTURE says
- Part number
- OVFBC175
AMOLEN Crystal PLA Translucent Bundle, 1.75 mm, 4 × 200 g (Green, Pink, Orange, Blue)
Translucent PLA for the back plate and the water, the layer that actually glows.
In a layered map light, one layer does the glowing: the plate at the back that becomes the river, the harbor and the light behind every street. It has to let light through without showing the LEDs, and translucent PLA does exactly that. A single layer looks like colored glass; by the time you have ten of them stacked, the plate is frosted and the light coming through it is soft and even.
Small spools make sense here. A glow plate needs one color, an accent layer for parks or the old town another, and 200 g of each is enough for a full-size plate plus the test squares. Blue is the obvious water; the green and the orange are for the places where the map needs a second color.
Pro tip Print a 2 × 2 in (5 cm) square of each color at your layer thickness before the real plate, and hold them against the lit strip in a dark room. The look changes a lot between 1.6 and 2.4 mm, and a square costs minutes.
Why we like it
- ✓Four translucent colors in 200 g spools — try blue water and a green park without buying a kilogram of each
- ✓A few stacked layers come out frosted rather than clear, which is what spreads a backlight evenly
- ✓±0.02 mm diameter tolerance
- ✓The same listing has single colors, including a clear transparent, if you only need one
Keep in mind
- !A full 8 × 10 in plate at 2 mm takes around 130 g, so each 200 g spool covers one glow plate with a little to spare — not two
- !Translucent PLA shows every infill line when backlit, so these layers have to be printed at 100% infill
- Material
- PLA (translucent)
- Colors
- Green, Pink, Orange, Blue
- Diameter
- 1.75 mm ± 0.02 mm
- Spools
- 4 × 200 g (800 g total)
- Part number
- #1-3DPLATPBUPKORGN
LIBRATON 13-Piece Needle File Set (6 Steel, 6 Diamond, Brush)
Thin files that reach into the street channels where sandpaper can't.
A map layer is mostly edges: the outline of the water, hundreds of street channels, the corners of city blocks. Every one of them comes off the bed with a small lip from the first layer and, in the narrow channels, a string or a blob the nozzle dragged across. Sandpaper can’t get in there. A round needle file run once through a street clears it; a square file squares up a block; a flat one takes the lip off a long edge.
The set pairs steel files with diamond-coated ones. Diamond cuts PLA on the push and the pull, so the work goes fast, and the brush keeps the teeth of the steel files from clogging. Everything goes back into the pouch, which is what keeps a dozen thin files from becoming a drawer of loose spikes.
Pro tip File the street channels from the back of the layer, with the visible face down on a soft cloth. Any slip then marks the side nobody sees, and the lip you’re removing is on the back anyway.
Why we like it
- ✓Six shapes (round, half-round, square, flat, flat warding, triangle) in both steel and diamond
- ✓Diamond files cut in both directions and clear PLA quickly
- ✓Rubber-dipped handles, a cleaning brush and a canvas pouch included
- ✓Thin enough for the gaps between map streets, where sandpaper can't go
Keep in mind
- !Steel files load up with PLA fast — brush them out every few strokes
- !Diamond files are coarse for a visible face; use them inside the channels and finish edges with the steel files or fine paper
- Files
- 6 carbon steel + 6 diamond
- Shapes
- Round, half-round, square, flat, flat warding, triangle
- Handles
- Rubber-dipped, non-slip
- Also included
- Cleaning brush, canvas pouch
- Weight
- 9.87 oz (280 g), set
- Model
- 906696
Americanflat 8 × 10 Shadow Box Frame, Black (1.5 in Interior Depth)
A deep frame with glass and a back board — the light box, ready made.
The simplest way to turn a stack of printed layers into something that hangs on a wall is a shadow box: a picture frame with depth. The 1.5 in inside this one splits neatly into the three things a map light needs, a gap behind the diffuser for the light to spread, the diffuser itself, and the map on top of it, with the glass closing the front.
The back board is what you build on. Pull it out, stick the LED strip around the inside walls, file a notch for the cable, and the frame is a light box. The felt stays as a dark, non-reflective back, and the frame hangs in either orientation, so a long harbor and a tall river valley both work.
Pro tip Before you slice the layers, measure the opening from the inside of the frame, not the outside. The map should be about 1/8 in (3 mm) smaller than the opening each way so it drops in without forcing.
Why we like it
- ✓1.5 in interior depth — room for a lighting gap, a diffuser and three or four printed layers
- ✓Shatter-resistant glass rather than real glass
- ✓Hangs vertical or horizontal, or stands on a table on its 2.4 in deep body
- ✓Plain black MDF body — a dark, quiet edge around the glowing map
Keep in mind
- !The back board is MDF — you file or drill a notch for the USB cable yourself
- !The 8 × 10 is the size of what fits inside; the visible opening is a little smaller, so measure before you slice
- !Glass in front means reflections in a dark room — many builders leave it out
- Fits
- 8 × 10 in
- Interior depth
- 1.5 in
- Exterior
- 10 × 8 × 2.4 in
- Material
- Engineered wood (MDF), shatter-resistant glass, felt back
- Weight
- 2.4 lb
- Included
- Hanging hardware, display pins
- Model
- SB0810BK
PAUTIX 5 V USB COB RGB LED Strip, 4.92 ft (1.5 m), Remote and App
A dotless USB strip with a remote, long enough to line the inside of the frame.
The light behind a map has one job: to be even. Ordinary RGB strips are rows of separate LEDs, and every one of them shows up as a bright spot wherever a layer is thin. A COB strip packs the LEDs so densely that it glows as a continuous line, so what reaches the map is a wash of color rather than a row of dots.
Color is the fun part of a map light. Set the strip to a soft blue and the harbor looks like water; set it to warm white and the whole thing looks like a paper cut lit from behind. The strip remembers the last setting, the remote has a timer, and the whole thing runs from the USB port of a phone charger. The 1.5 m length lines the inside of an 8 × 10 frame with about half a meter to spare.
Pro tip Stick the strip to the inside walls of the box with the LEDs facing the diffuser, not the back. Light that hits the acrylic directly from the edges spreads better than light bounced off a dark felt back.
Why we like it
- ✓COB strip with 816 LEDs per meter — one smooth line of light, no dots showing through thin layers
- ✓RF remote plus a Bluetooth app, with memory for the last color and a timer
- ✓5 V USB — runs from a phone charger, no power brick or wiring
- ✓Cuttable at the marked points, 3M adhesive backing, 10 mm wide
Keep in mind
- !Needs a USB port that supplies 2 A or more, PAUTIX says — a weak port means flicker or drop-outs
- !If you only ever want warm white, a single-color COB strip gives more light for the same current
- Length
- 4.92 ft (1.5 m)
- LEDs
- 1224 (816 per m), COB
- Width
- 10 mm
- Power
- 5 V USB, 10 W, port of 2 A or better
- Control
- RF remote and Bluetooth app, memory, timer
- USB cable
- 2.5 ft
- Model
- COB-USB-RGB816F010-1.5M
SimbaLux White Translucent Acrylic Sheet, 12 × 12 in, 1/8 in, 2 Pack
Milky acrylic between the strip and the map, so the glow is even.
An LED strip around the inside of a frame lights the edges of whatever sits in it far more than the middle. A diffuser fixes that: a translucent white sheet a little way in front of the strip scatters the light so that by the time it reaches the map, the middle and the edges glow the same. White acrylic at about a third transmission is the standard material for exactly this in sign boxes.
The sheet also does the carrying. Rest it on four printed corner blocks, and the whole map stack sits on a rigid, flat surface instead of sagging toward the LEDs. A 12 × 12 sheet gives you an 8 × 10 panel with offcuts to spare, and the second sheet in the pack covers the next light or a mistake on the first cut.
Pro tip Score the sheet with the protective paper still on, along a steel ruler, with eight or ten firm passes of a plastic scoring knife. Then snap it over the edge of the bench. Peel the paper only after the edges are filed.
Why we like it
- ✓32% light transmission — the LEDs disappear, the glow stays
- ✓Cast acrylic, 1/8 in nominal (2.7–3.3 mm) — stiff enough to carry the map stack
- ✓Cuts with a scoring knife, a fine saw or a laser; comes with protective paper
- ✓Two sheets — one project and a spare, or a second light
Keep in mind
- !Has to be cut down to the frame opening; score-and-snap works, but the edge needs a few passes with a file
- !32% is a fairly dim diffuser — pair it with a bright strip, not a couple of puck lights
- Size
- 12 × 12 in
- Thickness
- 1/8 in nominal (2.7–3.3 mm)
- Material
- Cast acrylic
- Light transmission
- 32%
- Color
- White, translucent
- Quantity
- 2 sheets
- Model
- SL-AS3W32-12x12-2PC
Gorilla Super Glue Gel XL, 25 g, Clear
A gel glue that stays in a dot instead of running into the cutouts.
Stacking map layers is a lot of small glue joints in exactly the wrong place for liquid glue: next to open channels where a drop that runs ends up as a hard, shiny blob in a street. A gel stays as a dot. Put six or eight of them on the back of a layer, at the corners and across the wide land areas, press the next layer on, and in half a minute it holds.
The same gel fixes the four printed corner blocks inside the frame and the finished stack to the acrylic. The squeeze bottle gives small dots, and the pin in the cap means the bottle is still usable when the next project comes around, which with super glue is not a given.
Pro tip Align the layers dry first, mark two corners with a strip of masking tape, then glue. The gel sets in seconds, and a layer that lands 1 mm off doesn’t come apart again without breaking something.
Why we like it
- ✓Gel stays put on flat and vertical surfaces — no run-off into cutouts
- ✓Sets in 10–45 seconds without clamping, full cure in 24 hours, Gorilla says
- ✓Anti-clog cap with a metal pin keeps the 25 g bottle usable for the next project
- ✓Dries clear, with no foaming
Keep in mind
- !Cyanoacrylate can leave a white haze (blooming) on plastic around the joint — keep it away from the translucent plate wherever light passes
- !Bonds skin in seconds — keep the cap handy and a bottle of acetone within reach
- Type
- Cyanoacrylate gel
- Size
- 25 g (0.88 fl oz)
- Set time
- 10–45 s
- Full cure
- 24 h
- Finish
- Clear
- Model
- 112660