Quick CNC Holiday Gifts You Can Finish In A Weekend
Carved ornaments, coasters and small name signs — plan Saturday morning, hand them over Sunday evening. The steps and the tools for each one.
Published October 4, 2026 · 6 picks
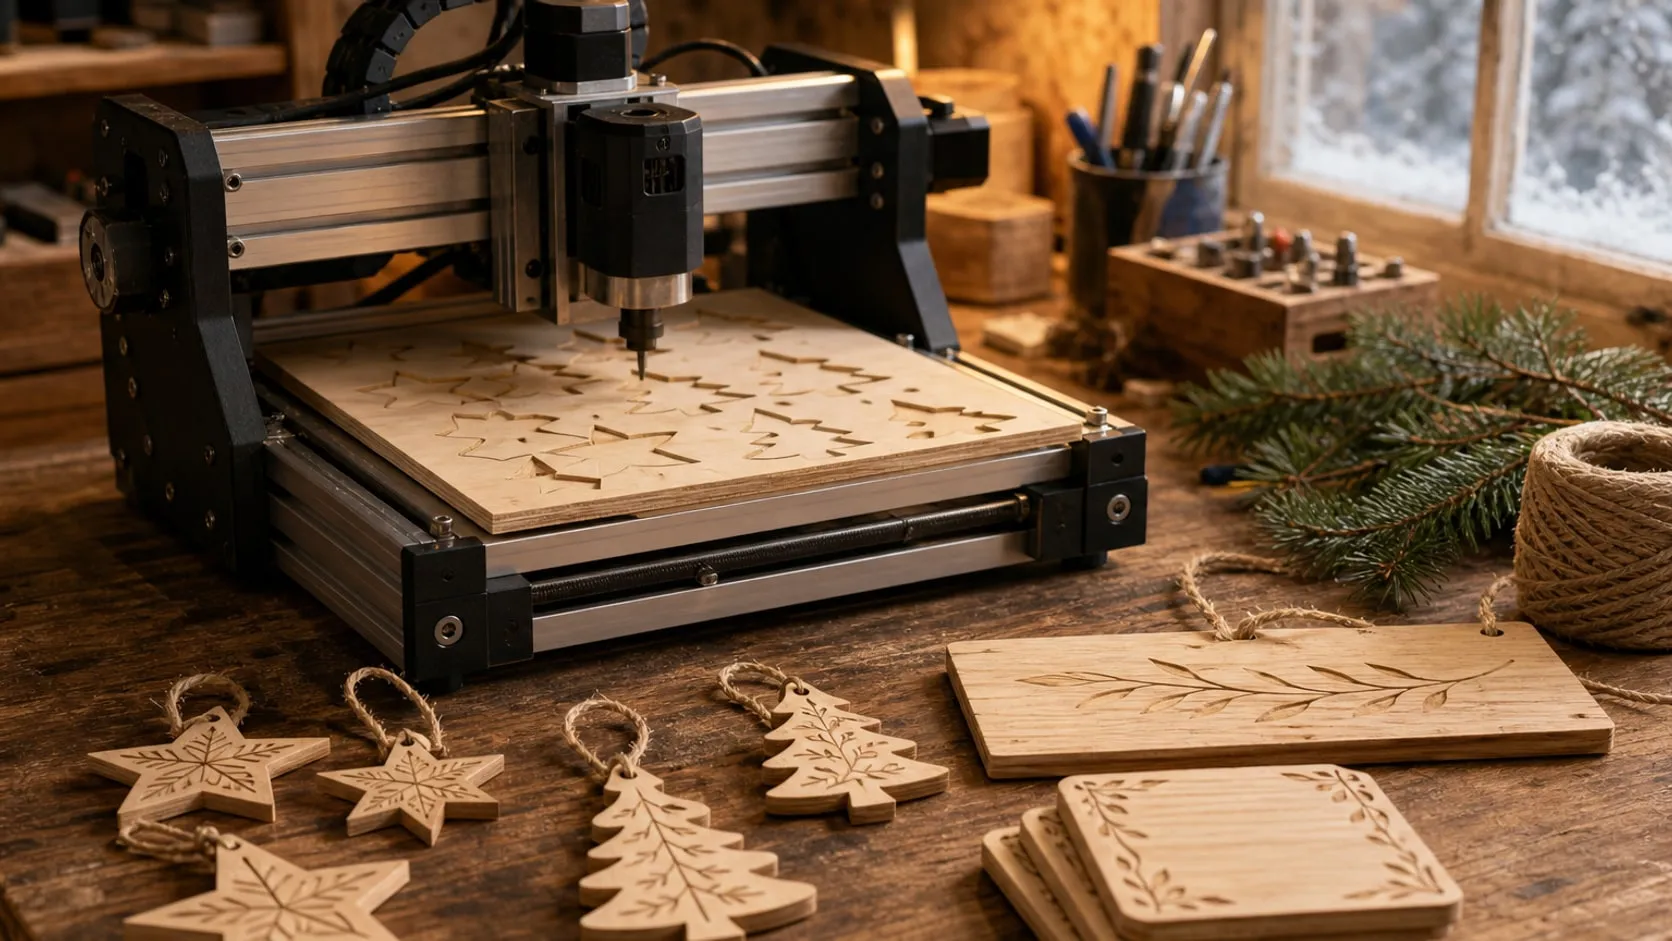
Big CNC projects take weeks. Holiday gifts don’t have to. Ornaments with a name, a set of carved coasters or a small family sign all come out of thin sheet stock, run in well under an hour of machine time, and take a finish you can wipe on. They’re also the kind of project that sells: a personalized ornament is easy to make in a batch and easy to customize per order. Here’s a weekend plan, with the tools for each step below.
The three projects
- Name ornaments: a star, tree or circle about 3–4 in across with a V-carved name and a hanging hole. Nine 3 in ornaments fit on one 12 × 12 in sheet.
- Coasters: 4 in squares or circles with a carved pattern, initial or simple line art. Make them in sets of four.
- Small signs: a family name or “Est. 20XX” on a board around 6 × 12 in. One evening of design, one short carve.
Step 1: Pick and prep the material (Saturday morning)
Thin birch plywood is the easiest stock for all three projects: flat, stable and light-colored, so carved lines stand out. For coasters you can also use 1/4–3/8 in hardwood if you have offcuts.
- Measure the thickness in a few spots. “1/4 inch” sheets vary, and your cut depth depends on it.
- Sand the face lightly with 180 grit before carving. It’s much easier on a flat sheet than around carved letters.
- Nest everything on one sheet in your CAM software, with about 1/4 in between parts.
Step 2: Hold the sheet down
Thin sheets bow under clamps and small parts move once they’re cut free. Double-sided tape fixes both: a few strips across the back hold the whole sheet flat, and nothing sits in the toolpath. Clean the dust off the spoilboard first and press the sheet down hard.
Leave small tabs on each part (or stop the cut-out a hair short of full depth) so the last pass doesn’t throw an ornament across the shop.
Step 3: V-carve the design
This is where the gift gets personal. A 90° V-bit carves names and line art with crisp corners, and V-carve toolpaths in most CAM programs (Carbide Create, Easel, VCarve and others) adjust the depth to the width of each letter.
- Bold, simple fonts carve best at ornament size; thin script fonts lose their detail.
- Limit the max depth to about half the sheet thickness so wide strokes don’t break through.
- Run the carve before the cut-out, while the sheet is still one solid piece.
Change bits safely: unplug or lock out the spindle before your fingers go near the collet, and wear eye protection while the machine runs.
Step 4: Cut the shapes free
Switch to a small downcut end mill for the profiles. On plywood it keeps the top edge clean, which saves sanding later. Take shallow passes (about 1/16 in each) and cut out the hanging holes before the outside profiles. Then snap the parts free and trim the tabs with a utility knife.
Step 5: Clean up and fix
Sand the edges and the faces lightly by hand with 220 grit and brush the dust out of the carved lines. If a point chipped off or fibers stand up inside a letter, a drop of medium CA glue fixes it. Let it set, then sand it flush.
Optional color: paint the carved lines with acrylic before final sanding, then sand the face back. The paint stays in the grooves and the surface comes out clean. Many makers seal the face with a quick coat of shellac first so the paint doesn’t bleed into the grain.
Step 6: Finish (Sunday)
Wipe on an oil-and-wax finish, let it soak in for about 20 minutes, wipe off the rest and buff. It’s ready to handle the same day, and it’s food-grade if the same batch includes a small serving board. For coasters, a hard film finish such as a wipe-on poly holds up better to wet glasses, but needs a day or more between coats.
Add a ribbon or twine to the ornaments and stick small cork or felt pads under the coasters.
What it costs in time: an hour or two of design and setup, under an hour of machine time per sheet, and an afternoon of sanding and finishing. The tools for each step are below.
At a glance
6 picksAs an Amazon Associate I earn from qualifying purchases. If you buy through a link on this page we may earn a small commission, at no extra cost to you. How this works.
LISHINE Baltic Birch Plywood Sheets, 12 × 12 × 1/4 in (8-Pack)
Square 1/4 in birch sheets — a whole batch of ornaments fits on one.
Most quick CNC gifts come out of thin sheet stock: ornaments, tags, coasters with a carved design, small layered signs. A pack of square sheets lets you nest a whole batch on one sheet and keep the rest for the next order, instead of cutting down a full 4 × 8 ft panel.
Birch plywood is a practical choice for this: the face is light and plain, so V-carved lines and painted fills stand out, and the cross-laminated plies resist warping in thin parts. The edges show the ply layers, which many makers treat as part of the look.
Pro tip Measure each sheet with calipers in a few spots and set your cut-out depth to the thickest reading plus a hair. “1/4 inch” plywood is often a little under or over, and tabs that don’t cut through are easier to fix than a scored spoilboard.
Why we like it
- ✓12 × 12 in sheets fit most desktop CNC beds without cutting down
- ✓About 1/4 in (6 mm) thick — right for ornaments and layered signs
- ✓Light, plain birch face takes V-carving, paint and oil well
- ✓Eight sheets — room for test cuts and a full batch
Keep in mind
- !Craft-grade sheets — expect the odd void in the inner plies on cut edges
- !Thickness is "approx." on the listing; measure before you set cut depth
- Size
- 12 × 12 in (300 × 300 mm)
- Thickness
- About 1/4 in (6 mm)
- Sheets
- 8
- Material
- Birch plywood, unfinished
XFasten Double Sided Woodworking Tape, 1 in × 108 ft (3-Pack)
Holds thin sheets flat without clamps in the bit's way.
Clamps work for a single sign, but ornaments and coasters are small and thin: clamps take up space on the bed, sit in the way of the bit and can bow a 1/4 in sheet. Double-sided tape holds the sheet down across its whole surface, so it stays flat while the V-bit carves and the end mill cuts the shapes free.
This tape is made for that kind of job: router templates, CNC routing and holding boards to a carrier. A few strips across the back of a sheet are usually enough for light engraving passes.
Pro tip Wipe the dust off both the spoilboard and the back of the blank, lay the tape down, then press the blank on hard (a mallet over a scrap block works) or leave a weight on it for a minute. Tape holds by contact, and pressure makes the contact.
Why we like it
- ✓Holds thin sheets flat across their whole face, not just at the edges
- ✓No clamps in the toolpath, so the bit can reach the whole blank
- ✓Cloth backing resists curling; XFasten says it peels off without residue
- ✓Three 108 ft rolls — a long supply for small parts
Keep in mind
- !Holds by surface contact, so dusty or rough stock won't stick well
- !Small parts can still break loose on the final pass — leave tabs or a thin skin
- Width
- 1 in
- Length
- 108 ft per roll (3 rolls, 324 ft total)
- Backing
- Cloth
- Adhesive
- Silicone-based
- Model
- DSWT136P3
Whiteside 1502 V-Groove Router Bit, 90°, 1/2 in, 1/4 in Shank
A 90° V-bit for names, lettering and line art.
Personalization is what turns a plain shape into a gift: a name on an ornament, a family name on a sign, a pattern on a coaster. V-carving does that with one bit. The software varies the depth to match the width of each stroke, so the lettering comes out crisp with sharp inside corners.
A 90° V-bit is the usual starting point: it’s a standard angle in V-carve software, it cuts relatively shallow for a given width, and at 1/2 in across it covers everything from small names to a bold sign title.
Pro tip Set a flat depth (or max depth) so the bit can’t plunge deeper than about half the sheet thickness. On 1/4 in plywood, a wide letter can otherwise cut straight through or break into the glue line between plies.
Why we like it
- ✓90° is a standard V-bit angle in V-carve software
- ✓1/2 in diameter handles both fine lettering and wider strokes
- ✓Carbide-tipped, made for natural wood, composites and hard plastics
- ✓1/4 in shank fits common desktop CNC and trim-router collets
Keep in mind
- !A 90° tip can't reach the finest serifs of very small text — a 60° or 30° bit is better for tiny lettering
- !Carbide-tipped, not solid carbide; the edges can chip if the bit is dropped
- Angle
- 90° included
- Cutting diameter
- 1/2 in
- Point length
- 1/4 in
- Shank
- 1/4 in
- Overall length
- 1-7/8 in
- Model
- 1502
Whiteside RD1600 Spiral Downcut Bit, 1/8 in, 1/4 in Shank
A 1/8 in downcut bit that leaves clean top edges on plywood.
After the V-bit carves the design, something has to cut the shape free. On plywood the top face is the one people see, and an upcut bit tends to lift and fray those top fibers. A downcut bit pushes them down instead, so the edge around an ornament or coaster stays clean and needs less sanding.
At 1/8 in across, this bit follows the curves of stars, trees and cut-out lettering, and its 1/2 in cutting length is plenty for 1/4 in sheets.
Pro tip Take step-downs of about half the bit diameter (1/16 in) in 1/4 in plywood and leave small tabs on each part. A downcut bit packs chips into the slot, and shallow passes keep it cool and keep the parts from shifting on the last pass.
Why we like it
- ✓Downcut spiral pushes fibers down for a clean top edge on plywood
- ✓1/8 in diameter gets into tight curves and inside corners
- ✓Solid carbide, two flutes
- ✓Pushes chips down, which helps hold thin sheets in place
Keep in mind
- !Chips pack into the slot instead of clearing — cut in several shallow passes
- !A 1/8 in bit is easy to snap with an aggressive feed or deep step-down
- Cutting diameter
- 1/8 in
- Cutting length
- 1/2 in
- Shank
- 1/4 in
- Overall length
- 2 in
- Flutes
- 2
- Model
- RD1600
Bob Smith Industries BSI-133H Insta-Cure+ Gap Filling CA Glue, 1 oz
Medium CA glue for chipped points and loose fibers.
CNC work in plywood has small failures: the tip of a star chips off, a thin part of a letter breaks loose, a layered sign has one piece that needs reattaching. CA glue fixes those in seconds, so a part with a small flaw doesn’t have to be recut.
A medium, gap-filling CA is the practical middle: thick enough to stay where you put it on a small part, thin enough to wick into a crack. A drop on fuzzy fibers inside a carved letter also stiffens them so they sand off cleanly.
Pro tip Put a drop on a piece of scrap and pick it up with a toothpick. You get a tiny, controlled amount for small repairs, instead of a puddle from the bottle that later shows through the finish.
Why we like it
- ✓Medium, gap-filling viscosity — doesn't run off a small part like thin CA
- ✓Bonds in 5–10 seconds, the label says
- ✓Works on wood, plastic, metal and more
- ✓Extender tip included for small spots
Keep in mind
- !Listed as not water resistant — use a water-resistant wood glue for coaster glue-ups
- !Bonds skin in seconds and the fumes irritate eyes; ventilate and keep debonder handy
- Volume
- 1 oz (28 g)
- Type
- Cyanoacrylate, medium / gap filling
- Bonds
- 5–10 seconds (BSI)
- Includes
- 1 extender tip
- Model
- BSI-133H
Howard Butcher Block Conditioner, 12 fl oz
A wipe-on oil-and-wax finish that's ready the same day.
A weekend gift doesn’t have time for a finish that needs days between coats. An oil-and-wax conditioner is the fast option: wipe it on, let it soak in, buff off the rest. Raw birch and hardwood get warmer in color, and the carved lines read darker against the face.
Because it’s food-grade, it’s also the easy choice for anything that may end up near food, like a carved cutting board or a serving tray made in the same batch.
Pro tip Rags soaked in oil finishes can heat up as they dry. Mineral oil and wax are low-risk, but make it a habit to lay used rags flat outside to dry before throwing them away, the same as with Danish oil or linseed oil.
Why we like it
- ✓Food-grade mineral oil with beeswax and carnauba wax
- ✓Wipe on, wipe off — no brush, no spray booth, no long wait between coats
- ✓Warms up the wood color and makes V-carved lines stand out
- ✓Howard lists it for salad bowls, wooden spoons and wooden toys
Keep in mind
- !An oil-and-wax finish, not a hard film — coasters need a fresh coat now and then
- !Little protection against heat or standing water compared with lacquer or varnish
- Volume
- 12 fl oz (355 ml)
- Contents
- Food-grade mineral oil, beeswax, carnauba wax
- Application
- Wipe on, wipe off
- Model
- BBC012