Build a Wi‑Fi Automatic Pet Feeder With Camera
An ESP32 camera board, a small stepper and an airtight bin make a feeder you can trigger and watch from your phone — the steps and the parts for each one.
Published October 4, 2026 · 6 picks
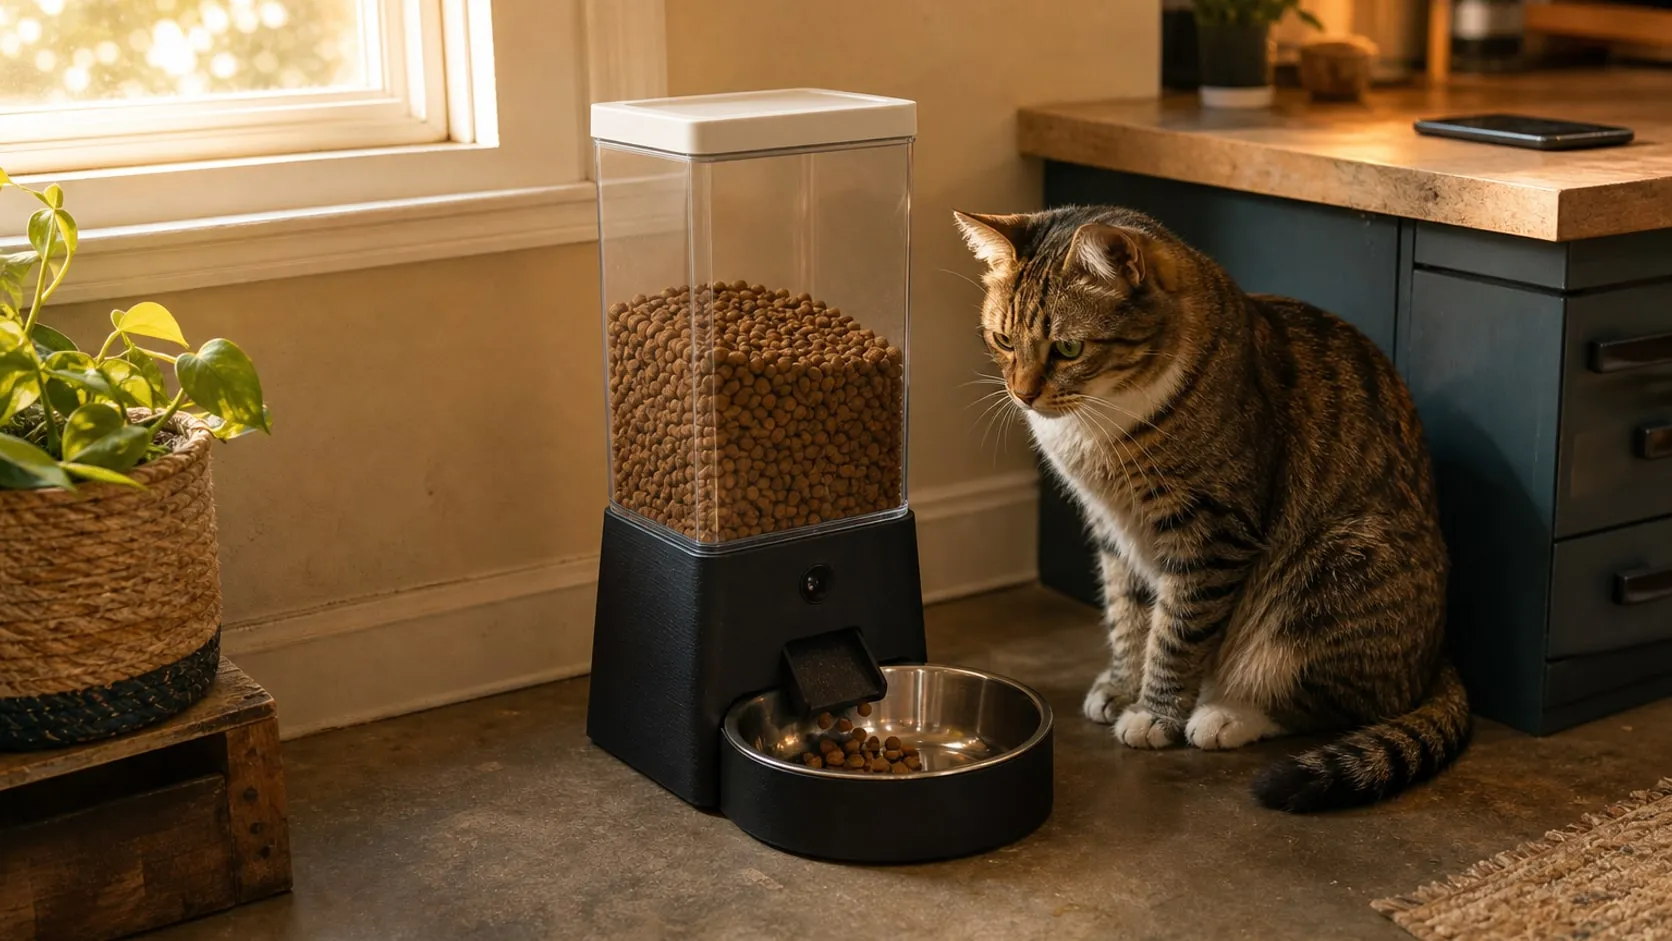
Smart feeders with a camera are everywhere in maker videos this year, and for a good reason: before a trip, being able to drop a portion from your phone and see it land in the bowl is worth more than any schedule. Even Arduino’s own blog has featured a DIY feeder build. A homemade one is also easy to fix and change: a different portion size, a second meal or a bigger hopper is a code edit or a reprint. Here’s the whole build, step by step, with the parts for each step below.
Step 1: Pick a design and plan the portions
Most DIY feeders work the same way: food sits in a hopper, a motor turns a paddle wheel (or a short auger) under it, each pocket of the wheel drops a small amount of food down a chute into the bowl, and a camera looks at the bowl. MakerWorld, Printables and Thingiverse have feeder bases built around common steppers and containers; search for one that fits the motor and hopper you plan to use.
- A wheel beats an auger for a small motor. A paddle wheel with four to six pockets needs far less force than a screw pushing through kibble.
- Match the pockets to the food. Small cat kibble and large dog kibble need different pocket sizes; a pocket at least twice the size of one piece jams less.
- Plan the camera view. The lens should see the bowl and the bottom of the hopper, so one picture tells you whether food came out and how much is left.
- Use models you’re allowed to print, and check the license if you plan to share or sell the result.
Step 2: Print the base, wheel and chute
Print the parts in PETG rather than PLA. It handles a motor that warms up, a sunny floor and regular washing better.
- Base wide and heavy at the bottom. A tall feeder is a tempting target for a curious dog. Widen the footprint or add screw holes to fix it to a board.
- Wheel and chute with 4+ walls and smooth faces. Fewer gaps, fewer crumbs stuck in layer lines.
- Print a test wheel first. Check that one pocket holds the amount you expect before you print the rest.
Printed plastic isn’t certified food-safe, and layer lines can trap crumbs. Keep food contact to dry kibble, and wash the wheel and chute in warm soapy water regularly.
Step 3: Prepare the hopper
An airtight food container makes a better hopper than a printed one: it’s big, smooth inside, easy to clean and its lid keeps the food fresh. Cut an outlet in the bottom of the container to match the opening in your printed base, then seat the container on the base. Cut slowly with a fine-tooth saw or a step drill so the clear plastic doesn’t crack, and smooth the edge so kibble slides through freely.
Leave the lid closed and the container sitting firmly in the base; a pet that can push the bin off can usually get into it, too.
Step 4: Mount the motor and the wheel
Screw the stepper to its mount on the base and press the wheel onto the motor’s flat-sided shaft. Turn the wheel by hand with the hopper full: it should move without catching, and food should fall from one pocket at a time, not pour past the wheel. If food leaks around the edges, the gap between wheel and housing is too large; reprint the housing a little tighter rather than relying on the motor to hold food back.
Step 5: Set up the board and the camera
Install the Arduino IDE, add the ESP32 board package and select the XIAO ESP32-S3 board. Open File → Examples → ESP32 → Camera → CameraWebServer, select the XIAO ESP32-S3 camera model, enter your Wi-Fi name and password and upload it. Open the board’s IP address in a browser and you have a live view.
Aim the camera before you build it in: place the board where it will sit in the lid or front panel, and check that the bowl fills most of the picture. Good light helps a lot; a feeder in a dark corner gives a grainy picture.
Keep the stream on your home network. To check in from outside, use a VPN or a home automation system such as Home Assistant, not an open port on your router.
Step 6: Wire the motor driver
Connect the ULN2003 driver to the XIAO with jumper wires:
| Driver | XIAO ESP32-S3 Sense |
|---|---|
| IN1 | D0 |
| IN2 | D1 |
| IN3 | D2 |
| IN4 | D3 |
| + (5–12 V) | 5V |
| − | GND |
Plug the motor’s white 5-pin connector into the driver. Then add a feed function to the camera sketch. The Arduino Stepper library is built in; note the pin order IN1, IN3, IN2, IN4 that the 28BYJ-48 needs:
#include <Stepper.h>

const int STEPS_PER_REV = 2048;                 // 28BYJ-48 in full-step mode
Stepper wheel(STEPS_PER_REV, D0, D2, D1, D3);   // IN1, IN3, IN2, IN4

void feed(int portions) {
  wheel.setSpeed(10);                           // rpm; slower = more torque
  for (int i = 0; i < portions; i++) {
    wheel.step(STEPS_PER_REV / 4);              // one pocket on a 4-pocket wheel
    wheel.step(-40);                            // small back-step clears a jam
    wheel.step(40);
  }
  for (int p : {D0, D1, D2, D3}) digitalWrite(p, LOW);   // coils off, motor stays cool
}
Call feed() from a button on the camera web page, from a timer, or from Home Assistant through ESPHome if you
prefer a ready-made app and schedule over writing your own.
Step 7: Power it and plan for outages
One 5 V USB-C supply runs everything: it powers the XIAO, and the XIAO’s 5V pin passes that supply on to the motor driver. Route the cable along the wall, away from the bowl, and cover it with a cable protector if your pet chews.
A wall supply means no feeding during a power cut. If outages are common where you live, power the feeder from a small UPS or a power bank that supports pass-through charging (check the spec; many power banks switch off when charging or when the load is very small), and keep the feeder’s schedule in the code, not only in an app, so it keeps running even if Wi-Fi drops.
Step 8: Calibrate and test before you leave
- Weigh the portions. Run ten feeds into a cup on a kitchen scale and divide. Adjust the number of pockets per meal until it matches what your pet should eat.
- Run it for a week at home. Watch every feeding on the camera: jams, double portions and Wi-Fi drops show up in days, not hours.
- Check the camera shows an empty bowl clearly, so you can tell “fed and eaten” apart from “never came out”.
A feeder is a convenience, not a pet sitter. For anything longer than a short trip, still arrange for someone to check on your pet, top up the water and step in if the feeder jams.
What it costs in time: a day of printing for the base, wheel and chute, an evening for cutting the hopper and assembly, an evening for the camera, wiring and code, and a week of test feedings at home. The parts for each step are below.
At a glance
6 picksAs an Amazon Associate I earn from qualifying purchases. If you buy through a link on this page we may earn a small commission, at no extra cost to you. How this works.
OVERTURE PETG Filament, 1.75 mm, 1 kg, Black
Tougher, more heat-tolerant than PLA for a base and wheel that work every day.
The printed parts of a feeder have a harder life than a shelf ornament: a wheel that turns several times a day, a base that gets bumped by a curious pet, a chute that gets washed. PETG is the usual step up from PLA for that kind of part. It flexes a little before it cracks, and it doesn’t soften near a warm motor or on a sunny floor.
OVERTURE’s high-speed formula prints at the same temperatures as most PETG and comes pre-dried, so you can start with the default PETG profile in your slicer. Black also hides kibble dust and the gaps around the camera window.
Pro tip Print the paddle wheel and chute with more walls and a smooth top surface facing the food. Fewer gaps means fewer crumbs stuck in the layers, and washing gets easier.
Why we like it
- ✓PETG handles heat and wear better than PLA — useful next to a motor that warms up
- ✓±0.02 mm diameter tolerance, OVERTURE says
- ✓Vacuum-sealed and pre-dried; rated for printing up to 300 mm/s
- ✓Nozzle 230–260 °C, bed 65–70 °C — within range of most current printers
Keep in mind
- !Strings more than PLA; plan to tune retraction or clean up wisps on the wheel
- !Not certified food-safe — printed layer lines can trap crumbs, so parts that touch food need regular washing
- Material
- PETG
- Diameter
- 1.75 mm ± 0.02 mm
- Weight
- 1 kg
- Nozzle temp
- 230–260 °C
- Bed temp
- 65–70 °C
- Speed
- 30–300 mm/s
OXO Good Grips Pet POP Container, 6.0 Qt
A clear, airtight 6-quart bin that sits on top of the printed base.
The hopper is the part of a DIY feeder that’s hardest to print well: it has to be big, food-friendly, easy to clean and ideally sealed so the kibble stays fresh. A ready-made airtight container solves all of that. The 6-quart POP holds several days of food for most cats and small dogs, and its push-button lid keeps the top closed while the printed base underneath does the dispensing.
The square shape helps too. A printed adapter that matches a 6.5-inch square is far easier to design than one for a round bin, and the clear walls let you check the food level through the feeder camera.
Pro tip Mark the outlet with tape and cut it with a fine-tooth saw or a step drill, slowly. Clear storage plastic can crack if you force a large drill bit through it, and a crack near the outlet lets in air and ants.
Why we like it
- ✓Holds up to 6.5 lb of dog food or 4.5 lb of cat food, OXO says
- ✓Push-button lid seals airtight against air and pests
- ✓Clear walls — the camera or a glance shows how much food is left
- ✓Square 6.5 × 6.5 in footprint is easy to design a printed base for
- ✓BPA-free, dishwasher safe, ½-cup scoop included
Keep in mind
- !Cutting an outlet in the bottom makes it part of the feeder for good; buy a second one if you also want a sealed storage bin
- !Tall (12.6 in) — a feeder built under it needs a wide, stable base so a pet can't tip it
- Capacity
- 6.0 qt / 5.7 L
- Holds
- Up to 6.5 lb dog food / 4.5 lb cat food
- Size
- 6.5 × 6.5 × 12.6 in
- Lid
- Push-button, airtight
- Material
- BPA-free plastic
- Care
- Dishwasher safe
ELEGOO 28BYJ-48 5V Stepper Motor with ULN2003 Driver (5 Sets)
A geared 5 V stepper and driver that turn the wheel the same amount every time.
A feeder needs to dispense the same amount each time, and that is what a stepper is good at: it turns in fixed steps, so “one turn of the wheel” means the same thing on Monday and on Friday. The 28BYJ-48’s built-in gearbox makes it slow but steady, which suits a paddle wheel that drops a few pieces of kibble at a time.
ELEGOO’s own notes are worth following: use a regulated 5 V supply, connect the controller’s ground and the motor supply’s ground together, and slow the motor down if it buzzes instead of turning. With five sets in the box, there are spares for a second feeder or a jammed prototype.
Pro tip After each feeding, set all four driver inputs LOW. The motor’s gearbox holds the wheel in place on its own, and the coils stay cool instead of drawing current all day.
Why we like it
- ✓Geared 5 V stepper (nominal 1:64) — slow, controlled, repeatable movement
- ✓ULN2003 driver board with four LEDs that show the coil sequence while you test
- ✓Runs from 5 V, the same supply as an ESP32 board
- ✓Five motor-and-driver sets, plus female-to-male jumper wires
Keep in mind
- !Low torque — it turns a light wheel, not a heavy auger packed with kibble
- !Slow; one turn takes several seconds
- !Draws current and warms up while holding still unless the code switches the coils off
- Motor
- 28BYJ-48, 4-phase, 5-wire unipolar
- Gear reduction
- 1:64 (nominal)
- Voltage
- 5 V
- Driver
- ULN2003, inputs IN1–IN4
- Pack
- 5 motors + 5 driver boards + jumper wires
- Model
- EL-SM-003
Seeed Studio XIAO ESP32-S3 Sense (Camera & Microphone)
A thumb-sized Wi-Fi board with the camera already attached.
A Wi-Fi feeder with a camera usually means two parts: a microcontroller that turns the motor and a separate camera for the live view. The XIAO ESP32-S3 Sense combines both. The camera clips onto a small expansion board stacked on the back, and the Arduino IDE’s ESP32 package includes a camera web server example that streams it to a browser on your home network.
The board is tiny, so it fits inside a printed feeder lid with room to aim the lens at the bowl. That small size also means only a handful of pins, but a stepper driver needs just four plus power and ground.
Pro tip Get the camera stream working first, before you add the motor. Once you know the board, the Wi-Fi and the lens angle are right, adding the feeding code is the easy part.
Why we like it
- ✓ESP32-S3 dual-core at up to 240 MHz with 2.4 GHz Wi-Fi and Bluetooth LE
- ✓Detachable OV2640 camera, up to 1600 × 1200
- ✓8 MB PSRAM and 8 MB flash, plus a microSD slot (up to 32 GB, FAT)
- ✓Built-in digital microphone
- ✓Programs from the Arduino IDE or MicroPython over USB-C
Keep in mind
- !Pin headers aren't soldered on this version — you'll need a soldering iron, or the pre-soldered variant
- !Very few free pins; fine for one motor driver, tight for a bigger project
- !The small camera works best at close range and in decent light
- Chip
- ESP32-S3, dual-core, up to 240 MHz
- Wireless
- 2.4 GHz Wi-Fi, Bluetooth LE
- Camera
- OV2640, 1600 × 1200 (OV3660 compatible)
- Memory
- 8 MB PSRAM, 8 MB flash
- Storage
- microSD slot, up to 32 GB (FAT)
- Board size
- 21 × 17.5 mm
- Connector
- USB-C
ELEGOO 120pcs Dupont Jumper Wires (M-M, M-F, F-F)
Every jumper type for wiring the board to the driver without soldering each test.
Most of a feeder build is trial and error on the bench: which pins drive the motor, which way it turns, how many steps make a good portion. Jumper wires let you change the wiring in seconds instead of re-soldering. Female ends fit the ULN2003 driver’s header pins directly, and male ends go into a breadboard.
ELEGOO is clear that these are for low-voltage signal wiring, and that’s all a feeder needs: four control lines and the 5 V supply for a small stepper.
Pro tip Once the feeder works, put a drop of hot glue on each connector or wrap the bundle with a cable tie. A motor that shakes a little every feeding will eventually wiggle a loose jumper off its pin.
Why we like it
- ✓40 each of male-male, male-female and female-female
- ✓20 cm (8 in) leads, peel off one or a whole ribbon
- ✓Standard 2.54 mm (0.1 in) pins fit breadboards and header pins
- ✓Color-coded, so power, ground and signal are easy to tell apart
Keep in mind
- !Copper-clad aluminum, not pure copper — fine for signals, not for heavy current
- !Push-on connectors can work loose with vibration; secure them in the finished build
- Pieces
- 120 (40 M-M, 40 M-F, 40 F-F)
- Length
- 20 cm / 8 in
- Pitch
- 2.54 mm / 0.1 in
- Conductor
- Copper-clad aluminum, PVC insulation
- Model
- EL-CP-004
CanaKit 3.5A USB-C Power Supply (5 V)
A steady 5 V, 3.5 A supply for the board, camera and motor on one cable.
A Wi-Fi camera and a motor on the same small board make a power supply’s weaknesses obvious: the camera stream drops or the board resets when the motor starts. CanaKit made this supply for the Raspberry Pi 4, which is fussy about voltage, so it delivers a solid 5 V with current to spare for a much smaller ESP32 build.
The 5-foot cable lets the feeder sit away from the outlet. Run it along the wall and out of reach, because pets chew cables, and plan a battery or UPS option if your feeder has to keep working through short outages.
Pro tip Power the stepper driver from the XIAO’s 5V pin, which passes the USB supply straight through. One cable then feeds everything, and the grounds are already shared.
Why we like it
- ✓Fixed 5 V at up to 3.5 A — plenty of headroom for a board, camera and stepper
- ✓UL Listed
- ✓5 ft cable with thick 18 AWG wire, so less voltage drop at the far end
- ✓Built-in noise filter, CanaKit says
Keep in mind
- !No battery backup — if the power goes out, so does the feeder
- !Fixed USB-C plug; to feed a motor driver separately you need a USB-C breakout or to use the board's 5 V pin
- Output
- 5 V DC, 3.5 A
- Connector
- USB-C
- Cable
- 5 ft, 18 AWG
- Plug
- North American 2-pin
- Certification
- UL Listed