How to Turn a Photo Into a 3D Printed Figure
From a photo of your dog, your kid or yourself to a painted figure on your shelf — the six steps and the tools for each one.
Published October 4, 2026 · 6 picks
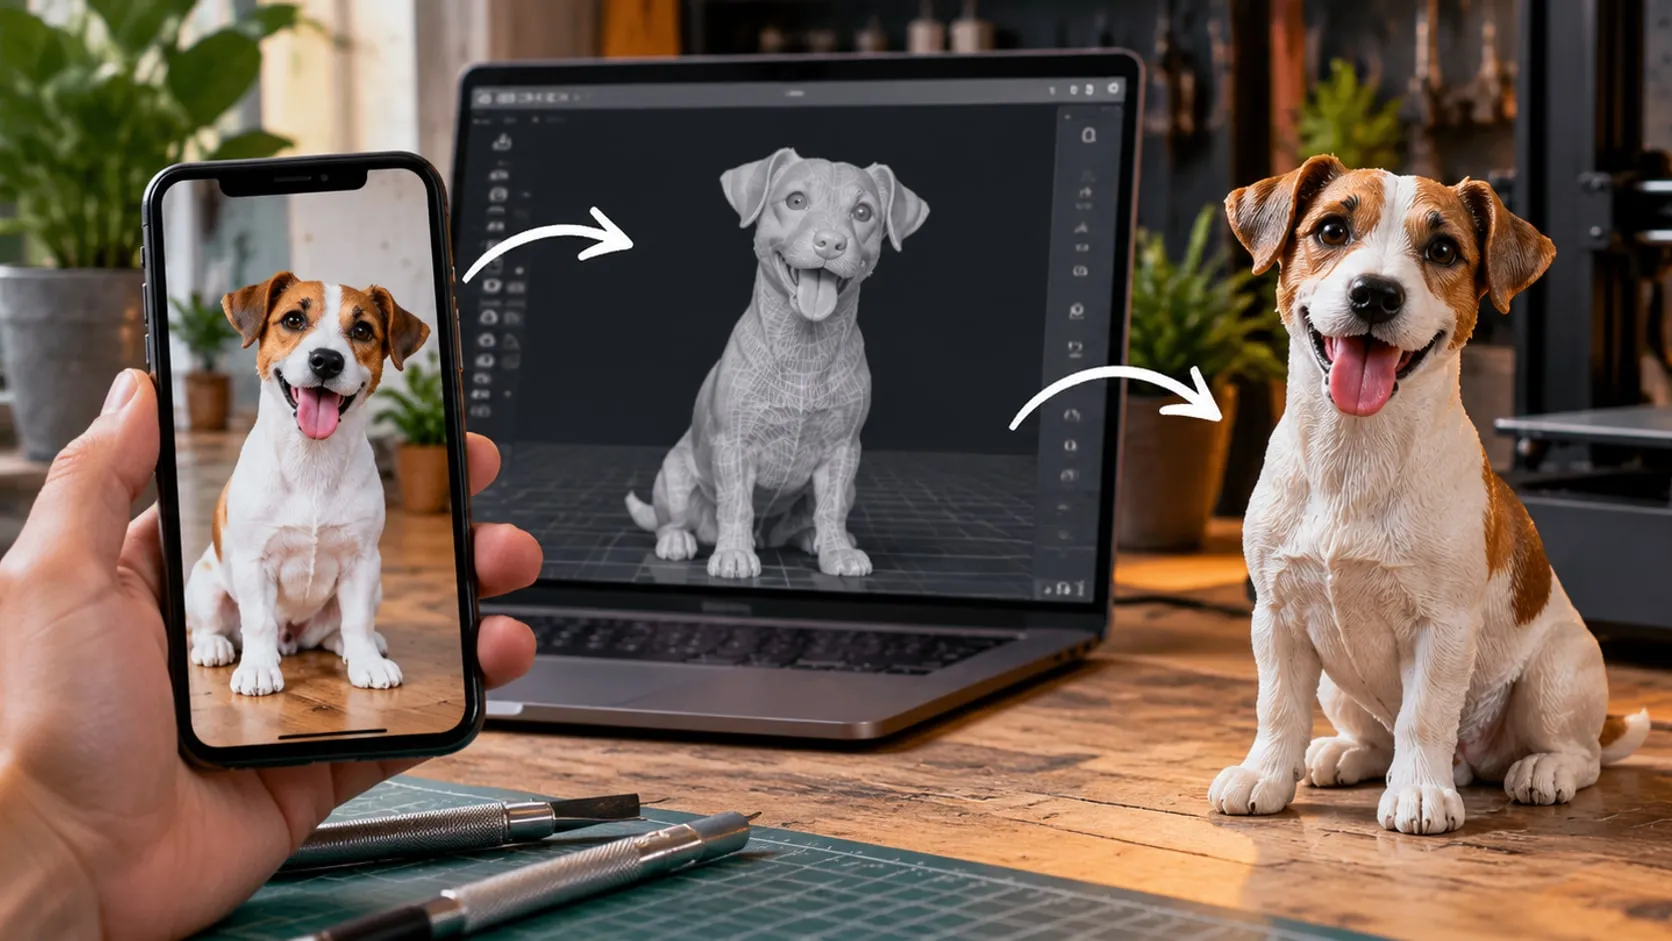
A figure made from a photo used to mean paying a sculptor. Now the hardest part, turning a flat picture into a 3D model, can be done by AI in a few minutes. The rest is a printer and a few hours of finishing. Here’s the whole process, step by step, with the tools for each step below.
Step 1: Pick the right photo
AI image-to-3D tools guess the parts of the subject they can’t see, so the photo decides most of the result.
- One subject, full body, plain background. A pet standing on a plain floor works far better than a group photo.
- Front or three-quarter view, even light. Hard shadows and odd angles confuse the model.
- Sharp and high-resolution. Blurry fur becomes blurry geometry.
- Use photos you have the right to use — your own pets, family or yourself, with their permission.
Step 2: Turn the photo into a 3D model
Upload the photo to an image-to-3D service such as Meshy, Tripo or MakerWorld’s figure generator. They create a textured 3D model from a single image, and many of them offer free credits to try before you pay. Run it a few times and keep the best result; the same photo can give quite different models.
Then open the model in a slicer for resin printers (Lychee and Chitubox both have free versions). Here you:
- Scale it. 5–10 cm tall is a good size for a first figure.
- Hollow it if it’s bigger than a few centimetres, and add drain holes underneath, to save resin.
- Tilt it and add supports. Keep supports off the face, so the most important detail stays clean.
Step 3: Print in resin
Resin printers cure each layer with light through a high-resolution screen, which is why they handle faces and fur far better than filament printers. Pour resin into the vat, send the file and leave it. A small figure usually prints in a few hours.
Already have a filament (FDM) printer? You can still print the figure. Use a 0.2 mm nozzle and the finest layer height your printer handles well, print it larger (10 cm+) and expect to spend more time sanding the layer lines.
Step 4: Wash and cure
The print comes out coated in liquid resin. Wearing gloves, wash it in isopropyl alcohol to remove the uncured resin, carefully clip the supports off, then cure it under UV light until the surface is no longer tacky. Work in a ventilated room, and keep resin and alcohol away from kids and pets.
Step 5: Clean up and prime
Sand away the support marks with fine sandpaper, then spray a primer. Primer gives paint something to grip and shows any marks you missed. For the easiest painting, prime black, then lightly spray white from above (zenithal priming): the top surfaces turn light, the recesses stay dark, and the figure is already shaded.
Step 6: Paint the details
One-coat paints such as Speedpaint are made for exactly this: brush one coat over the light primer and it flows into the recesses on its own. Finish with a fine brush on the eyes, nose and small details, the parts that make the figure look like your dog rather than a dog.
What it costs in time: around half an hour for the model and slicing, a few hours of unattended printing, and an evening for cleanup and painting. The tools for steps 3 to 6 are below.
At a glance
6 picksAs an Amazon Associate I earn from qualifying purchases. If you buy through a link on this page we may earn a small commission, at no extra cost to you. How this works.
Anycubic Photon Mono 4 Resin 3D Printer (7 in, 10K)
A 10K resin printer for the fine detail a small figure needs.
For a figure made from a photo, detail is everything: the face, the fur, the folds in the clothes. A filament printer draws in visible lines, while a resin printer cures each layer with light through a high-resolution screen, so small features come out sharp. That’s why most people printing figures and miniatures use resin.
The Photon Mono 4 is a compact entry point: a 10K screen for fine detail, a build volume that easily fits a figure several inches tall, and leveling you do once. Plan for the process around it too: resin needs gloves, a ventilated room and a wash-and-cure step after printing.
Pro tip Print figures tilted at an angle with supports, not flat on the plate. It reduces the suction force on each layer and keeps the face and front details free of support marks.
Why we like it
- ✓10K mono screen, 17 × 17 µm pixels for fine detail
- ✓Build volume of 153 × 87 × 165 mm — plenty for figures
- ✓Laser-engraved build plate to help prints stick
- ✓Four-screw leveling, done once
- ✓Resumes printing after a power cut
Keep in mind
- !Resin printing needs gloves, ventilation and post-processing — it's not plug-and-play like PLA
- !No Anycubic app support on this model
- Screen
- 7 in mono LCD, 10K (9024 × 5120)
- Pixel size
- 17 × 17 µm
- Build volume
- 153.4 × 87 × 165 mm
- Leveling
- 4-point, one-time
- Weight
- 3.5 kg
- Model
- Photon Mono 4
ELEGOO Mercury Plus 2.0 Wash and Cure Station
Washes off liquid resin and UV-cures the figure evenly.
A resin print comes off the printer covered in liquid resin, soft and sticky. It needs two things before you can sand or paint it: a wash in alcohol to remove the uncured resin, and a UV cure to harden it all the way through. Doing that with a jar and sunlight works, but it’s messy and uneven.
The Mercury Plus does both steps in one machine. Wash the figure in the sealed bucket, swap to the curing turntable, and the UV lights cure it evenly from all sides. Since it isn’t tied to one brand, it works with the Anycubic printer above or most others.
Pro tip Don’t over-cure small figures. A few minutes is usually enough; too long can make thin parts brittle. Start short and check if the surface still feels tacky.
Why we like it
- ✓Sealed wash container keeps the alcohol from evaporating
- ✓16 UV LEDs (405 nm) and a 360° turntable for even curing
- ✓Wash prints in a basket or still on the build plate
- ✓Lid blocks 99.95% of UV light
- ✓Works with most LCD, DLP and SLA printers
Keep in mind
- !Not meant for washing water-washable resin — rinse that under running water
- !You still need isopropyl alcohol for the wash bucket
- Curing light
- 16 × 405 nm UV LEDs
- Turntable
- 360° rotating
- Wash
- Sealed bucket, basket or build plate mount
- Display
- TFT, set and remaining time
- Weight
- 10 lb
Schneider Black Nitrile Gloves, 3 mil, 100 Count
Uncured resin should never touch your skin.
Liquid resin is a skin irritant, and with repeated contact many people develop an allergy to it, which is hard to undo. That’s why gloves aren’t optional in resin printing: you wear them whenever you touch the vat, a fresh print or anything with uncured resin on it.
Nitrile is the usual choice for resin work. These are thin enough to handle small parts and supports, and black makes it easy to see resin residue on the glove.
Pro tip Take gloves off by peeling them inside out and throw them away; don’t reuse them. And keep your phone out of the work area, because a resin fingerprint on a screen is how resin ends up on your hands later.
Why we like it
- ✓Nitrile, latex-free and powder-free
- ✓Described as chemical- and puncture-resistant
- ✓Textured fingertips for grip on small parts
- ✓100 gloves in the box, sizes S to L
Keep in mind
- !3 mil is thin — change gloves as soon as resin gets on them
- !This listing link is size Large; pick your size on Amazon
- Material
- Nitrile, latex- and powder-free
- Thickness
- 3 mil
- Grip
- Textured fingertips
- Count
- 100
- Sizes
- S–L
The Army Painter Classic Zenithal Primer Set, Black + White Spray
Black, then white from above — shading before you paint.
Paint doesn’t stick well to bare resin, and a primer coat fixes that. It also hides small layer lines and support marks so you can see what still needs sanding.
The zenithal trick makes primer do more: spray the whole figure black, then spray white only from above, like sunlight. The top surfaces turn light and the recesses stay dark, so the figure already has shading before you paint. That’s exactly what one-coat paints like Speedpaint are designed to sit on.
Pro tip Use short bursts from about 20–30 cm and several thin coats instead of one heavy one. A thick coat of primer fills the fine details you printed in resin for in the first place.
Why we like it
- ✓Black and white matte spray primers in one set
- ✓Made for zenithal priming (light from above, shadows below)
- ✓Gives paint something to grip on smooth resin
- ✓2 × 400 ml cans
Keep in mind
- !Spray in a ventilated area or outdoors, not at your desk
- !Only a few reviews on Amazon so far
- Contents
- Black + white spray primer
- Volume
- 2 × 400 ml
- Finish
- Matte
- Technique
- Zenithal priming
The Army Painter Speedpaint Starter Set 2.0 (10 × 18 ml)
One-coat paints that shade themselves over a light primer.
Painting a figure the traditional way takes layers: base color, shading, highlights. That’s where most people give up. Speedpaint is designed to shortcut it. You brush one generous coat over a light primer, and the paint flows into the recesses and pulls away from the raised edges, so it shades itself as it dries.
The result won’t be competition-level, but for a figure of your dog or yourself, it’s the fastest way to get something that looks painted rather than colored in.
Pro tip Paint the largest areas first and let each color dry before painting next to it. Speedpaint is thin and flows, so two wet colors touching will bleed into each other.
Why we like it
- ✓One coat over a light primer — the paint pools in recesses for shadows
- ✓9 colors plus 1 metallic, with a basecoat brush
- ✓Water-based acrylic
- ✓Mixing balls in every bottle
Keep in mind
- !Needs a light (white or grey) primed surface to work as intended
- !Ten colors won't match every pet or person — you'll mix or add colors later
- Bottles
- 10 × 18 ml (9 colors + 1 metallic)
- Type
- Water-based acrylic, one-coat
- Included
- Basecoat brush, mixing balls
- Model
- WP8059
Golden Maple Detail Paint Brushes, 10 Pieces
Fine brushes down to 5/0 for eyes and small details.
The paint set comes with one brush for big areas, but the details are what make a figure recognizable: the eyes, the nose, a collar or a pattern on the fur. Those need small, pointed brushes.
This set covers everything from a 5/0 for eye dots to a size 8 for larger areas. The triangular handles help with a steady grip, which matters more than the brush itself when you’re painting something a few millimetres wide.
Pro tip For eyes, use the very tip of a small brush with a little paint, and brace your painting hand against the hand holding the figure. Steady hands come from support, not from holding your breath.
Why we like it
- ✓Ten sizes from 5/0 up to 8
- ✓Fine nylon tips for small details
- ✓Triangular birch handles for a steady grip
- ✓Protective tubes keep the tips in shape
Keep in mind
- !Nylon brushes wear faster than sable ones
- !Clean them right away — dried acrylic ruins a fine tip
- Brushes
- 10
- Sizes
- 5/0, 3/0, 2/0, 0, 1, 2, 3, 4, 6, 8
- Bristles
- Nylon
- Handle
- Triangular birch wood
- Extras
- Protective tubes