Install an Overhead Garage Storage Lift
Get holiday totes off the floor and onto a ceiling platform that comes down to you — planning, parts and a safe install, step by step.
Published October 16, 2026 · 6 picks
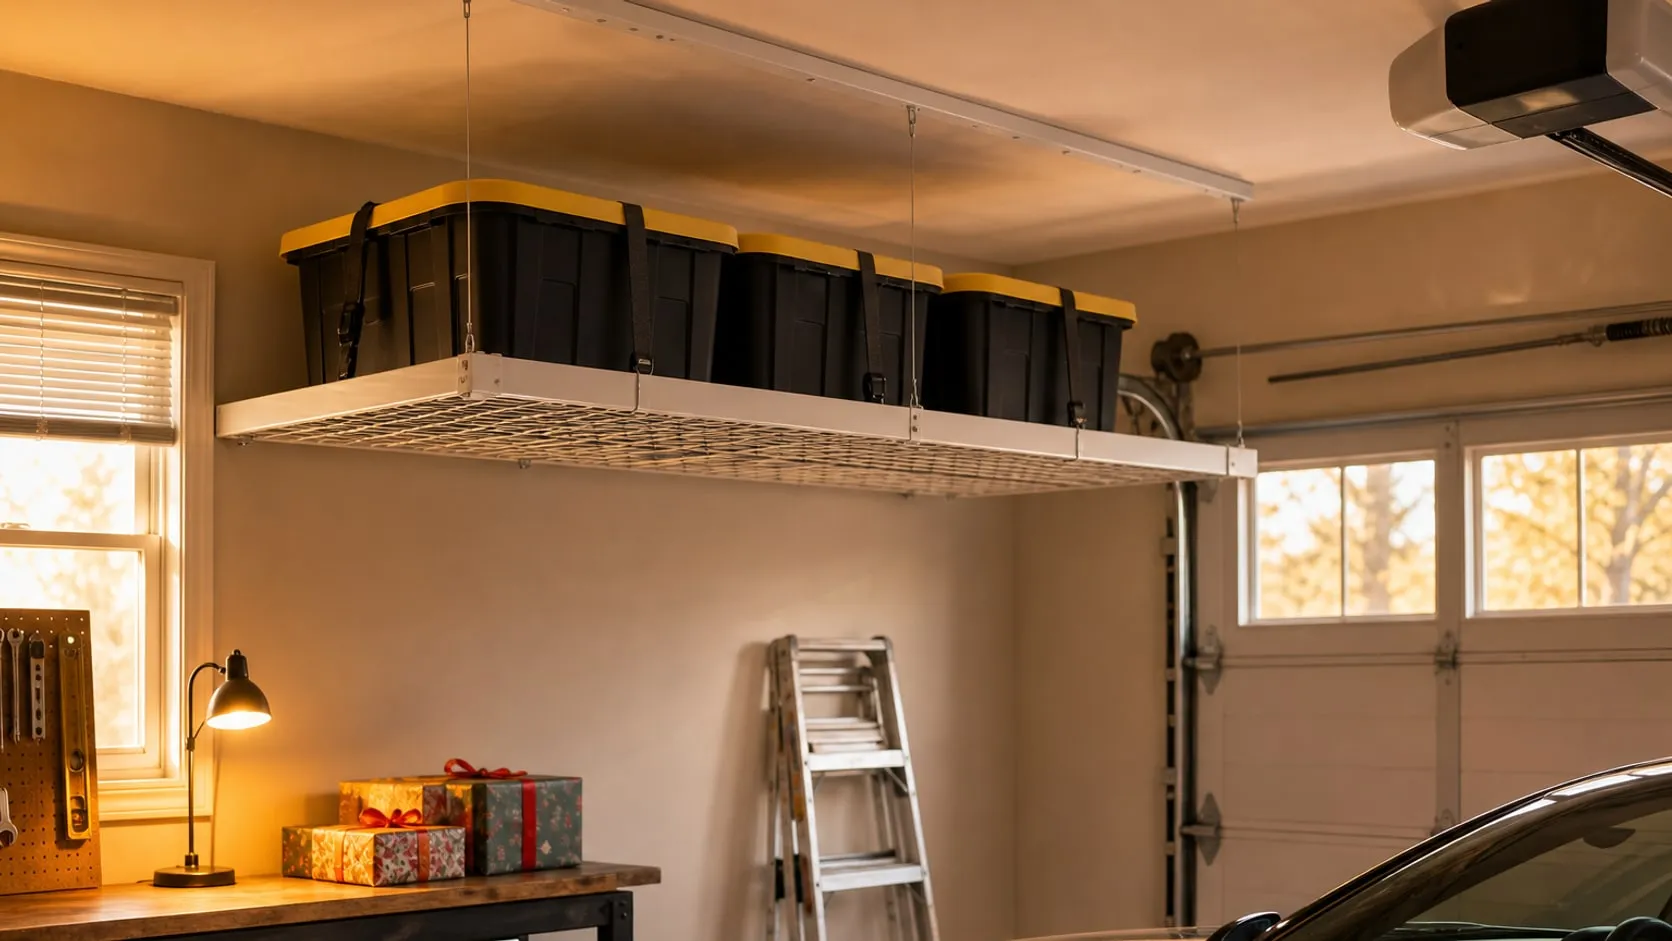
Overhead garage lifts are all over Pinterest and TikTok right now, usually in the same before-and-after: a garage floor buried in holiday bins, then a clean floor and a platform of totes floating near the ceiling. The appeal over a fixed overhead rack is simple. A fixed rack means a ladder and lifting a 40 lb tote over your head; a lift brings the whole platform down to waist height, you load it standing on the floor, and send it back up. Hand-crank kits do it with a winch, powered kits with motors. Either way, the install is the same idea: find the joists, bolt the mounts into solid wood, hang the platform and load it sensibly. Here’s the whole job, with the tools for each step below.
Step 1: Plan the spot and the load
Most of the work is deciding where the platform can go. Before buying anything:
- Measure the ceiling height and note what’s on it: the opener and its rail, the door track, lights, the attic hatch, sprinkler heads.
- Open the garage door. The raised door and its track take up the front of the ceiling. Most lifts end up beside the opener rail or over the hood of the car, toward the back.
- Tape the outline on the floor (4 × 6 ft for the lift here) and check it with the door open and the car parked. Leave room for the platform plus your tallest tote stack.
- Check the framing. In the attic or through the hatch, see whether you have joists or trusses, which way they run and how far apart they are (usually 16 or 24 in). The lift’s manual says how its mounts must cross them.
- Know your load. The rating is for an evenly spread load, and 360 lb fills up faster than you think. Weigh a full tote on a bathroom scale and do the math.
- Power. A motorized lift needs power to run; check what the manual asks for before you settle on a spot.
If you have trusses, don’t cut, notch or drill through them beyond what the manufacturer allows, and check that the lift’s load is acceptable for your roof framing. If you’re not sure what’s above the drywall, ask a contractor before hanging 300+ lb from it.
Step 2: Find and mark the joists
Lag screws into drywall alone will pull out. Every mount has to go into the center of a joist.
- Scan along the ceiling with the stud finder and mark both edges and the center of each joist in the area, at both ends of where the mount will go.
- Snap a chalk line or draw a straight line through the center marks.
- Drill a small test hole on the line. Wood shavings mean you’re in the joist; drywall dust and then nothing means you missed.
Step 3: Mount the ceiling hardware
- Hold each mount or rail on its line and mark the holes. Check the spacing with a tape against the manual; mounts that are off by an inch make the platform hang crooked.
- Drill pilot holes with the bit size the manual gives for its lag screws, usually about the screw’s core diameter. Tape the bit at the screw’s length as a depth stop.
- Drive the lag screws with a socket on a drill or impact driver, then snug the last turn with a hand ratchet. Snug, not cranked: over-tightening crushes the wood.
- Pull down hard on each mount. Nothing should move.
Work from a stable ladder, not a chair or a bucket, with safety glasses on. The kit here weighs 126 lb in total, so have a second person hold rails and motors while you drive the screws.
Step 4: Hang the platform and set the limits
- Assemble the deck on the floor directly under the mounts.
- Attach the cables to the deck corners as shown in the manual, keeping them straight and untwisted.
- Raise it empty a foot or two and check it’s level. Adjust the cables before going higher.
- Set the stops. On the DURA-LIFT, the app lets you set upper and lower limits: the upper stop below the ceiling with clearance for your tallest tote, the lower stop at a comfortable loading height. On a crank kit, mark the top position on the cable or wall.
- Run it up and down a few times empty, then with a light load, watching the cables and mounts.
Anti-sway and locks: the platform hangs on cables, so a bump can make it swing. Many kits include a safety lock or latch for the raised position. Use it, and never stand or let kids play under a platform that’s moving or held only by a winch.
Step 5: Load it and strap it
- Use matching totes. The same footprint packs tight and stays put; the 27-gallon totes here fit side by side on the 4 ft width.
- Heavy in the middle, light at the ends, and keep the load well under the rating. Spread it evenly; a full end and an empty end strain one side’s cables.
- Strap each row to the frame, through the lid keyholes. Tuck the loose strap tails away from the door path.
- Label the totes on the side that faces down, so you can read them from the floor.
- Fit the safety net if your kit has one, then raise the platform slowly and watch the first trip all the way up.
Step 6: Check it every season
Twice a year, before and after the holidays: look at the cables for fraying, pull on the mounts, check that the lag screws are still snug and the limits still stop where they should. Keep the load list taped inside a cabinet so you know what’s up there.
What it costs in time: an hour of measuring and planning, an hour for finding joists and mounting the hardware, an hour or two to assemble and hang the platform, and half an hour to load it. The tools for each step are below.
At a glance
6 picksAs an Amazon Associate I earn from qualifying purchases. If you buy through a link on this page we may earn a small commission, at no extra cost to you. How this works.
Franklin Sensors ProSensor M150 Stud Finder
Shows the full width of each joist and its center, where the lag screws belong.
An overhead lift is only as strong as the wood the lag screws go into, so the first tool for this job isn’t the drill. Edge-finding stud finders tell you where a joist starts; the M150’s row of sensors shows the whole width, and the green center light tells you where a screw has the most wood around it.
That matters on a ceiling: a lag screw that catches the edge of a 1½ in wide joist can split it or pull out. Mark both edges and the center along the full length you plan to use, because joists aren’t always perfectly straight.
Pro tip After marking, drill one small pilot hole at the center mark. If the bit hits solid wood all the way and brings down wood shavings, not just drywall dust, your marks are right.
Why we like it
- ✓9 sensors show the full width of the stud or joist, with a green LED at the center
- ✓No calibration; you can start scanning anywhere, even directly over a joist
- ✓Finds wood and metal framing up to 1.5 in deep
- ✓Live AC wire warning
Keep in mind
- !Needs 2 AAA batteries (not included) and doesn't work with rechargeables, Franklin says
- !1.5 in depth won't read through thick plaster or double layers of drywall plus furring
- !Like any stud finder, confirm with a small test hole before trusting it with a ceiling load
- Sensors
- 9
- Depth
- Up to 1.5 in
- Detects
- Wood and metal studs, live AC wire
- Power
- 2 × AAA (not included)
- Size
- 5.5 × 3 × 2 in
- Model
- ProSensor M150 (FSM15002HD)
DEWALT Titanium Nitride Drill Bit Set, 14-Piece (DW1354)
Every pilot size from 1/16 to 1/2 in, with a tip that doesn't wander overhead.
Driving a 5/16 in lag screw straight into a joist without a pilot hole is how joists split and screws snap. The right pilot is roughly the size of the screw’s solid core, and the lift’s manual usually names it. A set with every size from 1/16 to 1/2 in means you’re not guessing or making do with the closest bit in the drawer.
The pilot-point tip matters more overhead than on the bench: you’re pushing up, often on a ladder, and a bit that skates across the drywall puts the hole off your center mark.
Pro tip Wrap a piece of tape around the bit at the screw’s length as a depth stop, and wear safety glasses — drilling overhead sends drywall dust straight down into your face.
Why we like it
- ✓14 sizes from 1/16 to 1/2 in, enough to match the pilot size for most lag screws
- ✓Pilot Point tip starts without walking, which helps when drilling overhead
- ✓Titanium nitride coating, for wood, metal and plastic
- ✓Case with removable bit bars and a clear lid
Keep in mind
- !Standard jobber length, not extra-long; for deep holes through thick framing you may need a longer bit
- !Not impact-rated — use it in a drill, not an impact driver
- Pieces
- 14
- Sizes
- 1/16 to 1/2 in
- Tip
- Pilot Point, 135°
- Coating
- Titanium nitride
- For
- Wood, metal, plastic
- Case
- 8.75 × 8.75 × 1.4 in
- Model
- DW1354
LEXIVON Impact Grade Socket Adapter Set (LX-101)
Lets a drill or impact driver turn your sockets, so a dozen lag screws go in fast.
A ceiling lift kit goes up with a handful of lag screws, often a dozen or more, and turning each one with a ratchet while standing on a ladder with your arms over your head gets old fast. An adapter lets a drill or impact driver spin the socket instead, so the screw goes in quickly and you only need the ratchet for the last bit of snugging.
Pick the drive that matches your socket set; the 3/8 in one fits most common lag screw sockets. LEXIVON says the set meets ANSI specs and backs it with a lifetime limited warranty.
Pro tip Drive each lag until the washer touches the bracket, then switch to a hand ratchet for the final turn. Stop when it’s snug — over-tightening crushes the wood fibers and the screw loses its grip.
Why we like it
- ✓1/4, 3/8 and 1/2 in square drives on a 1/4 in hex shank, for quick-change chucks and standard drill chucks
- ✓Impact grade, heat-treated chrome vanadium steel with a black phosphate finish
- ✓Spring-loaded detent ball holds the socket
- ✓Comes in a small holder that keeps the three together
Keep in mind
- !You still need the right socket for the lag screw head; none are included
- !Only 3 in long — not an extension for reaching around a joist or bracket
- !Easy to over-drive lag screws with an impact driver; finish by hand
- Drives
- 1/4, 3/8, 1/2 in square
- Shank
- 1/4 in hex
- Length
- 3 in
- Material
- Chrome vanadium steel, black phosphate
- Use
- Drill or impact driver
- Model
- LX-101
DURA-LIFT Elevate 4x6 Motorized Overhead Storage Lift
A 4 × 6 ft steel platform with app-controlled motors and a 360 lb rating.
A fixed overhead rack frees floor space, but it puts the storage 8 ft up, which means a ladder and lifting a heavy tote over your head. A lift solves exactly that part: the whole platform comes down to waist height, you load it on the ground and send it back up. The Elevate does it with motors and a phone app instead of a hand crank, and lets you set an upper and lower stop so it never runs into the door track or the floor.
The 4 × 6 ft deck is the middle size: big enough for a row of 27-gallon totes and a cooler, small enough to fit between the garage door opener rail and a side wall in most two-car garages. The included net latches onto the deck and holds the load while it moves.
Pro tip Before you drill a single hole, lay the 4 × 6 ft outline on the floor with painter’s tape and open the garage door. If the raised door or the opener rail crosses the tape, the platform can’t go there.
Why we like it
- ✓Motorized lift with Bluetooth app control (iOS and Android) to raise, lower, pause and set height limits
- ✓Up to 360 lb capacity, evenly distributed, DURA-LIFT says
- ✓Drops up to 12.5 ft, with adjustable limits for lower ceilings
- ✓Motors, platform, mounting hardware and instructions in the box
- ✓4 × 3 ft safety net included to keep items from sliding off while it moves
Keep in mind
- !The kit weighs 126 lb — the ceiling install is a two-person job
- !The listing doesn't say how the motors are powered; check the manual for outlet or battery needs before you plan the spot
- !Ceiling-only mount — you need solid joists or trusses in the right place, and clearance from the garage door and opener
- !Indoor use only
- Platform
- 4 × 6 ft (48 × 72 in)
- Capacity
- 360 lb (evenly distributed)
- Max drop
- 12.5 ft
- Control
- Bluetooth app (iOS, Android)
- Frame
- Carbon steel, white
- Kit weight
- 126 lb
- Extras
- 4 × 3 ft safety net
- Model
- DLSEM4Fx6F
Sterilite Industrial Storage Tote, 27 Gallon (4-Pack)
Matching 27-gallon totes that sit tight on the deck, with tie-down keyholes in the lid.
An overhead platform works best with matching totes: the same footprint packs tightly without gaps, the same height lets you plan clearance, and identical lids stack without sliding. At 28.5 × 19.6 in, these fit side by side on a 4 ft wide deck with the long sides running front to back.
The keyholes in the lid are the useful detail here. A strap through them holds the lid on and the tote in place while the platform moves, which is exactly what a lift needs.
Pro tip Put the heaviest totes in the middle of the deck, not at one end, and label the short ends that face down. You’ll be reading them from the floor, at an angle, with the platform raised.
Why we like it
- ✓27 gallons in a 28.5 × 19.6 × 15.5 in footprint
- ✓Channeled walls for rigidity; stackable with lids on
- ✓Lid has built-in keyholes for tie-down straps
- ✓Snap lid, water resistant; BPA- and phthalate-free, made in the USA, Sterilite says
Keep in mind
- !Opaque black — you'll need labels to know what's inside from below
- !Water resistant, not sealed; not for anything that can't handle garage humidity
- !At 15.5 in tall, plan about 16 in of clearance above the deck, or 32 in if you stack two
- Capacity
- 27 gal
- Size
- 28.5 × 19.6 × 15.5 in
- Count
- 4 totes with lids
- Lid
- Snap, with tie-down keyholes
- Color
- Black with yellow lid
- Model
- 50659Y04
Rhino USA Ratchet Tie-Down Straps, 1 in × 15 ft (4-Pack)
One strap per row keeps the load from shifting while the platform moves.
A load on a moving platform needs to stay put: a lift that hits its upper stop or pauses mid-travel gives the totes a small jolt, and a tote that slides off from 8 ft up is a real hazard. One strap across each row of totes, hooked to the platform frame, turns the load into one block that moves with the deck.
These are standard ratchet straps, the same kind used on truck beds, so they do the job here with plenty of margin. The keeper clips matter: they stop the S-hooks from bouncing off the frame when the strap goes slack.
Pro tip Run the strap through the tie-down keyholes in the tote lids, not just over them, and roll the loose tail into a bundle with a rubber band so it doesn’t hang down into the door’s path.
Why we like it
- ✓Four 1 in × 15 ft polyester straps with a padded ratchet handle
- ✓Coated full-bend S-hooks with keeper clips, plus 4 soft loops
- ✓Rated about 600 lb working load, 1,800 lb break strength, per the packaging
- ✓Lifetime replacement from Rhino USA; carry bag included
Keep in mind
- !15 ft is more than a 4 × 6 ft platform needs — the extra tail has to be tied off neatly
- !Easy to over-tighten and crack a plastic lid; snug is enough
- !Not retractable, so loose webbing piles up when you unstrap
- Size
- 1 in × 15 ft
- Count
- 4 straps + 4 soft loops
- Working load
- About 600 lb
- Break strength
- About 1,800 lb
- Hooks
- Coated S-hooks with keepers
- Material
- Polyester