How to Build an Insulated Outdoor Cat Shelter for Winter
A latching tote, 1 in foam, taped edges and straw — the rescue-group cat shelter in seven steps, plus a heated pad if there's an outdoor outlet.
Published October 12, 2026 · 6 picks
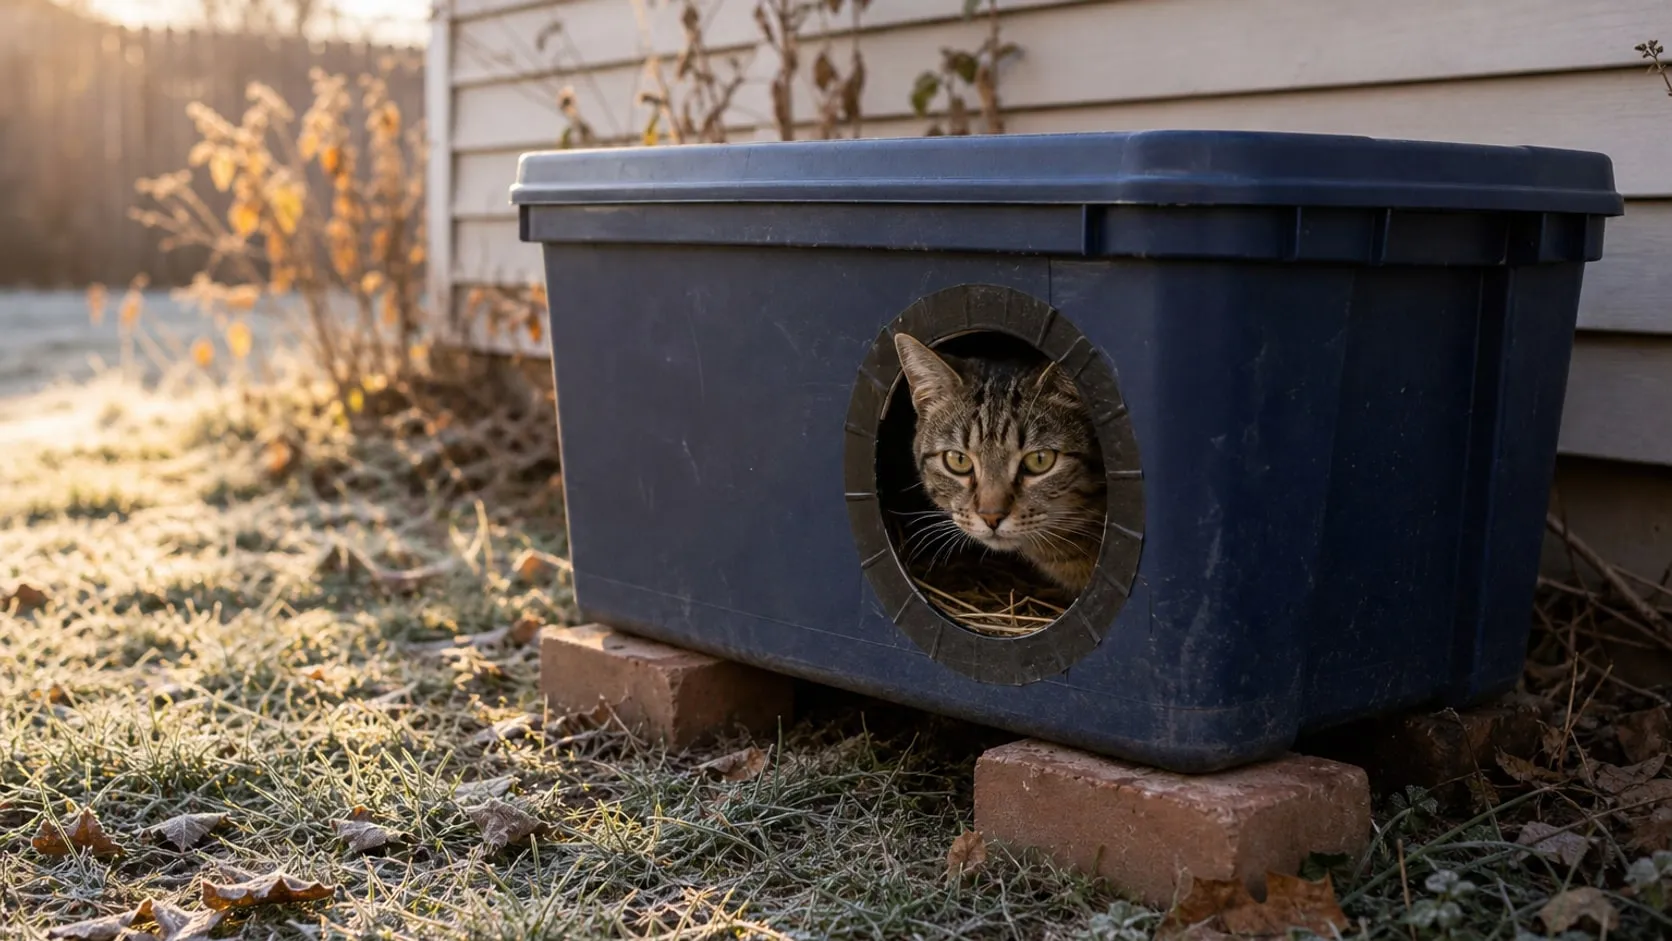
Every October, rescue groups and TNR volunteers pass around the same plan: a plastic tote, foam board, a door and a bed of straw. It works because it does three simple things well. It keeps the wind and wet out, it holds a cat’s own body heat in, and it’s small enough that one cat can warm it. You can build one in a weekend afternoon with a knife and a roll of tape, and the second one goes much faster. Here’s the whole build, step by step, with the parts for each step below.
Step 1: Pick the tote
The tote decides what fits inside, so start with the floor, not the gallons. Sterilite lists the inside bottom of the 30 gal Tuff1 at 22¼ × 14¾ in. After a 1 in foam lining that leaves about 20 × 12¾ in: room for one or two cats on straw, or for the 12.5 × 18.5 in heated pad in Step 6.
- Latches matter. A lid that blows off in a storm turns a shelter into a bucket of snow.
- Smaller is warmer. A cat heats the space with its body, so the lining in Step 3 also lowers the ceiling to about 12 in. Resist the urge to build a mansion.
- Dark totes blend in, which helps if the shelter sits where neighbors or passersby might bother it.
Step 2: Cut the door
Mark a 6 in circle on one long side, close to one end, with its bottom edge about 4 in above the floor. A raised door keeps the straw in and rain and snow out, and putting it at one end lets a cat sleep at the far end, out of the draft. A plate or a lid makes a good template.
Cut it with a fresh blade in several light passes around the line rather than one hard push. Keep the hand that holds the tote out of the blade’s path, and slow down near the end, where the plastic suddenly gives way. Six inches is wide enough for a cat and too narrow for most dogs. Some builders add a second door at the opposite end so a cat can’t be cornered; if you do, keep both doors the same size.
Step 3: Line it with foam
Rigid XPS foam is what turns a box into a shelter. Score it deep along a straightedge with the utility knife, bend it over a table edge, and it snaps clean.
- Floor. Piece together a floor from two panels to fill the bottom of the tote. Put it in first; it holds the wall pieces in place.
- Walls. Stand panels on their long edge around the floor. At 12 in wide, a panel on edge makes a wall exactly 12 in tall, so you only cut them to length. Fill out the long walls with an extra strip.
- Door. With the wall panel in place, trace the door through the hole from outside, take the panel out, and cut the matching hole.
- Ceiling. Measure the inside of the lining at the top of the walls and cut one ceiling panel (or two) to rest on the wall tops. It’s a loose inner lid, so you can lift it out to check the straw. The tote lid closes above it.
Three packs of 15 × 12 in panels line one shelter with some offcuts left over.
Step 4: Tape the door edge and the seams
The cut plastic edge of the door is sharp and the foam behind it is soft, and a cat goes over both every time it comes and goes. Wrap the door opening with short strips of tape folded over the edge, so the plastic and the foam are both covered. Then run tape along the seams where the foam panels meet, so drafts and straw dust don’t get behind the lining.
Tape indoors, on a clean, dry, room-temperature tote, and press every strip down hard with your thumb. Butyl adhesive grips by pressure, and a strip laid on loosely in the cold is the one that peels in January.
Step 5: Fill it with straw, not blankets
This is the step most shelters get wrong. Blankets, towels and old pillows soak up moisture from wet fur and breath, stay damp and freeze. Straw stays dry, and cats burrow into it. Don’t confuse it with hay, which is grass grown for feed: it holds moisture and molds.
Fill the shelter loosely, about halfway, so a cat can dig a nest, then put the ceiling panel and the lid on. No food or water inside: spills wet the straw, and food draws raccoons and other wildlife into the shelter.
Step 6: Add heat (if you have an outdoor outlet)
Foam and straw keep a cat’s own heat in, and for most shelters that’s enough. When the shelter sits by a house, a garage or a barn with an outdoor outlet, a heated pad helps old, thin or sick cats on the coldest nights.
- Make a path for the cord. Cut a small notch in the rim at a back corner of the tote, away from the door. Run the cord in through the notch and down the inside corner between two foam panels, and tape over what’s left of the notch. Never run a cord through the cat door.
- Lay the pad flat on the floor foam, lengthwise, with its fleece cover on. Don’t put straw on top of it; the cat should lie on the pad directly. A little straw tucked around its edges is fine.
- Plug it into a GFCI-protected outdoor outlet. If you need an extension cord, use one rated for outdoor use and keep the connection off the ground and covered.
- Test it. The K&H pad only warms fully when something presses on it, so it can feel cool to the touch. Hold your palm on it for a few minutes; it should warm up.
Step 7: Place it and check it
- Get it off the ground. Set it on a pallet, two bricks or a couple of 2 × 4s. Cold comes up from frozen ground, and a raised tote doesn’t sit in meltwater.
- Turn the door away from the wind, or toward a wall a couple of feet away, which blocks the wind and still leaves the cat a way out.
- Pick a quiet spot near where the colony already eats, but not right next to the food bowls.
- Check it every couple of weeks. Open the lid, lift the ceiling panel and swap any straw that’s wet, matted or dirty. After snow, clear the door; a buried door is no door.
Cats can take a while to try a new shelter. A pinch of catnip in the straw near the door can help, and patience helps more.
What it costs in time: a couple of hours for the first shelter, most of it measuring and cutting foam, and well under that for each one after. The parts for each step are below.
At a glance
6 picksAs an Amazon Associate I earn from qualifying purchases. If you buy through a link on this page we may earn a small commission, at no extra cost to you. How this works.
Sterilite Latching Tuff1 Tote, 30 Gallon, 4-Pack
A latching 30 gal tote whose floor still fits a heated pad after a 1 in foam lining.
Every rescue-group shelter plan starts with the same thing: a plastic tote with a lid. It’s waterproof, it’s light enough to carry to a colony site, and it wipes clean. What matters is the size of the floor, because the floor decides what fits inside once it’s insulated.
Sterilite lists the inside bottom of this one at 22¼ × 14¾ in. Line it with 1 in foam and you still have about 20 × 12¾ in, enough for the K&H heated pad in Step 6 or a deep bed of straw. The two latches matter more than they look: a lid that blows off in the first storm turns a shelter into a bucket.
Pro tip Build all four at once. The foam cutting and the door template take the most time on the first shelter; the next three go much faster, and colonies rarely need just one.
Why we like it
- ✓Interior bottom is 22¼ × 14¾ in, so a 12.5 × 18.5 in pad still fits after a 1 in foam lining
- ✓Two latches hold the lid on in wind and against curious raccoons
- ✓Polyethylene shell, which Sterilite describes as rugged with reinforced walls
- ✓Four totes in the pack — four shelters from one order
- ✓Made in the USA, per Sterilite
Keep in mind
- !Only sold as a multipack on this listing; one shelter needs one tote
- !Dark blue plastic sits in the sun all day; fine in winter, but move it into shade if you leave it out in summer
- !At 17½ in deep inside it's roomy for one cat — the foam lining shrinks that, which is what you want
- Outside
- 29⅞ × 19¾ × 18⅛ in
- Inside, bottom
- 22¼ × 14¾ × 17½ in
- Capacity
- 30 gal
- Lid
- Latching, recessed for stacking
- Material
- Polyethylene
- Count
- 4
STANLEY Classic 99 Retractable Utility Knife (10-099)
Cuts the door through the tote wall and scores the foam panels to snap.
Two cuts make this shelter: dozens of straight cuts through foam board, and one round hole through a tote wall. A plain utility knife does both. XPS foam doesn’t need to be sawn; score it deep along a straightedge, bend it over the edge of a table, and it snaps clean. The tote wall takes patience instead of force: several light passes around the outline until the blade breaks through.
The Classic 99 is STANLEY’s plain retractable knife, and its strength here is control. With five blade positions you can set the blade just long enough for 1 in foam, and the heavy zinc body doesn’t flex when you lean on it along a long cut.
Pro tip Cut away from the hand that holds the work, never toward it, and retract the blade every time you put the knife down. Most utility-knife injuries happen on the last cut of the day, when the plastic suddenly gives way.
Why we like it
- ✓Die-cast zinc body, solid in the hand on long cuts
- ✓Five blade positions, so you can keep the blade short for control
- ✓InterLock nose holds the blade firmly
- ✓Stores up to 10 spare blades in the handle; comes with three
- ✓Limited lifetime warranty, per STANLEY
Keep in mind
- !Blade changes need a screwdriver, unlike quick-change knives
- !Tote plastic dulls a blade fast — swap to a fresh one before the door cut
- Model
- 10-099
- Length
- 6 in
- Blade positions
- 5
- Blades included
- 3
- Blade storage
- Up to 10 in handle
- Weight
- 3.2 oz
Ramede XPS Rigid Foam Board, 15 × 12 × 1 in, 4 Pieces
Rigid 1 in XPS foam for the floor, walls and ceiling; plan on three packs.
A plastic tote on its own is just a box out of the wind. Its thin walls let heat out almost as fast as a cat can make it. A lining of rigid foam on the floor, the walls and under the lid changes that, which is why every rescue-group plan includes it.
XPS foam suits the job: it’s rigid, it shrugs off damp, and it cuts with nothing more than a utility knife. These panels come in a handy 15 × 12 in size, so you can buy just enough for one shelter. If you’re building for a whole colony, a full sheet of foam board from a home center goes further; for one or two shelters, these are easier to get home.
Pro tip Cut the floor piece first and set it in. It holds the wall pieces in place at the bottom, so the lining stands up without glue.
Why we like it
- ✓Extruded polystyrene (XPS), the same kind of rigid foam used in building insulation
- ✓1 in thick and rigid, so the pieces stand up against the tote walls on their own
- ✓Scores and snaps cleanly with a utility knife
- ✓Pieces are 15 × 12 in, easy to cut down to wall and floor panels
Keep in mind
- !Small panels mean more seams; a 30 gal tote takes about three packs
- !The listing gives no R-value
- !Bare foam edges crumble if a cat claws them — tape the exposed edges
- !Sizes can be off by up to ¼ in, per the listing, so measure each piece
- Material
- XPS (extruded polystyrene)
- Size
- 15 × 12 × 1 in (±¼ in)
- Count
- 4
- Other sizes on listing
- 15 × 12 × 2 in (4 pcs); 12 × 7.5 × 1 in (8 pcs)
Gorilla All Weather Tape, Black, 1.88 in × 25 yd
Cold-rated butyl tape for the door edge and the foam seams.
Two places on a tote shelter need tape. The door: once it’s cut, the plastic edge is sharp and the foam edge is soft, and a cat goes in and out over both dozens of times a day. Wrapping the opening in tape gives a smooth edge and stops the foam from being clawed apart. And the seams: where the foam panels meet, a strip of tape closes the gap so drafts and straw dust don’t get behind the lining.
Ordinary duct tape lets go when it freezes. Gorilla’s all-weather version uses a butyl adhesive, and the company rates it from 0°F to 200°F, which covers most winter nights a shelter will see.
Pro tip Wipe the tote clean and dry before taping, and press each strip down hard with your thumb along its whole length. Butyl adhesive grips by pressure; a strip laid on loosely is the one that peels in January.
Why we like it
- ✓Butyl adhesive rated for 0°F to 200°F, per Gorilla
- ✓Weather-resistant shell built for sun, rain and snow
- ✓Grips plastic, wood and metal
- ✓Tears by hand, no scissors needed on site
- ✓25 yd roll, plenty for several shelters
Keep in mind
- !Rated down to 0°F; apply it indoors on a dry, room-temperature tote, not out in the cold
- !Permanent adhesive — hard to peel off if you get a piece wrong
- Width
- 1.88 in
- Length
- 25 yd
- Adhesive
- Butyl, single sided
- Temperature range
- 0–200°F
- Thickness
- 16.75 mil
EZ-Straw Just Straw, Small Bale (1 cu ft)
Straw stays dry where blankets soak up moisture and freeze.
The most common mistake with outdoor cat shelters is filling them with blankets, towels or old pillows. They feel warm to us, but they soak up moisture from wet fur and breath, then stay damp and freeze. Straw is the bedding rescue groups recommend because it stays dry: cats burrow into it, and the loose stalks trap warm air around them. Hay looks similar but is a different thing: grass grown for feed, it holds moisture and tends to mold.
Finding straw in a city in October isn’t always easy, which is where a bagged bale earns its place. This one is plain straw, bagged in plastic you can leave by the back door, and light enough to carry to the shelter.
Pro tip Fill the shelter loosely, about halfway, so a cat can dig a nest. Check it every couple of weeks, and replace any straw that’s wet, matted or dirty instead of adding more on top.
Why we like it
- ✓Clean processed straw, bagged and easy to carry to a colony site
- ✓Bag is UV-protected plastic and can be stored outside, per the maker
- ✓Sold for pet bedding as well as garden use
- ✓Also on the listing as a 2-pack, so you have a refill ready
Keep in mind
- !Processed straw is finer than long baled straw and packs down; fluff it up on every check
- !1 cu ft fills one shelter, not a colony's worth — farm-supply bales go further for many shelters
- Contents
- Wheat straw, processed
- Volume
- 1 cu ft
- Bag size
- 17 × 10 × 13 in
- Weight
- 10 lb
- Maker
- Rhino Seed & Landscape
K&H Extreme Weather Kitty Pad, 12.5 × 18.5 in, 40 W
An outdoor heated pad with a steel-wrapped cord, for shelters near an outlet.
Straw and foam keep a cat’s own heat in. When the shelter sits by a house, a garage or a barn with an outdoor outlet, a heated pad adds heat the cat doesn’t have to make, which matters most for old, thin or sick cats on the coldest nights.
This pad is built for exactly that place. The shell is hard plastic rather than fabric, the cord is wrapped in a steel coil, and K&H says the thermostat brings the surface up to temperature only when an animal lies on it, idling just above the surrounding air otherwise. That’s also why it can feel cold to your hand when you test it: press your palm on it for a few minutes and it should warm up.
Pro tip Plug it into a GFCI-protected outdoor outlet, and if you need an extension cord, use one rated for outdoor use and keep the connection off the ground under a cover. Don’t put straw on top of the pad; the cat should lie on it directly, on the fleece cover.
Why we like it
- ✓Made for outdoor use, with a rugged ABS plastic shell
- ✓5½ ft steel-wrapped cord against chewing
- ✓Thermostat warms the pad when a cat is on it, and keeps it only slightly warm otherwise, per K&H
- ✓40 W, so it doesn't draw much power over a long winter
- ✓Comes with a washable fleece cover; whole product certified by MET Labs, per K&H
- ✓At 12.5 × 18.5 in, it fits the floor of a lined 30 gal tote
Keep in mind
- !Needs an outdoor outlet within reach — no use at a colony site without power
- !Feels barely warm with nobody on it, which can make you think it's broken; K&H explains this on the listing
- !The cord needs its own path into the shelter, never through the cat door
- Size
- 12.5 × 18.5 × 0.5 in
- Power
- 40 W
- Cord
- 5½ ft, steel wrapped
- Shell
- ABS plastic
- Cover
- Fleece, machine washable
- Certification
- MET Labs listed
- Warranty
- 1 year limited