Make Miniature Diorama Baubles (3D Print + Resin)
A tiny lit winter scene inside a clear bauble — a 3D-printed cabin and trees, painted, lit and set with UV resin. Six steps and the tools for each.
Published October 16, 2026 · 6 picks
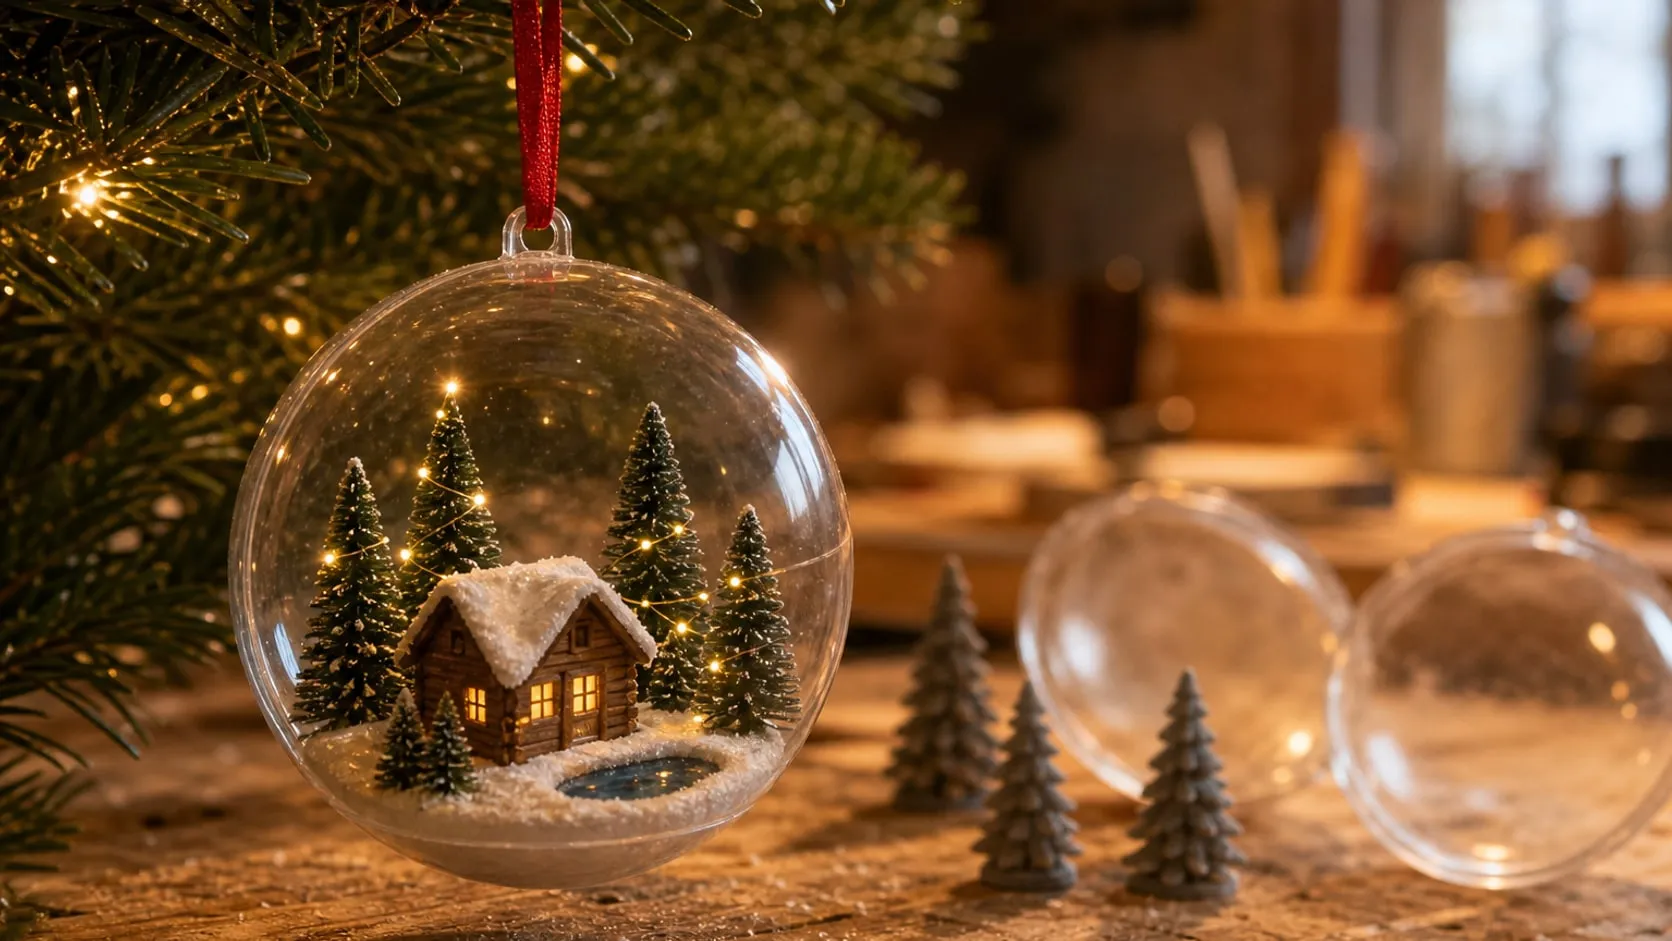
Miniature worlds are one of the hobby trends Pinterest flagged for 2026, and a diorama bauble is the version that ends up on the tree: a tiny snowy cabin with pine trees and a lit window, inside a clear ball. With a resin printer it’s a very doable weekend project, and once the first one works, a batch for family and friends is mostly printing time. Here’s the process, with the tools for each step below.
Step 1: Plan the scene to fit the ball
A 100 mm (4 in) bauble sounds roomy until you put a cabin in it. Plan the sizes before you print anything.
- The base. Model a round disc about 75–80 mm (3 in) across and 3–4 mm thick. In a 100 mm ball it rests on the curve of the bottom half, roughly 3 cm below the seam. Test-fit it before building on it.
- The battery box. The light string runs on a small coin-cell box. Measure it with calipers and model a pocket or a pair of legs under the base, so the box sits hidden in the bottom of the ball.
- The height. Keep the tallest piece, usually a tree or the chimney, under about 60 mm (2.4 in) and near the middle. The ball narrows toward the top, so tall parts near the edge will hit it.
- The models. Free miniature cabins, pine trees and figures are easy to find on Printables, MakerWorld or Thingiverse; check each model’s license if the baubles are gifts or for sale. A small hollow in the base for a frozen pond is easy to add in Tinkercad.
One cabin, three or four trees of different heights and an open patch of snow read better than a crowded scene.
Step 2: Print the pieces in resin
Small parts like window frames and pine branches are where resin printers shine. Print everything in one batch: the base flat on the plate, the cabin and trees tilted with supports. Then wash, remove supports and UV-cure the parts, as in our photo-to-figure guide.
Wear nitrile gloves whenever you handle uncured resin, work in a ventilated room and keep resin and alcohol away from kids and pets. Pine trees are thin: cut supports off with flush cutters rather than snapping them, or the branches snap with them.
Only have a filament (FDM) printer? Print the base and the cabin in PLA with a 0.2 mm nozzle if you have one, and model the trees a little chunkier. Snow hides a lot of layer lines.
Step 3: Prime and paint
Spray a thin coat of grey or white primer on all the pieces, then paint them before anything is glued: it’s far easier to paint a tree in your hand than inside a scene.
- Trees: dark green, with a lighter green brushed lightly over the tips.
- Cabin: a brown base, a lighter brown on the boards, white on the roof edges.
- Windows: warm yellow. Under the LEDs, yellow windows make the cabin look lit from inside.
- Base: white or light grey where the snow will go, dark blue in the pond hollow.
Thin the paint with a little water and use a palette; one drop goes a long way at this scale. Let everything dry overnight before the next step.
Step 4: Add the lights
Twenty LEDs on a meter of wire is a lot for a 4 in ball, and that’s fine: the extra wire disappears into the trees.
- Plan the path. Feed the bare lead from the battery box up through a small hole in the base, near the back.
- Light the cabin. Push one or two LEDs inside through a back window or a hole drilled in the back wall.
- Wrap the trees. Spiral the rest of the wire around the trees from the top down. Space the LEDs out; bunched LEDs look like one bright spot.
- Test it. Switch it on in a dark room before gluing anything. It’s much easier to move a wire now than later.
Step 5: Assemble with UV resin
UV resin doesn’t set until the lamp hits it, so you can place a piece, adjust it and only then cure it.
- Glue the pieces. A drop under each tree and under the cabin, set them in place, then 2–3 minutes under the lamp.
- Pin the wire. A small drop of resin where the wire touches a branch or the base keeps it from springing back.
- Pour the pond. Fill the blue hollow with two or three thin layers of resin, curing each one. Thick layers cure unevenly.
- Set the base. Put the finished base in the bottom half of the ball with the battery box underneath, and fix it with three small dots of resin on the rim of the base, cured with the lamp.
Wear gloves for this step too: LET’S RESIN warns on its label that the resin can cause a skin allergy. Use resin, not super glue, near the clear plastic, since super glue fumes leave a white haze inside the ball.
Step 6: Snow, close and hang
Brush thin white glue over the base, the roof and the tops of a few branches, then shake snow over it. Once the glue is dry, turn the half-ball upside down over a sheet of paper and tap off the loose flakes, or they’ll end up stuck to the inside of the ball.
Switch the lights on, snap the top half on and tie a ribbon through the loop. Don’t glue the ball shut: the coin cells last about a day of continuous light, according to YKB, so you’ll be opening it for new batteries. Switch the bauble on for the evening, not all season.
What it costs in time: an hour to plan and slice, a few hours of unattended printing, an evening of washing, priming and painting, and an evening to light, assemble and snow the scene. The tools for each step are below.
At a glance
6 picksAs an Amazon Associate I earn from qualifying purchases. If you buy through a link on this page we may earn a small commission, at no extra cost to you. How this works.
ZUOKEMY Clear Fillable Ornament Balls, 100 mm, 10-Pack
Clear 100 mm balls that split in half, so the scene is built in the open bottom.
A diorama bauble needs an ornament that opens wide. Balls that split into two halves are the easiest to work with: the bottom half becomes the stage, you build the scene in it with full access, and the top half closes over it at the end. At 100 mm the ball is big enough for a cabin, a few trees and a lit window, and still light enough to hang from an ordinary tree branch.
Ten in a pack means room for a test ball, and enough for a matching set of gifts.
Pro tip Glue the scene to the base, never to the ball itself, and fix the base in the bottom half with a few small dots of UV resin. Use UV resin rather than super glue anywhere near the clear plastic: super glue fumes leave a white haze on the inside of the ball.
Why we like it
- ✓100 mm (3.94 in) across — room for a scene about 3 in wide
- ✓Splits into two halves with a snap fit, so you can build the scene in the open bottom half
- ✓Built-in hanging loop on top; hanging strings included
- ✓Plastic, so a dropped bauble doesn't shatter
- ✓Also sold in 80 mm and 70 mm
Keep in mind
- !The seam around the middle stays visible
- !Clear plastic scratches more easily than glass, and super glue fumes can fog it
- !Lesser-known brand; check every ball for marks before you build in it
- Diameter
- 100 mm (3.94 in)
- Material
- Clear plastic
- Opening
- Two halves, snap fit
- Pack
- 10 balls + hanging strings
ANYCUBIC Standard 3D Printer Resin, Grey, 1 kg
A plain grey resin that shows every tiny detail before you paint.
A diorama bauble is all small parts: a cabin with window frames, pine trees, maybe a figure the size of a fingernail. That’s resin printer territory. A plain standard resin is enough for display pieces that sit behind clear plastic and never get handled, and grey is the most practical color: you can see the detail clearly, and it takes primer and paint without fighting you.
ANYCUBIC says the resin works with LCD and DLP printers in general, not only its own. Shake the bottle well before each print; the maker notes that unmixed pigment can give an uneven color.
Pro tip Print a small exposure test before the real parts. Thin details like pine needles and window bars are the first to disappear when exposure is off, and they’re exactly what makes a miniature scene read.
Why we like it
- ✓405 nm resin for LCD and DLP resin printers
- ✓Grey makes small details and print flaws easy to see before priming
- ✓ANYCUBIC describes it as low-shrinkage with good fluidity, which suits fine detail
- ✓Available in many colors and bottle sizes if grey isn't what you want
Keep in mind
- !Needs a resin printer, gloves, ventilation and a wash-and-cure step — none of it is optional
- !A standard resin is more brittle than tough or ABS-like resins, so very thin parts like tree tips can snap
- !The listing's spec table is mixed up with printer specs, so check the bottle label for exposure settings
- Type
- Standard photopolymer resin
- Wavelength
- 405 nm
- Compatible with
- LCD and DLP resin printers
- Color
- Grey
- Amount
- 1 kg
Vallejo Basic Colors USA Acrylic Paint Set (16 × 18 ml)
Sixteen basic colors in dropper bottles, mixed a drop at a time.
A diorama bauble needs a lot of colors in very small amounts: dark green for trees, two browns for a cabin, a warm yellow for lit windows, white for snow on the roof. A starter set of basic colors covers all of that, and the dropper bottles are the real advantage for tiny work: one drop on a palette is plenty for a whole tree.
Vallejo includes a user’s guide in the set, which helps if you’ve never mixed miniature paint before.
Pro tip Paint the lit windows a warm yellow first and add a thin frame around them afterwards. Under the micro LEDs, warm yellow windows make the cabin look lit from inside even where no LED actually sits.
Why we like it
- ✓16 colors × 18 ml, including white, black, browns, greens, silver and gold
- ✓Dropper bottles make it easy to put exact drops on a palette and repeat a mix
- ✓Water-based; thins and cleans up with water
- ✓Matte finish once dry, which keeps small parts from looking plastic
Keep in mind
- !No brush included
- !Basic colors only — snowy greys, wood tones and skin shades have to be mixed
- !Drops are easy to over-dispense on tiny parts; a palette is a must
- Bottles
- 16 × 18 ml (0.6 fl oz)
- Type
- Water-based acrylic, matte
- Colors
- White, Flat Flesh, Lemon Yellow, Clear Orange, Flat Red, Purple, Azure, Flat Blue, Flat Green, Refractive Green, Buff, Flat Brown, Yellow Ochre, Black, Silver, Gold
- Model
- 70.140
YKB Micro LED Fairy Lights, 1 m, CR2032 Battery, 6-Pack (Warm White)
Micro LEDs on thin wire, with a coin-cell box that hides under the base.
Lights are what make a diorama bauble look magical on the tree rather than just a scene in a ball. Micro LEDs on bare copper wire are the right kind: the wire is thin enough to wrap around a printed pine tree or slip through a cabin window, and the LEDs are only a little bigger than the wire itself.
The coin-cell box is what makes the project work: no cable leaving the ball. A six-pack also means one string per bauble for a whole batch of gifts.
Pro tip Measure the battery box with calipers before modeling the base, then model a pocket for it underneath with a millimeter of clearance. The box stays hidden, and opening the ball gets you to the switch.
Why we like it
- ✓6 strings, each with 20 micro LEDs on 1 m (3.3 ft) of thin copper wire
- ✓Coin-cell box (2 × CR2032, included) with an on/off switch
- ✓20 cm (7.9 in) of plain wire between the box and the first LED, so the box can sit out of sight
- ✓Warm white, 2700–2900 K
Keep in mind
- !YKB rates the batteries at about 24 hours of continuous light — switch it off between viewings
- !A whole meter of wire is a lot for a small bauble; it has to be coiled or wrapped
- !The battery box isn't waterproof, and its size isn't on the listing
- LEDs
- 20 per string
- Wire
- 1 m (3.3 ft), silver-coated copper
- Lead to first LED
- 20 cm (7.9 in)
- Power
- 2 × CR2032 (included)
- Color
- Warm white, 2700–2900 K
- Pack
- 6 strings
LET'S RESIN UV Resin Kit with Light, 200 g
Glue, ice and a frozen pond that harden in minutes under the lamp.
Inside a diorama bauble, UV resin does three jobs: it glues the cabin and trees to the base, it holds the fairy light wire where you want it, and a thin layer of it makes a frozen pond. Unlike two-part epoxy it doesn’t set on its own, so you can place every part, nudge it into position and only then switch on the lamp.
The lamp is small and flat, which suits the job: you can hold it right over a part or hang it over the base. Work in thin layers and turn the base so the light reaches every side.
Pro tip For a frozen pond, paint the hollow in the base dark blue first, then cover it with two or three thin layers of resin, curing each one. A few drops of white paint dragged through the first layer before curing look like ice cracks.
Why we like it
- ✓One-part resin, no mixing or measuring
- ✓Includes a UV lamp with 2, 3 and 5 minute timer settings
- ✓Fine nozzle bottles for placing single drops
- ✓LET'S RESIN gives under 2% shrinkage and a 2000 cps viscosity
- ✓Kit includes a silicone mat and mixing tools
Keep in mind
- !Cures only in thin layers; thick pours need several rounds under the lamp
- !The label warns of skin allergy (HEMA) — gloves every time
- !The lamp can't reach resin hidden behind or under parts, so cure as you build
- Contents
- 200 g UV resin (2 × 100 g), UV lamp, silicone mat, mixing tools
- Type
- One-part UV-curing resin, hard
- Lamp
- 8 LEDs, 5.2 × 2.7 × 0.75 in, 2/3/5 min timer
- Viscosity
- 2000 cps (per the maker)
- Model
- ALR00038
Woodland Scenics Soft Flake Snow Shaker (57.7 in³)
Fine scenery snow that covers the base, the roof and every joint.
Snow is what turns a printed base and a few trees into a winter scene, and it’s also what hides the print lines and the joints where the trees meet the base. Woodland Scenics is one of the best-known names in model railroad scenery, and its snow is made for exactly this scale.
Sprinkled dry, it won’t stay put inside a bauble that gets moved and hung. Brush a thin coat of glue where you want snow, shake the flakes over it and tip off the loose ones once the glue has set.
Pro tip Do the snow last, after the lights are in place. Brushing glue around a finished, snowy scene is far harder than working on bare paint.
Why we like it
- ✓Made by a model scenery brand for miniature landscapes
- ✓Shaker top makes light, even sprinkling easy
- ✓A large container — enough for many baubles and other scenes
Keep in mind
- !The listing gives almost no details, so check the label for use instructions
- !Loose flakes go everywhere; it needs glue underneath to stay put
- !Far more than one project needs
- Type
- Soft flake scenery snow
- Container
- Shaker bottle
- Volume
- 57.7 in³
- Model
- SN140